One type of text environment creates what is sometimes called a "large symbol". For example, you can use the tabular environment to create a table, which is treated by LaTeX as a large symbol and placed somewhere on the page by LaTeX, or "floated". PostScript graphics can also be handled by LaTeX as large symbols.
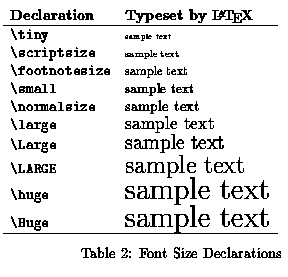
Below is an example of LaTeX source
code that creates a table showing the effects of the basic font-size
change declarations (Note how they are used). The table has two
columns, with & used as a separator,
and the text in each column is left justified, which is done by the
template
argument { l l }\tabular command.
Those are two letters "ell", not two numbers
"one". The spaces
in the argument are ignored.
If you
wanted the text in the first column right justified, you could use the
template
{ r l }{ |r l |}{ |r | l|}\begin{tabular}. You can also center the
text in a column by substituting "c" for "r" or
"l".
We summarize.
Here is how justification is specified:
l means that the column will be left justifiedr means that the column will be right justifiedc means that the column will be centered
Here are some layout features:
\hline after \\ to draw a line
between rows\caption{MY TABLE} just before the
end{table} line.
\begin{table}[ht]
\begin{tabular}{ l l }
\textbf{Declaration}    &  \textbf{Typeset by \LaTeX} \\ \hline
\verb=\tiny=            &  {\tiny sample text}        \\
\verb=scriptsize=       &  {\scriptsize sample text}  \\
\verb=\footnotesize=    &  {\footnotesize sample text}\\
\verb=\small=           &  {\small sample text}       \\
\verb=\normalsize=      &  {\normalsize sample text}  \\
\verb=\large=           &  {\large sample text}       \\
\verb=\Large=           &  {\Large sample text}       \\
\verb=\LARGE=        	&  {\LARGE sample text}       \\
\verb=\huge=        	&  {\huge sample text}        \\
\verb=\Huge=        	&  {\Huge sample text}        \\ \hline
\end{tabular}
     \caption{Font Size Declarations}
\end{table}
[ht] following the command
\begin{table} indicates to LaTeX that we
prefer the table to be "floated" either at the top of the page or at the
point where where the table appears in the source file (h for here,
t for top,
b for bottom, p for separate page).\verb allows us to typeset LaTeX commands instead
of having LaTeX interpret them. What follows is a non-letter, such as = or +,
then the string that is to be typeset verbatim, then a matching non-letter.
Be careful that the string that you want to typeset verbatim does not contain
a non-letter that matches the ones you are using to mark the ends of the
string. For example \verb+$sin(x)+cos(x)=1$+ will give an
error message because LaTeX will interpret the string $sin(x) as
what you want typeset verbatim, and will go on to try interpreting
cos(x)+1$+ in the usual way. Since LaTeX uses pairs
of matching $ signs, it will complain. Best mark the ends of the string by
! instead.
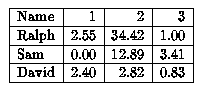
Make a LaTeX document (12pt article class) to display the following table.
Note: The names are left justified and the other entries are right justified.
Use the title line \title{\LaTeX{} Table Exercise.
Hand in a typeset copy.
To produce nicely formatted theorems, propositions and corollaries, you follow a two step procedure:
\newtheorem command to define the
proclamation. For example,
\newtheorem{theorem}{Theorem}\begin{theorem} ...\end{theorem}. The second argument to the
\newtheorem command, Theorem is used to label
the statement.
\begin{theorem}The first theorem of this article states ...\end{theorem}
The result will look something like this:
Theorem 1 The first theorem of this article states ...
Of course, you can do the same for Propositions, Lemmas, Corollaries, Definitions,
and so on.
For example, \newtheorem{lemma}{Lemma}
could be used to create a "lemma" environment.
The point is that you get a uniform style to all of your proclamations,
you can create cross-references to them, and they are numbered automatically.