


The instrument itself consists of a long flat board of hardwood, an inch or two thick, which has a large hole cut out of the upper half (though sometimes this was made in a couple of pieces - see below). The lower half is hollowed out to form a sound cavity. A thin board is then glued to the top and further secured by small nails all around the edges. There are no soundholes. Six strings are attached to a small tailpiece which is secured to an tail endpeg, like on a violin, or to an integral knob on the end of the instrument, and run over a very small bridge set on the lower half of the instrument. There are six pegs at the top end of the instrument, to which the other end of the strings are attached (there is no endnut of any kind). The instrument is played vertically, sometimes with a strap on the back to allow the left hand to hold the instrument and stop the strings. There are two ways of playing the instrument. One is like a harp, with the left hand supporting the instrument and the right hand plucking the strings. The second way is to use a plectum in the right hand strumming across all the strings, with the left hand behind the instrument, the left hand fingers lightly touching the strings that the player does NOT want to sound in the chord (the touched strings do not vibrate, so do not sound a note, more like a dull thud, but adds to the percussive rhythmic of the strum). Mostly this second technique might have been used to accompany the recitation of poetry or song.


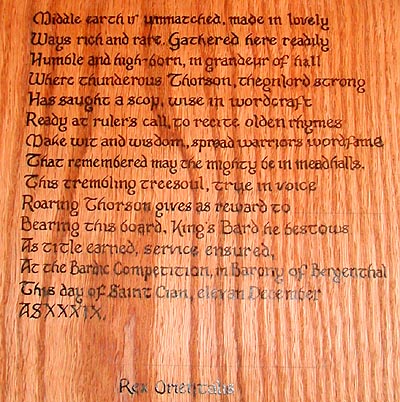
The text on the back was done with sepia ink (simulating aged willow bark ink) in an A/S text style, though in modern English. The poem is vaguely A/S in style, employing the alliterative four beat line with strong cesura, and use of the "kenning" a kind of poetic metaphorical device. Writing on oak with a pen isn't lots of fun.
I am presently working on one for myself. The original plans I drew up are below.

After drawing up these sketched plans based on my own research, I discovered Michael J. King, had starting producing a CD including more detailed historical plans, so I adapted one of his plans for my purpose and started to work!
SECOND ATTEMPT
Kind of like the citole, I decided I wanted to make a pretty instrument for myself, and wanted to experiment with using some exotic materials. For example, a number of the discovered bridges for the instrument were constructed from amber, and I thought that, while a bit heavy, it is hard enough to make a useful bridge. I also wanted to play more with bone and ivory on the instrument.
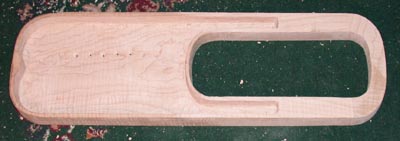
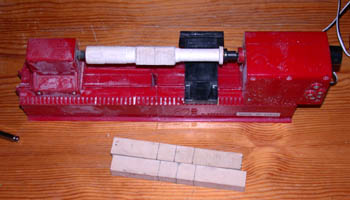
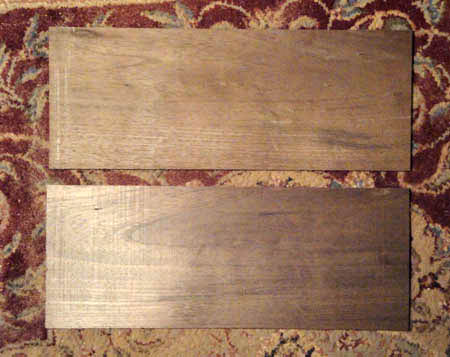
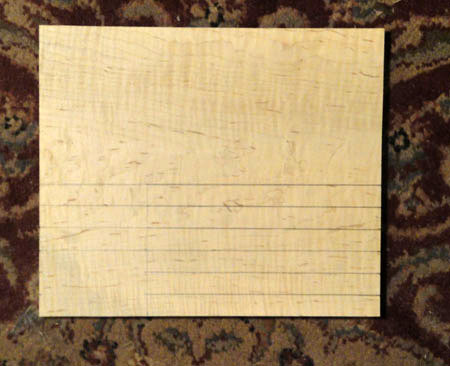
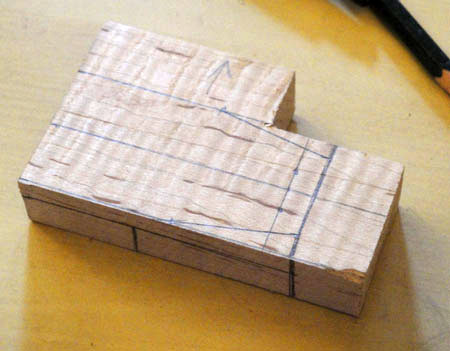
Adapting the plans, I was able to acquire some very pretty, highly flamed maple wood for the body from Bell Forest Products. Interestingly enough, Michael King used hardwoods for the soundboard (for example, using maple rather than spruce), so I thought I'd give it a try and see how it sounded. So I got some curly maple guitar body back/side wood from Euro Tonewood, actually via eBay, and went from there. Here are those pieces:
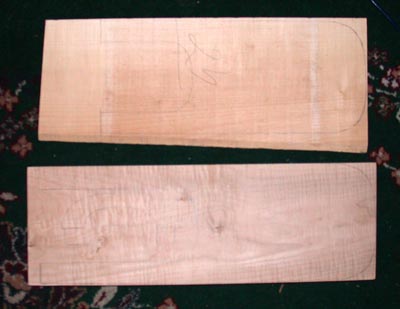
The top piece is the soundboard wood (about 1/2 inch thick at this point), and the bottom piece is the body block wood (about 1 and 3/4 inches thick). The body will end up about 8 inches wide, and will be assembled from two pieces (the body and the top arm) cut from the same block. You can see the pencilled in designs faintly on the wood.
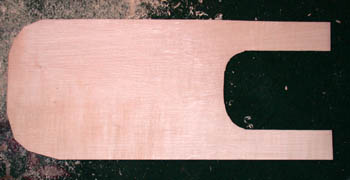
First off, the soundboard was roughly cut out (the dark streaks here are scorch marks from the saw that originally cut the board I think). I used a coping saw for this.

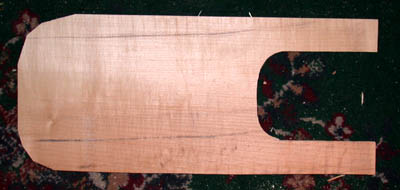
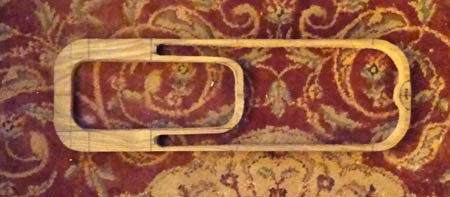
Next I had to cut out the main block. The small problem was that I needed to leave the cut out portion of the top intact as the top arm was going to be shaped from it. Since I do not have a band saw, only a large hand saw and a small hand saber saw, the nearly two inch thick maple was going to make it difficult to "make the turn" at the bottom of the cut out area. So I started off my drilling two 1/2 inch wide holes at the corners of where I was going to cut, and used the saber saw to cut a straight line between them. I used the saber saw to cut out a little ways toward the arms and upwards, and then I used the large saw to cut down to those points to get out the piece intact. Also note that my dining room chair is my "workbench" for clamping!

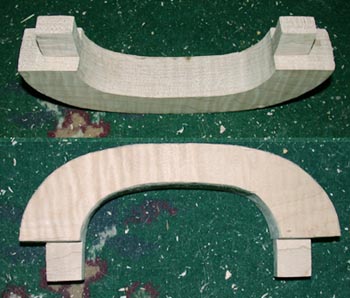
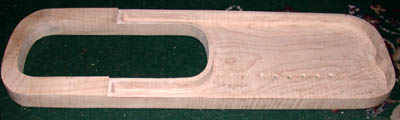
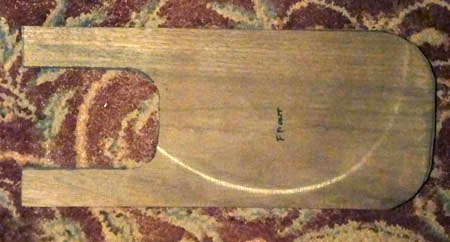
This is the rough cut body block. The "teeth" at the base of the opening are my way of shaping the curve there. I cut slots, and then use a chisel to knock out the wood between the slots. It's considerably faster than sawing though the thicker wood with the coping saw.
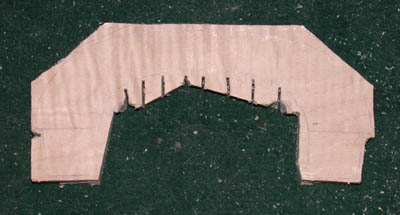
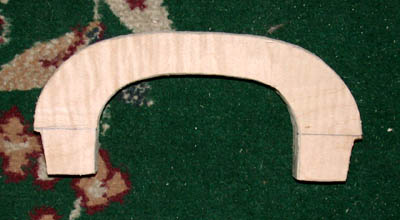
This is the rough cut top arm. Again it was cut out with the large saw, and slots cut into the "inner" curve, which will be chipped out with a chisel to more quickly shape that portion. The large "tabs" at the bottom will be the tails of the mortise joint.
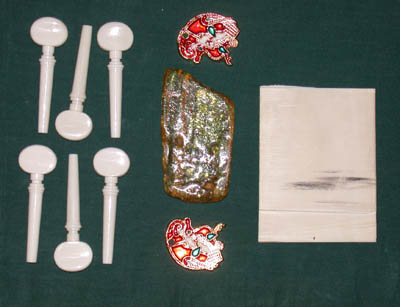
While I am working on that portion, here are some of other smaller bits. The pegs are cattle bone (very white) violin pegs I acquired from the Taiwanese workshop of luthier Antonio Tsai, who usually sells his stuff through eBay. The large piece of ivory will be used for the tailpiece, and is scrap from the rosette of citole #4. It comes from Cue Components. The large chunk of amber I acquired from a Baltic amber store in Mystic, CT. It is surprisingly light and very brittle, so I suspect it is going to be very difficult to work with. The two other pieces were a lucky find. I don't do metal-work, having NO space to do that in my house, so I wasn't sure what I was going to do to about the shoulder metal mounts. Than I stumbled across these pieces at a merchant at the SCA Pennsic War called Quiet Press.

A closeup of the metal piece. This is gold plated bronze with enamel. It is a copy of one of the Sutton Hoo pouch mounts, but is pretty close in design and of course in almost identical style to the actual Sutton Hoo lyre mounts. The two are facing each other, and will be mounted at the mortise joint where the body and top arm meet.
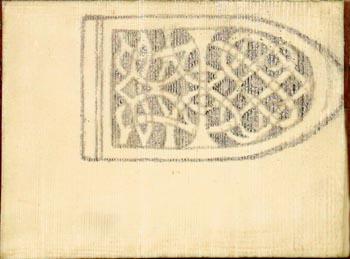
The tailpiece sketched onto the ivory. I'm using a design from an Anglo-Saxon sword chape (tip of the sheath) as the pattern. The darkened spaces will be carved out. Depending on initial stress tests of the piece, this may end up with an thin ebony backing for strength.

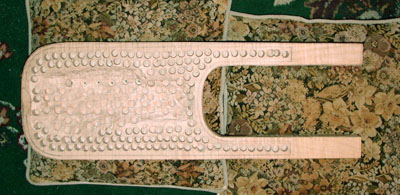
Working on the tailpiece - using the mini finger drills, I drilled out a bunch of holes into the openings, and am slowly widening them out using the micro files. It takes about an hour per hole, and there are over 60 of them...
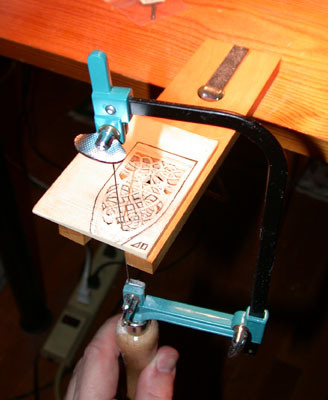
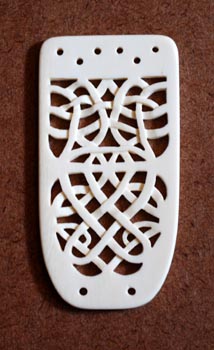
In working on another project (specifically the tailpiece for citole number four), I encountered some annoying problems trying to get some inlay to work. So for this past holiday season, I received as gifts a very nice jeweler's saw and a inlay cutting mount. I had originally thought to use this for inlay, but it occurred to me that it might work just as well to cut out the holes in the ivory. And, um, wow, it not only worked, but sped up the process by about one thousand percent. Feeding the thin blade though the finger drilled holes, I was able to cut out the hole shapes rather accurately, requiring only minor clean-up with the micro files. Thus this over 100 hour process of shaping the holes turned into something like 10-12 hours of work. You know what they say about having the right tools for the job... The top half has been cleaned up - the bottom half still has a little work yet to do. Given how fast that part went, I probably will do the interlacing three-dimensional work on it as well.

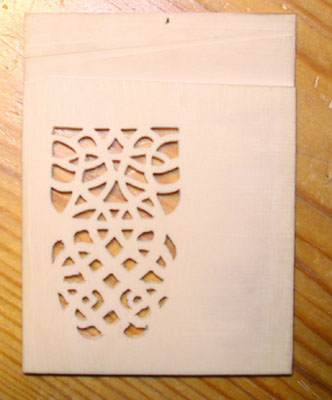
The "decorative" portion of the tailpiece has been completed, and the piece roughly cut out of its block. The interlace pattern has been given a 3-D cut. The piece is still strong, so I don't think it will need a backing to hold the (relatively low) string tension. Space has been left at the top and bottom for the holes to insert the strings. I will do the final shaping of the piece once those holes have been cut and tested under a bit of tension.
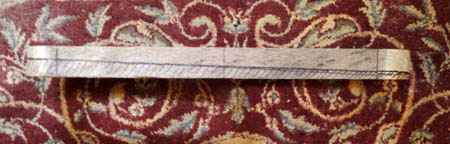
The top arm has now been cleaned up. Note that the tiger striping that is visible runs perpendicular to the normal grain of the wood. The tabs have been left overlarge at the moment.

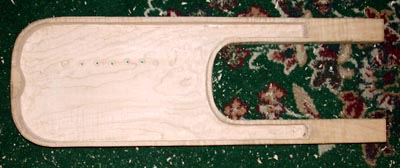
The body block has now been cleaned up, and the area that is going to be hollowed out has been pencilled in.
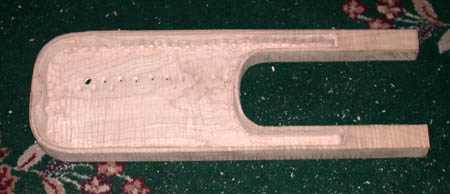
The body block has started to be hollowed. Using my normal technique, I drill many holes in with a 1/2 inch drillbit to quicken the process of wood removal. Then I go at it with the 1/2 scoop chisel. Had two problems with this one. First, the stopper I had on the drillbit slipped without my knowing it, and one row of holes ended up too deep (actually breaking through the back in one place). Those are the holes that you see the little dots in roughly the middle of the hole. I plugged the hole for the moment, but may need to do a cleaner insert. At the moment it kinda looks like a knot in the wood. Rather frustrating, but these things happen. A note about the pillows: I tend to work on the floor of my living room (as I've mentioned previously). When whacking at the particularly hard and curly maple with the chisel and mallet, it is particularly loud, and tends to be sufficiently reverberent on the floor to potentially annoy our neighbors. So I put the instrument on these pillows to cushion the sound a little. Still loud in the house, but it deadens the noise the neighbors have to put up with. It does, however, mean that some of the energy of each blow is lost to the slight give of the pillows as a support.
A slightly angled view of the body block as it stands to this point. I've done all the hollowing, and am now cleaning up the sidewalls and doing the final thinning of the walls and floor. In this picture the lower arm hollowing has been completed, but the upper arm still needs to be carved out some more. Most of the gross removal of wood was down with the spoon chisel and mallet, but the side-wall carving and the arm hollowing was down with hand chisels. A lot of the bulk removal of the material at the tail and the upper curve was done with the dremel, as carving cross grain there was dulling my tools horribly, and was moving extremely slowly. The outer walls will remain between 3/16 and 1/4 inch thick, as they have to be able to receive the small nails that traditionally hold the soundboard in place. Also visible here is the blow-through hole. Still not quite sure how I finally want to plug it, but I think the end result is probably going to be a "maker's mark" inlay on the back.
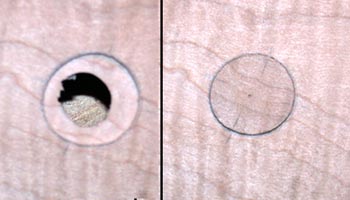
Decided on a plug. I debated between putting something decorative there (like a "maker's mark" or something to that effect), but as it was fairly large and off-center, it would have probably looked a little weird. As it was, I decided to do as clean a plug as I could - so I found a bit of the scrapwood and cut a thin disk to insert. The dremel router was used to clear out the space, and the plug was glued into place and sanded down flush (the plug picture is before I sanded it down). Came out pretty clean - the grain didn't match up quite as nicely when I sanded it down a bit, but it's really only noticeable on very close inspection.
The body block has not been fully cleaned up - the side walls and floor thinned out as much as they are going to be, and everthing basically smoothed down (not polished, but generally sanded). We're ready for the cross-bar now.
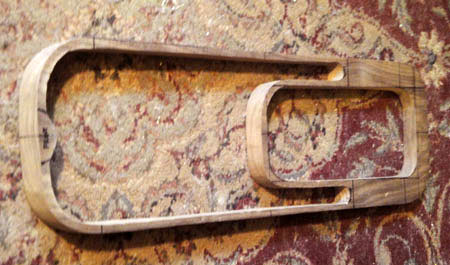
It seems that a number of the historical finds were not constructed from a single piece, but added the cross-bar arm as a separate piece with the grain running perpendicular to the main body. The cross grain means that the wood is less likely to split with the drilling and tension of the pegs. The joints were mortised into place. The joint I modelled this after is based on the Prittlewell reconstruction. I was going to originally just drill holes on either side and peg them together, but I think this is more historically accurate, is stronger, and tests my skills a bit more. First the tabs of the joint on the cross-bar were shaped and cleaned up, as shown here. Next the matching holes were drilled and chiseled out off the body block "stems." Getting the two parts to line up exactly was a true test of patience on my part, and involved continual re-fitting, shining light through the joint to see where the misaligns were, filling it down a hair, refitting, etc. Took several hours.
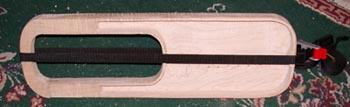
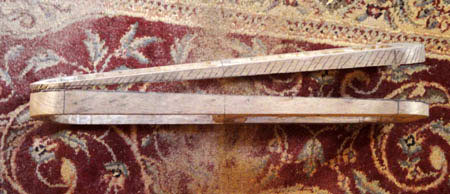
The body and cross-bar being put together. I had been given as a present this interesting band clamp, which uses a 1.5 inch nylon band on a tensioner to hold irregular shapes together. It worked particularly well to clamp this.
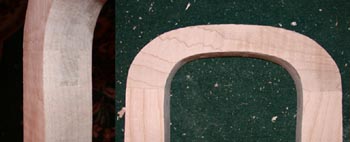
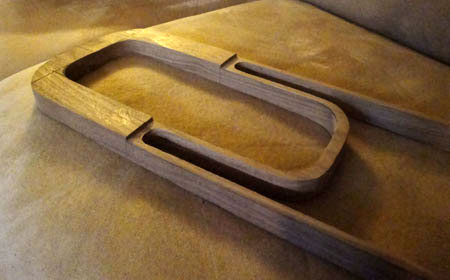
Lots more sanding and filing cleaned up the joint, and it came out cleaner than I expected. You can see the inner mortise joint visible on the inner edges of the arms. The joint on the front face is strengthened and "hidden" by the bird metal braces.
The full body is pretty much done now. Just have to do a lot of random sanding and filing to even and straighten out the sides and the cross-bar.

Thinning down the soundboard, done mostly with my rasp/planer. It needs to go down to about 1/8 inch, and is starting out at about 7/16th inch, so lots of material removal. The soundboard will be "inlaid" into the body, so it will initially be left a little thicker to allow for any error in the carving down of the body (ie, it might end up thicker at the edges and thinner in the middle if the carved down space on the body is accidentally cut too deep. The bunnies like the large pile of curly scraps!
The soundboard is now down to about 3/16th. Now to make a space for it on the body block.
The soundboard is set into the main body block, so I need to carve down a shelf for it to sit on so that it is flush with the upper part of the instrument. My initial thought was to use the dremel router to carve it down an even amount, but the very thin walls and not really having something to cleanly brace it on (the table on which I work is slightly warped, and the bottom of the lyre is slightly dished, the combination of which means that it is very hard to clamp it really flat and run a support block next to it to level the router). So ultimately I ended up simply penciling in a clean line and carving/filing down to that line all around the necessary space. The mini-chisels were used to create a clean edge at the top. Also the cavity was given a final pass of rasping/sanding to even it out as best I could before the soundboard went on.
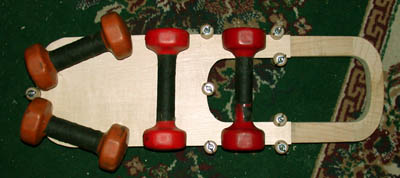
Attaching the soundboard to the body block. I presently have eight violin circle-clamps, and used those to clamp the corners at the arms, bottom of the inner curve and the tail. Otherwise all the clamping was done standard style - using handweights!

Filing down the ragged edges of the soundboard, and the soundboard is attached. It is still too thick, and needs to be shaved down the last bit of thickness, and then the whole body needs to be given a final clean up and lots (and lots and lots and lots) of sanding to remove all the scratches from it (what I refer to as "glassing" the wood).
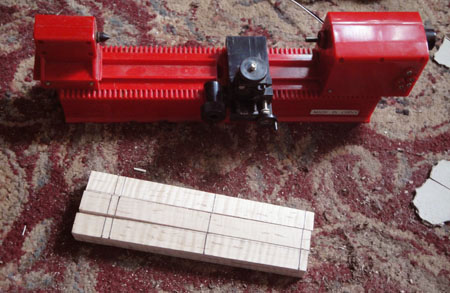
In the meanwhile (as I can only sand for so many hours at a time), finishing out the other fittings. Originally I had intended to use the bone guitar pegs as the basis for the pegs, with intent to recut them into the square headed pegs appropriate to this instrument. Unfortunately, upon working on the first peg, it seems that those pegs were not cut from a single piece of bone - the stems were turned and the peg-heads were separately fashioned and then glued on. So when I attempted to recarve them, the top fell off. Striking that idea, I turned to some sections of antler that I had as a substitute. Unfortunately, the antler did not have any sections that were straight and thick enough to create the peg without running into sections that were spongy. I considered using ivory, but the pieces for each peg would have cost about $40-50 each, and I didn't feel like spending $250-300 for pegs. So I resorted ultimately to using the holly wood pen blanks I had left over from the citole pegs, and began turning them. Here is my little mini-lathe that I use to turn the pegs. The pen blanks are about six inches long for scale purposes.
Unfortunately, my old camera's lens broke. I have acquired a new (much nicer) camera, but it meant that there was a break in the images, and some of the inbetween stages were missed in documentation for the shaping of the pegs and bridge.

Pegs - the pegs were turned and then shaped into tapered square heads. Each was made from holly wood, and is about three inches long. The stems of each of the pegs were tapered using the violin/viola peg shaver, and they have been cleaned up and sanded smooth. The holes were then drilled into the arm of the lyre, and tapered there using the peg reamer. Each peg has to be individually matched to it's hole to make sure they are all even in depth. They will be oiled in the final pass, after the small holes for the strings have been drilled through them.
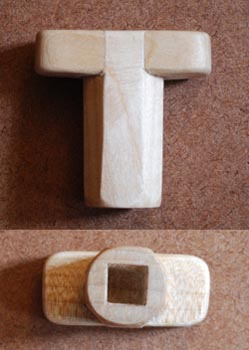
Peg Turner - the pegs are set up such that it would be difficult (though not impossible) to turn them by hand. As such, I fashioned from some scrap maple a peg turner. It is cut and tapered to fit the heads very cleanly. It has an octagonal stem (which allows it to fit in the narrow space between the mounted pegs and rotate without bumping them), and has a joined "T" handle, which was dovetail jointed onto the stem. The octagonal dovetail joint was a pain to do, but came out pretty nicely and was a fun little challenge.
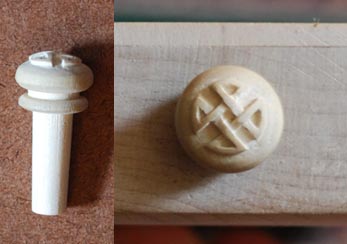
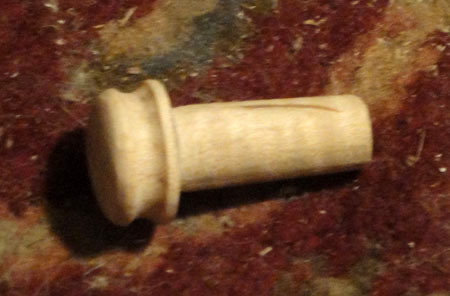
End Peg - was separately turned from holly wood, and is about twice as thick as the string pegs. It ends in a flattened ball, which looked boring by itself, so I cut a shallow knotwork relief pattern into it. The stem was also tapered using the violin/viola pegshaver. It is fit into a hole drilled in the end of the bottom of the lyre, where just it's head is exposed.
Tailpiece - the tailpiece was completed. The holes for the tailgut were drilled with the finger drills and widened with the micro-files. The six holes for the strings were drilled in two tiers to keep them close together, and the holes widened with the micro-files. The tail piece was then finally shaped, and given a polishing sanding.
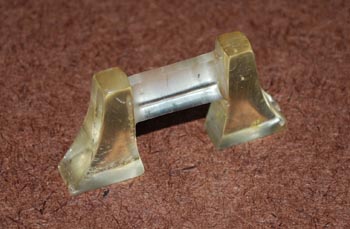
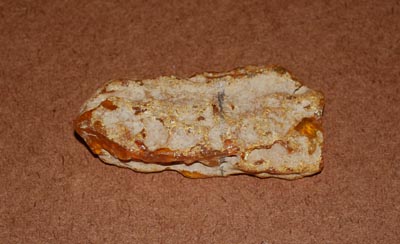
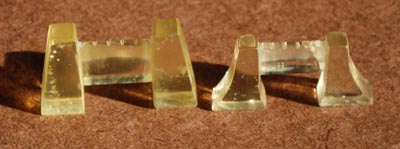
Bridge - the bridge was cut from a large chunk of clear colored amber. It had a number of cracks and inclusions which I had to work around. The amber is very brittle, so it is more or less impossible to "carve" using carving knives- that just chips away material and fractures the surface. So all the work on it was done with the jeweler's saw and files. I did determine that it could be polished to glass after having been roughed, so wasn't worried about that. I used as a model a small amber bridge presently in the British Museum. They are very small - only about one inch tall and maybe one and a half inches wide. This looks like a little gatehouse, with two sloping square towers that are joined by a wedge-shaped crossbar. The piece was successful cut out, thinned and shaped to form. There was one inclusion on one foot that fell out in shaping, leaving a small hole, but I didn't want to lose too much material in the foot, so the hole will have to remain. It shouldn't affect the integrity or structure in any way, though. It was then polished with increasingly fine sandpaper up to about 8000 grit. The result looks remarkably like plastic, which is both interesting and somewhat frustrating. It is clear enough to read text through, though.
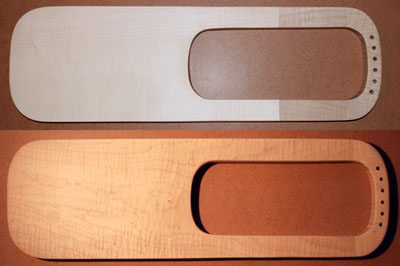
Body After many, many hours of hand sanding, the body block has been "glassed" - meaning that it's been sanded such that all the scratches that can be removed, have been, and the surface is as smooth as, well, glass. For those that care about such things, it has been sanded down using hand sandpaper to about 800 grit. The top photo here was taken with flash (I'm still experimenting with the new camera), and is a pretty true color reproduction of the block "in the white," while the bottom image is without flash, but showing more of the grain.

After wiping down the block with a damp cloth and repolishing it a bit, and rewiping down to remove all the sawdust, the wood is then treated with a coating of a mixture of beeswax and mineral oil. This seals and protects the wood, but uses only historical materials for doing so. It brings out the grain and flame very well, as the bottom shot here shows. The top is again without flash, but shows that the soundboard even has a little flame, though nowhere near as pronounced as the block.
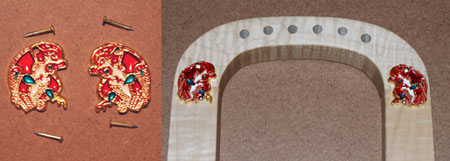
The last part of the body block is to add the shoulder braces. These are the shoulder braces, and the little brass nails that will be used to hold them in place. I positioned them at the shoulder joint, used the small finger drills to create clean pilot holes for the nails, and them nailed them down into place. The lower nails sit at the point where the feet join the body. I think they look very pretty.

Set Up. And now the last part - stringing her up. First step was to place all the pegs into position and drill holes in them at proper height with the finger drills (you can see the little finger drill still in the last peg).

TRAGEDY! As stated earlier, this was a partial experiment in materials science, and I learn something new every time. I had strung up the instrument and brought it to pitch. It sounded different than I was expecting. I had expectations of a bright, banjo-like sound, and instead I got a warm rich tone, which was quite pleasent. Unfortunately, after two days of tuning up the gut (gut takes a while to fully stretch out, and takes several days of re-tuning back up to pitch before it settles), the bridge snapped in half at one of the string grooves (yes, at the string I was tuning at the time). Thankfully it didn't break or even mark the string, which was convenient as the strings themselves are rather expensive. So I decided to poke around, this time on eBay, for another piece of amber to use as a new bridge, with intentions to carve this one a little heavier. I was surprised though that it broke so readily, as smaller and thinner historical bridges in amber seemed to exist, and I was using gut strings with relatively low (about 10-12 lb.) tension. In looking for more amber, I made a discovery. There are many kinds of amber. I was familiar with amber being different colors (clear, green, yellow, or even red), but did not realize that amber from different parts of the world are pretty much different stones. For example, the chunk of amber from which this bridge was carved was copal amber, which comes from South America, primarily Columbia, and is very young by amber standards. It doesn't really fully qualify as amber, as it is only a couple thousand years old, characterized by a slightly crackly surface created from the shrinkage of the material as it dries and polymerizes. Baltic amber, by contrast, is 30-80 million years old, and has fully fossilized into hard stone. Copal amber isn't as solid, not nearly as strong, and is more brittle than Baltic amber. It sounded really good though, so I decided I'd try to get more amber and re-try to make the bridge in amber. Searchng around eBay, I was able to find both a nice large piece of copal amber (for $26), and a surprisingly large (4x4x3 inch) chunk of baltic amber for very cheap as well ($39), so I acquired them both, and will make slightly more heavily constructed bridges out of both of them to see what the relative difference in sound is. In the meanwhile, I wanted to play the instrument at events and demos upcoming, so I made a maple bridge in the same dimensions (seen here next to the broken amber bridge), and installed that in the meantime. Interestingly enough, the sound is a little more muted with the maple bridge over the amber - the tone was richer and more complex with the amber bridge.

FINISHED INSTRUMENT This is instrument as it stands now (with the maple bridge). The strings are natural gut, acquired from my very reliable source Gamut Strings. The instrument was tuned G a b c d e (the c here being middle c); for those that care the sounding length is about 51cm, and the strings range in diameter from 1.46mm to 0.66mm. It can be played either by plucking the strings like a harp, or strumming across the strings while deadening the ones you do NOT want to sound, much like a modern autoharp. In the latter playing technique, you can get C, Dm, Em, G simply, their open varieties, and a number of aug 4s and 2s. What little we have of ancient Nordic music oddly emphasized thirds (at a time when everybody else was more interested in fourths, fifths, and seconds), and this instrument plays thirds very well, in either style. That does present an interesting chicken and egg notion (was the instrument designed to play thirds, or did the fact that it does play thirds well contribute to that emphasis in the music?). In any event, recordings of the sound will follow shortly, as soon as I make another amber bridge.

Final image - down the lyre in natural light - just thought this shot looked neat, and looks like the original photograph I first saw of the Sutton Hoo lyre.
Having determined that I liked the sound produced by the amber bridge better than the maple, I decided to try again with the amber. Poking around on eBay again, I was able to find a large chunk of copal amber (here pictured) and a large chunk of Baltic Amber. The Baltic amber turned out to be fake, however, so I decided to stick with the copal piece, and just make the bridge a bit heavier.
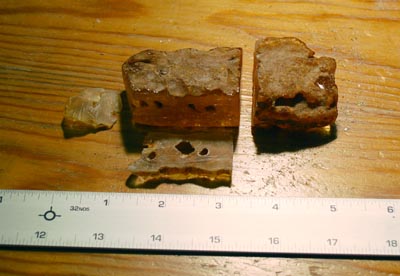
The first part was to cut out a rectangular solid chunk about the size of the bridge. The copal is fairly brittle, meaning that if you hack it to readily it chips and cracks. So cutting it is done with a fine-toothed jeweler's saw, slowly.
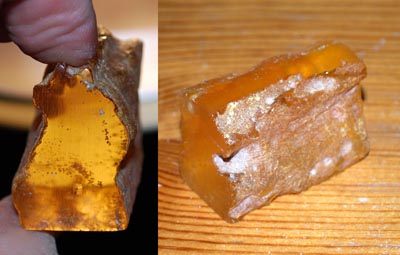
This is the rough chunk to be filed down to the bridge shape proper. That was done with a combination of the dremel sanding bits and hand files. I was surprised that the dremel bits didn't "melt" it like the heavier saw action did, but for whatever reason it worked rather cleanly. As you can also see, the interior has some random inclusions in it - little bits of plant, mostly.
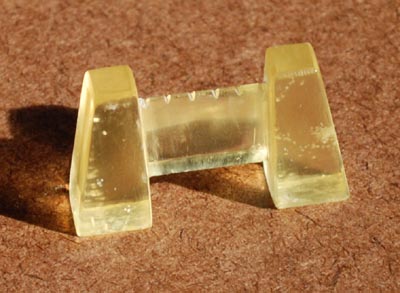
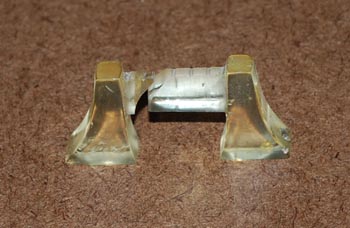
Lots of hours of filing and sanding later, and we get the final bridge. This is about twice as heavy as the original bridge (see second picture)- the pillars are thicker, and the cross-bar is about twice as thick top to bottom. I installed this one on the instrument, and indeed it did create a richer sound than than maple, though not quite as bright as the lighter, thinner bridge. I'm not willing to thin this one down much more for fear of it breaking, but will still keep my eye out for an appropriately sized piece of Baltic if one ever presents itself. So far it has held up to several weeks of heavy strumming, so it seems to be stable and strong enough.
The last bit will be to create the "accessories" - I've carved a small horn pick from some Scottish cattle horn, and now need to make the back strap for the instrument. In playing in the strumming method, it is physically impossible to hold the instrument in place, so it tends to slip off the lap or move in annoying ways, especially when vigorously strummed. The solution was to have a leather strap that was attached to the the back of the arms which one slipped the hand through, thus bracing the instrument while still allowing the fingers free movement. I haven't decided whether to make the strap a permanent attachment or something that can be slipped onto the instrument and then removed again. I have a feeling it's going to have to be a permanent attachment though.
Back to Top 
THIRD ATTEMPT
This is a slightly smaller lyre being made for somebody else. I wanted to experiment with a few ideas here. First, I wanted to see how a constructed body might work- making an open frame and attaching top and bottom rather than hollowing out the board. Secondly, as not hollowing it out makes it a little easier, I wanted to try tapering the body, so it was thin at the peg end and thicker at the tail end. This one was going to be dark, made of walnut, with light colored fittings of maple, because I also liked the way the "inverted" color scheme looked on the Utrecht citole.
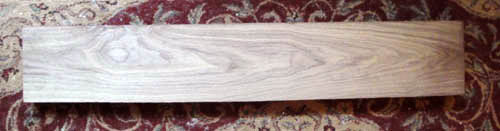
The large block of walnut that will form the frame of the body. It's a nice piece of American black walnut acquired from a hardwood dealer off of eBay.
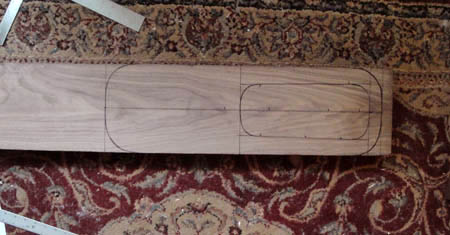
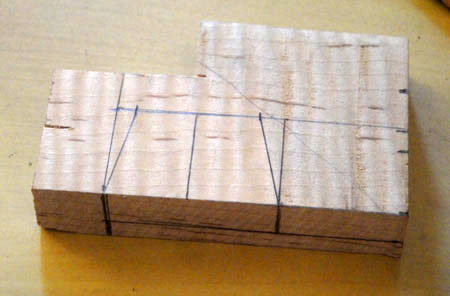
The pattern drawn onto the block. The pattern is pretty much a slightly scaled down version of the one I used for my Sutton Hoo lyre.
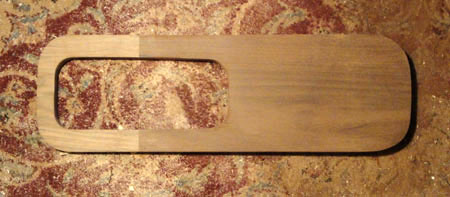
The body piece is cut out of the block, and the outer courses sawn off. The block is about 1 3/4 inches thick.
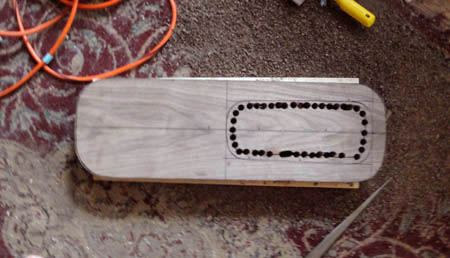
Next we do the cut out. The simplest method here is to drill a bunch of 1/2 thick holes through the block and then use a saber saw (lower right) to saw between the holes.
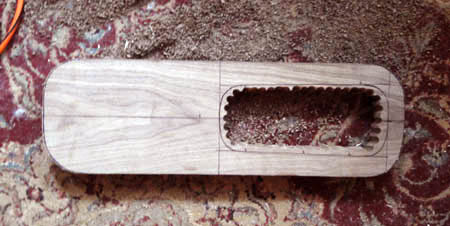
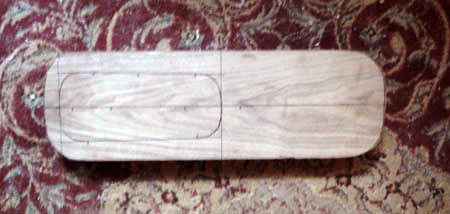
That piece is then popped out, and we have the rough hewn body block.
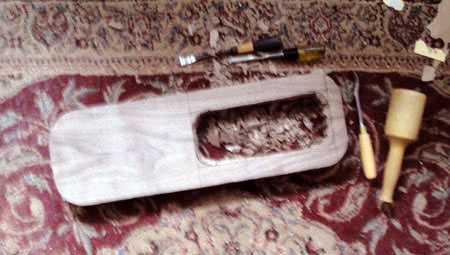
Using chisels I then round off the outer corners, and then start to clean out the edges of the inner cut out. The top and bottom cutting across grain is difficult, so I'm going to leave that cleanup until after I've thinned the top part of the block.
Unlike in the other instuments, I'm assembling both the top and bottom of this one. As such, I'm not hollowing out the body, but punching it out. The process for the top inner cut-out is repeated for the body cutout, though the walls are left much thinner. Again the top and bottom are difficult to chisel, so they are left for later to deal with.
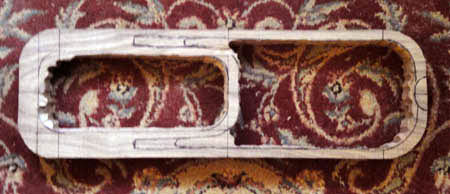
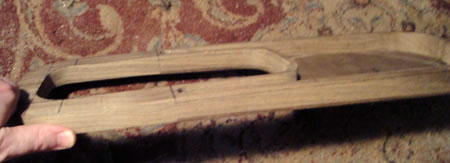
I wanted to taper this instrument lengthwise, so it was thinner at the peg end and thicker at the base. I mark along the entire edge (inner and outer) the line I'm following (the "shaded" area is to be removed).
The entire length is then sawn through and the body frame is now tapered to roughly the right shape.

With the upper arms thinner, I use a combination of saw and chisels to hollow the space in the arms.
The back and front plates of the instrument. These are a guitar back pair of walnut from LMII.
I select from each of the pieces which will be the front and back, and cut them roughly to shape. You can see the chalk guitar outline still on the inner side of the wood. I do label them to keep track of which is which.
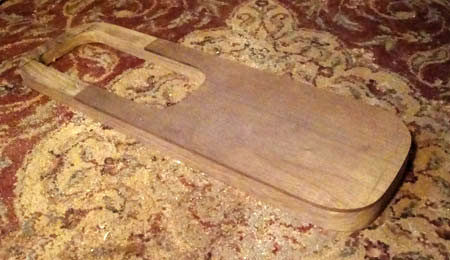
Much time with plane, files and a bit of dremel and the body frame is pretty much cleaned up.
This is a scrap piece of the nice flamed maple from another project. I'll be cutting all the fitting from this piece (it's about 10x12 inches). The lines are for the square pieces from which will be turned the pegs.
The area for the top and back plates is carefully marked on the body frame.
Using a combination of planes, files and the small chisels, the recess for the backboard is cut from the frame.

The backboard is fitted to the recess, the top lines cleaned up to matche exactly, and the large excess edges trimmed down for gluing.
The backboard is glued on, using the pile of spool clamps I have.
Once that is dry, the edges are cleaned up and the top thickness is carved down to the level of the body frame.

This process is then repeated for the front. With the back in place, the front is carefully measured and laid out so that it cleanly matches the positioning of the back.
Side view showing the pencilled line of what needs to be removed from the sidewalls.
Gluing the soundboard on the body frame. Bunny chew toys clutter the background. They like to help when I have wood on the floor, so need distraction.
The squares for the pegs have been lined for spacing. Above is my little red lathe. And of course, bunny chew debris.
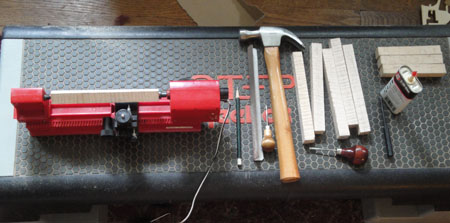
The random assortment of stuff for turning. The lathe, pencil for marking, files for cleaning up the ends of the blocks before mounting, the awl and mini chisel to mark and chip out the ends of the blocks to set into the lathe, the hammer to hammer the lathe block into the wood, the blocks of wood to turn, oil for the spindel contact point, etc.
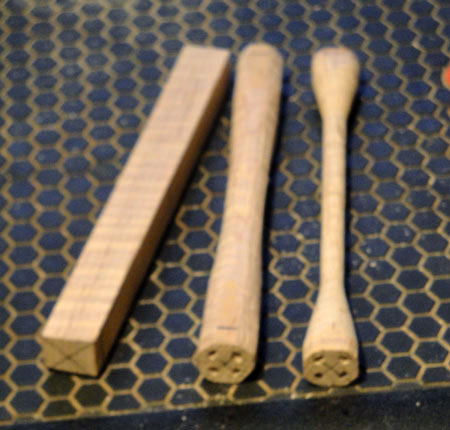
Progress of the pegs. Left is the block, with the centerlines marked in pencil. The blocks are then quick roughed with a curved plane rasp to remove some of the stock before putting them on the lathe. The last shows the finished peg "barbell." The four marks on the end of the sticks are from the engine block part of the lathe.
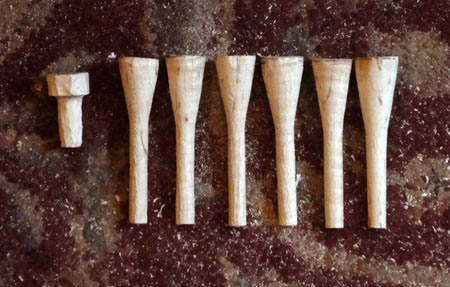
The six pegs cut from the barbells. The end peg was just hand cut with chisels.
The scrap remainder from the end of the peg will be used to cut the endpeg (already cut from the upper right corner here), the tailpiece which you can see sketched on this side of the block...
and the bridge, which is sketched on the other side. Those are cut from the piece and roughed out.
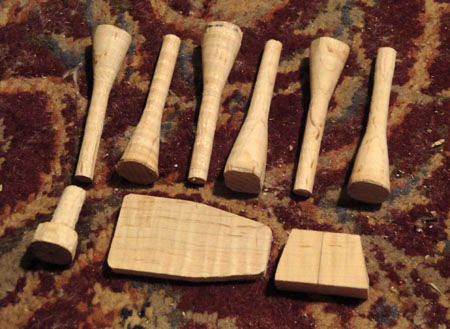
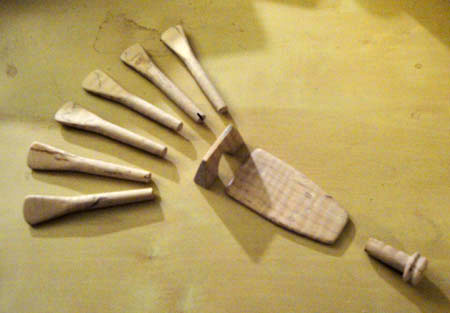
All the fittings together in the rough: six pegs, endpeg, tailpiece and bridge.
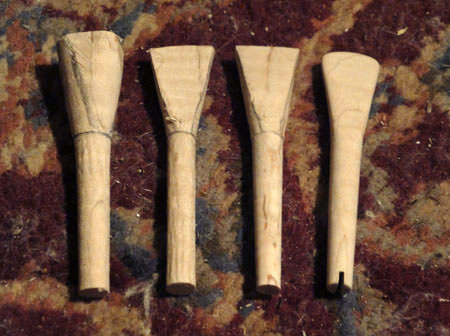
Each of the pegs is then individually carved down. The cone is cut down to a wedge, the peg stem is then run through the peg shaver to properly taper it, and then the head is shaped down and the whole sanded clean.
Same procedure is followed for the end peg, which is manually shaped with dremel, files and sandpaper.
The body is then sanded down with the block sanders to clean it all up in prep for drilling the holes for the pegs.
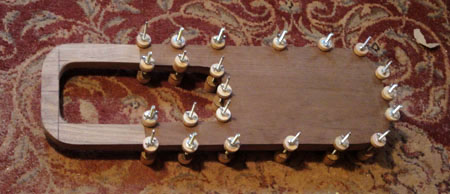
All the fittings in line finished. The holes have yet to be drilled in the pegs and tailpiece, which will be done when I'm ready to fit the strings.
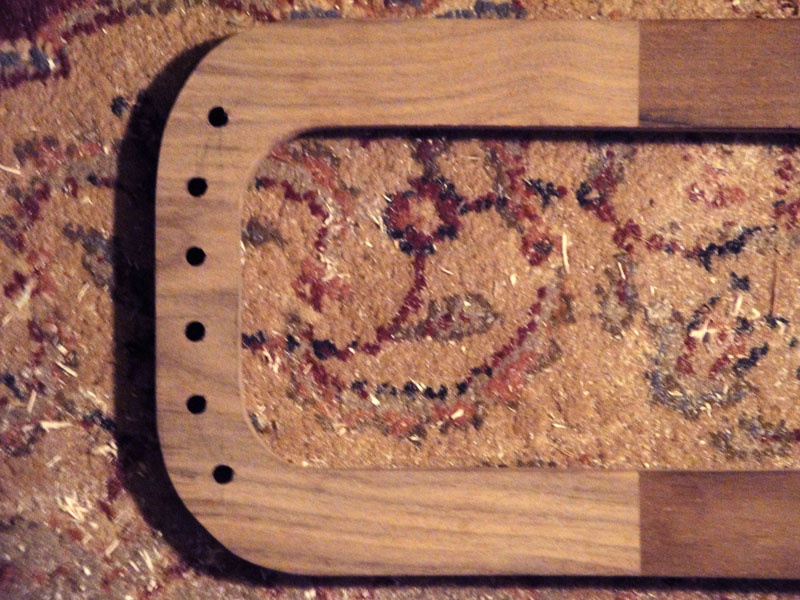
The siz holes along the top arc are drilled using a hand power drill. The holes are spaced evenly around the arc so that every string will past through the opening where the top plate meets the neck so that the hand can easier touch each string when played.
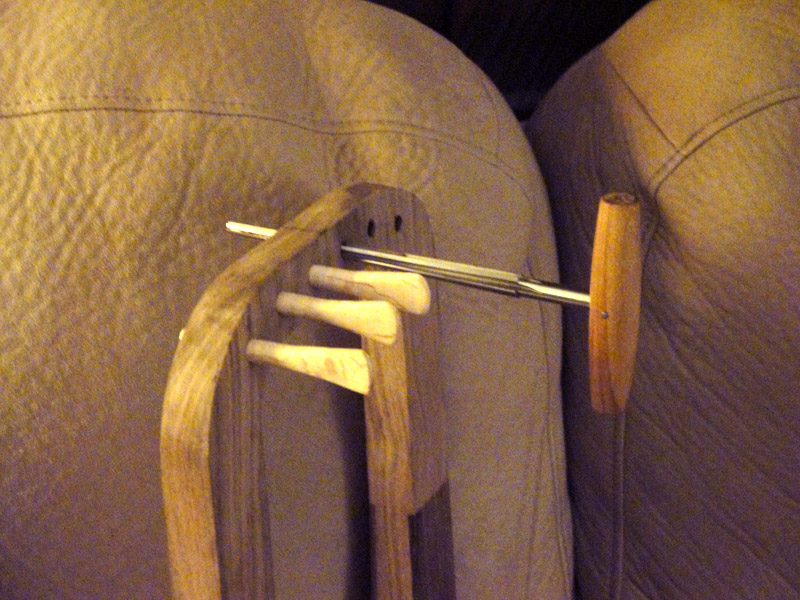
With the basic holes drilled, each is then reamed with the peg reamer, the peg cut to angle with the peg shaver, and each peg matched up to its hole so that they sit at an even depth.
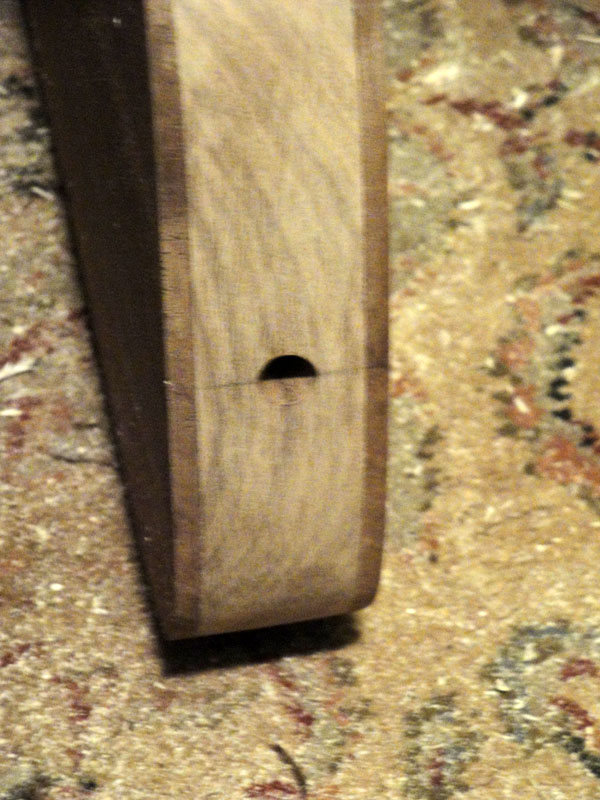
At the other end of the instrument, the endpeg hole is drilled, and similarly reamed and fitted with the endpeg.

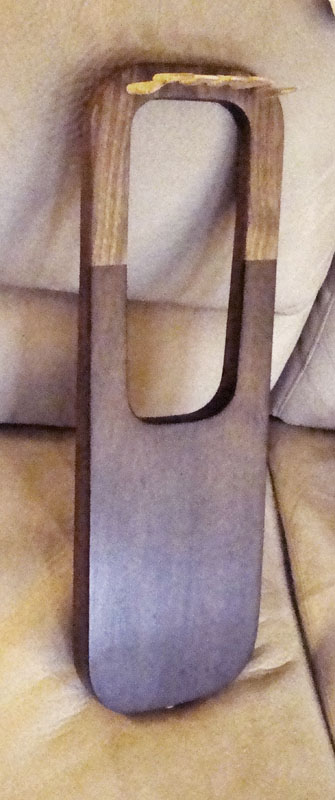
All the pieces are now together and ready for the final finishing and stringing.
The body is finished with a combination of beeswax and mineral oil. The oil is rubbed in, let to dry, and then another coat is rubbed in and let to dry. This seals and darkens it, but leaves all the grain visible and leaves the feel of wood under the hand (rather than feel of lacquer).


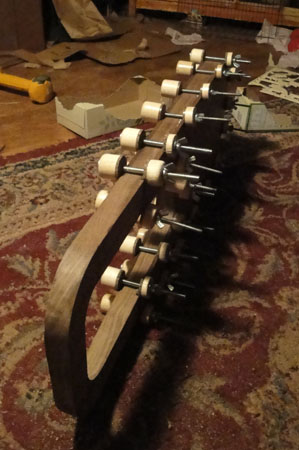
The finished instrument with all of the strings on. The strings are nylgut (rather than natural gut) per the preference of the individual that wante dthe instrument Nylgut looks pretty close to natural gut and sounds (for plucked instruments at least) almost identically to natural gut. It has the advantage of being more stable once stretched, so holds tuning better in changes of humidity and temperature. Since this instrument will be used for a lot of outdoor performance, that seemed preferable. Second picture shows closeup of the tailpiece and bridge assembly, and the third picture shows the slight taper of the thickness from wide at the bottom to narrow at the top. Overall it came out quite well, and was a successful experiment in this type of construction.