WARNING: This page is horrifically graphically intensive (about 450 images at the moment). It will take a long time to load everything.
Note - this page has gotten way too big and will be broken up shortly, I promise!
This page represents my continuing interest in medieval stringed instruments. I do a fair amount of singing, and was looking for a period instrument to accompany myself on. I already have a harp (a nice gothic bray harp made by George Stevens), and have been using my vaguely period looking mandolin as a strummed instrument. But I wanted something more authentic, and I don't play lute (or particularly have an interest - quite difficult to play, not loud enough for the majority of venues I play in, and very difficult to make). So casting about I learned about a popular early instrument called a citole. This page documents my research inquiry into the instrument, and my efforts to construct an elaborately decorated one.
BASIC HISTORY:
The citole appears in Europe somewhere around the end of the 12th century. It seems to have evolved slowly from the classical and late antiquity period instrument called the cithara, which was a kind of lyre. The increasing demand of monophonic music to have more elaborate note structures, and the influence of the older lutes forms of the east, appears to have created a fingerboard on the cithara (see illustrations below). Slowly the fingerboard made the side supports redundant, and the they shrank away into simple curls or juts to the side at the base of the neck. The citole was born.
Or was it? There is a great deal of confusion over exactly which instrument portrayed goes with what name. In the early 12th century, two instrument names appear - the gittern, and the citole. Both seem to be somewhat indescriminently applied to similar instruments, and various scholars have attempted (including Mary Remnant and Lawrence Wright) to separate out the two instruments. I shall report both their findings, the thoughts that preceded them, and my own musings on the subject.
The term cithara is where it begins. Cithara was the generic name for a class of instruments similar, but not the same as, the lyre, ostensibly deriving from the Greek island Cithara. The first instruments in southern Europe with vertical, incurved sides and a flat back were referred to as citharas. Cithara became Cithar, and a large cithar became a Citarrone, or Chitarrone/Chitarra. By the thirteenth century this instrument was the Chitera, Chiterna, Quinterna in Spanish and Italian, whilst in the French it gets the "g" and becomes guiterne or gitterne. The English name, gittern, geterne, gyttren (even gythorn) comes from the French, and gets applied somewhat haphazardly to any flat backed plucked instrument (as distinguished from the Guitare Moresque with its round back and the family of the lute that derives from it). The citole is alternately known as sytholle, sitole, cythol, cytol. Cerone, a 16th century Spanish writer, claimed that the citola was identical with the cetera, the cither, or the cittern. Bishop Oresme of Lisieux writes in the 14th century that "cithare est cithole" - the cithara is the citole. Galpin postulates that the original form was citharola, "little cither" which engendered the Provencal "cithola". The supposition that BOTH terms arose out of the same word, cithara, complicates the issue. So both citole and gittern owe their origins to the cithara, or it would appear.
THE CITOLE AND GITTERN IN THE LITERATURE
The citole makes its appearance late in the 12th century, and seems wildly popular throughout the 13th and well into the 14th century. It fades toward the end of the 14th save in some romances, and in the 15th starts disappearing from the literature altogether.
It appears in texts of the 12th century - Daurel et Beton (written in later 12th cent.) has a hero who could "play the citole, and harp richly, and sing songs and compose by himself". Erec et Enide (by Chretien de Troyes in 1164) also has his hero similarly skilled. Guiraut de Calanson in his work from 1210 called "Conseils aux Jongler" offered that the Jongler must know the pipe and tabor, the citole, the symphony (hurdy-gurdy), the mandore, the manichord, the 17-string rote, the harp, the gigue, and the 10-string psaltery. Thus the citole is set as a primary instrument of the jonglers and troubadours of its time.
Documentary evidence has it appearing in the 13th Century History of Fulke Fitzwarine. The Role de la Taille, a list of tradespeople in Paris from 1292, lists four citoleeurs. Giles li Muisis in roughly 1300 comments on Parisian students making merry with citoles. There are a number of mentions of it in 13th century Spain; including a citoler in the court of Alfonso the Wise (1252-1284), named Lourenco (from Portugal) involved in a court case where a knight, apparantly unhappy with the music, smashed his citole over his head. The citole is even associated with dance music in several literary references in Spain. It appeared heavily favored in England, by the number of players hired by courts there, including William le Citolur in 1269; Janyn the Citoler who was paid one mark for performing at the Westminster Festivities of 1305 (where Edward I was knighted); Ivo Vala for citole playing in 1312-1334; William Sitolir in 1332; Robertus le Cetoler 1339; John Sitoler in 1412). Ed III's court band had a "cyteler".
The 14th Century sees a boom in romance references to it; Launfal, Lybeaus Desconus, and The Squyr of Lowe Degre all having cytolers in their midst.
From Sir Launfal (Thomas Chestre Breton Lay - 14th Century)
"To daunce they wente, alle in same:
To se hem play, hit was fair game,
A lady and a knight.
They hadde menstrales of moch honours,
Fidelers, sitoles, and trompours,
And elles hit were unright;
Ther they playde, forsothe to say,
After mete, the someres day
All what hit was neigh night."
In Adam Davie's "Life of Alexander" from the 14th century, we read "At the feste was trumping,/ Piping and eke taborying,/ Sytolyng and eke harpyng."
From "The Pearl" (Pearl Poet, 14th century), Canto II:3
"Fowls there flew thru the forest in flocks,
Of flamboyant hues, both small and great;
But citole string and gittern player (note BOTH are listed here)
Their reckless mirth cannot repeat,
For when these birds their wings did beat-
They sang so, with a sweet assent.
More gracious glee could no one get
Than to hear and see this adornment."
From Sir Cleges (Middle English Breton Lay)
"And as he walkyd uppe and done
Sore sygheng, he herd a sowne
Off dyverse mynstralsy,
Off trumpers, pypers, and nakerners,
Off herpers notys and gytherners,
Off sytall and of sautrey. (this alliterative phrase seemed popular in a number of places)
Many carrals and grete dansyng
In every syde herd he syng,
In every place, treuly.
He wrong hys hondes and wepyd sore;
Mekyll mon he made ther,
Sygheng full pytewysly."
From Confessio Amantis "Tales of the Seven Deadly Sins" - Incipit Liber Octavus: Part 1
"He tawhte hir til sche was certein
Of Harpe, of Citole and of Rote,
With many a tun and many a note
Upon Musique, upon mesure,
And of hire Harpe the temprure
He tawhte hire ek, as he wel couthe."
In later 14th century the references are fewer, and by Chaucer, the citole is noted as being of the Knights Tale, ie, already archaic.
"The form of Venus, glorious as could be,
Was naked, Floating on the open sea,
And from the navel down all covered was
With green waves, bright as ever any glass.
A citole in her small right hand had she,
And on her head, and beautiful to see,
A garland of red roses, sweet smelling..."
Though of course, it could be a Chaucerian notion that Venus had the cithara, not the citole.
A stock phrase of the alliterative poetry survives with "Citole and psaltery" in various forms such as from Richard Holland's Buke of the Howlate (ca. 1450):
"The psaltery, the sytholis, the soft sytharist,
The croude and the monycordis, the gittrynis gay;
The rote, and the recordour, the rivupe, the rist,
The trumpe and the talburn, the tympane but tray"
There is still a citoler at the court of Navarre, Arnaut Guillem de Hursua, juglar de citola, who received payments in 1412 and 1413. Tinctoris gives us a very nice description in his "De Inventione et Usu Musicae" (c.1487); "Yet another derivative of the lyra is the instrument called cetula by the Italians, who invented it. It has four brass or steel strings usually tuned, a tone, a fourth, and back a tone, and its is played with a plectum. Since the cetula is flat, it is fitted with certain certain wooden elevations on the neck, arranged proportionately, and known as frets. The strings are pressed against these by the fingers to make a higher or lower note." But Tinctoris also states that by the late 15th century, "the cetula is only used in Italy by rustics to accompany light songs and to lead dance music." There is perhaps a question whether the instrument he is describing is already heading toward the cittern - the wire stringing, and the re-entrant tuning are both characteristic of the Renaissance cittern (of which much information on tuning and stringing is available), and he may instead be describing an instrument in transition. The cittern was popular both with nobles and with lower classes, and was kind of the bar-room guitar of Renaissance England.
The "rustics" in England put on plays, and in the 15th century Cornish miracle play Ordinale de Origine Mundi, King David speaks:
Wethong menstels ha tabours
trey-hans harps ha trompours cythol crowd fylh ha savtry
psalmus gyttrens ha nakrys
organs in weth cymbalys
recordys ha symphony.
Translation - [Blow minstrels and tabors/Three hundred harps and trumpets/Citoles, crowd, fiddle and psaltery/Shawms, gitterns and nakers/Organs, also cymbals/Recorders and symphony.]
But after the 15th century the instrument seems to vanish from the mind. The common belief is that it morphed slowly into the Cittern, and thus the name citole is merely replaced.
Thus the citole starts out as a jongleur and troubadour instrument in the 12th century, sees a brief but spectacular favor in the 13th and 14th, amongst the courts and in the heroic romances that entertained them, and then seems to slowly fade away into a has-been instrument by the 15th century, replaced by its successor, the cittern.
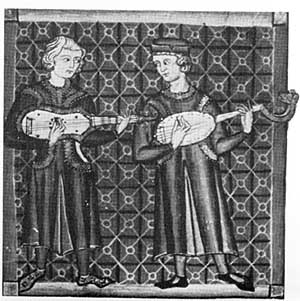
References to gittern players can be found from 1306 in England to Italian players of 1460's and 1470's. Particularly in the 14th century and early fifteenth, they appear in vogue, especially in the courts. Charles V inventory in 1373 includes four, including one of ivory. Court of Este and the court of Ferrara include hiring information of master players, and the Duke Leonello d'Este purchased one for himself in 1445.
Dante describing round back of gittern: "...just as it would be blameworthy operation to make a spade of a fine sword or a goblet of a fine gittern..." Jean Gerson, in French sermon of 1400, compares the four cardinal virtues to "la guiterne de quatre cordes". Chaucer mentions the instrument as that one used by the parish clerk to serenade the carpenter's wife "The moone, whan it was night, ful brighte shoon/ And Absolon his Giterne hath i-take". It also shows up in Piers Plowman: "Ich can not tabre, no trompe, ne telle faire gestes, / Ne fithelyn at gestes, ne harpen,/ Japen ne jagelyn, ne gentilische pipe,/ Nother sailen, ne sautrien, ne singe with the giterne." Tinctoris describes the gittern as "it is very obvious that the instrument invented by the Catalans, which some call the ghiterra and others the ghiterna, is descended from the lute; for it has the same tortoise-shell shape, tuning and method of playing as the lute, though it is much smaller." Tuning thus would be 4th/3rd/4th. But like with the citole, Tinctoris obverses in Ferrera "the ghiterra is used most rarely, because of the thinness of its sound. When I heard it in Catalonia, it was being used much more often by women, to accompany love-songs, than by men." He already saw the instrument in decline, replaced by the lute and up and coming guitarras. But it was far from dead. Henry VIII in the tallies of his possessions at his death had listed "four gitterons called Spanish Vialles." Don Luys Milan of Valencia in 1536 distinguishes the Gittern from the Spanish gittern or "vihuela" as the latter having six strings, and the former having four. Michael Praetorius as late as 1618 still provides a tuning for the instrument at d' a f c or g' d bb f, with the actual pitch varying with size of the instrument. However, these references to Gittern may instead be to the four course "guitar" rather than an actual gittern.
Like the citole, the instrument seems to have had a hey-day of the 13th-14th centuries, but went into decline after that.
MORPHOLOGY IN REPRESENTATION: WHAT DOES A CITOLE LOOK LIKE?
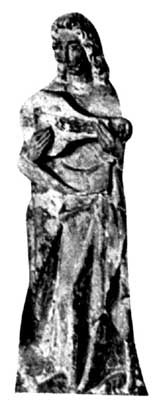
The image on the left is from the Bible of Charles the Bald from the 9th century -the one on the right, from the Utrecht Psalter, Psalm 43, also from the 9th century. These show the cithara in transition to the new form of instrument. The left shows the cithara/lyra having acquired a fingerboard, though the arms still support the top crossbar, even if ornamentally. The figure from Utrecht shows the neck now free of the arms, but the vestages of the arms still present in the broad curls at the top of the body of the instrument where it joins the neck. It is from instruments like these of the 9th century that the citole/gittern develops.
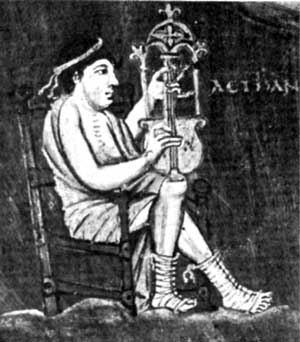
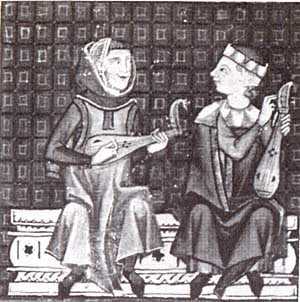
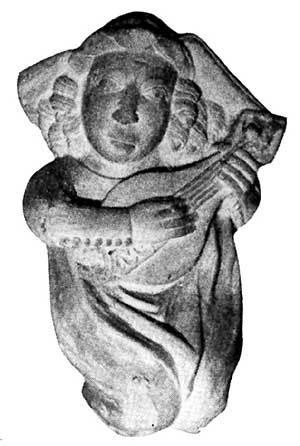
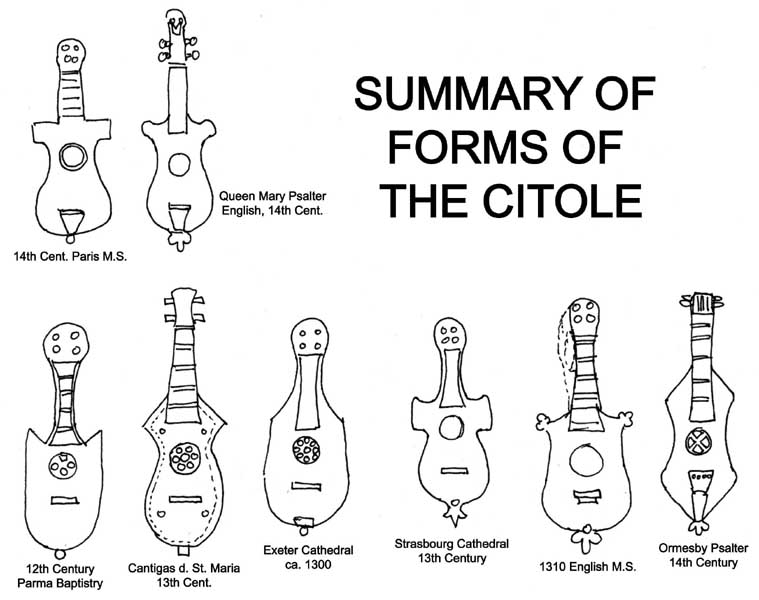
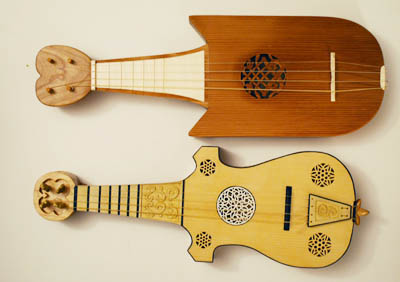
Chronologically, our next representation of the instrument is this sculpture by Benedetto Antelami, ca.1180, from the Baptistry in Parma, Italy. It shows an instrument with four distinct strings, a bridge, definite raised frets, and small wings at the top of the body. The strings run to an endpeg or piece. Unclear in these pictures is the small rosette shallowly carved into the soundboard. We cannot see the back of the instrument, but it appears to be flat, as it is very close to the body. The player uses a plectum, a fairly heavy arrow shaped one (as opposed to the light quill plectums also of the period). This instrument appears to be the direct precursor of the citole/gittern. Most individuals seem to classify it as a citole, and it is the instrument copied by modern reproductions that call themselves "citoles," including the instruments by Bernard Ellis and by Ancestral Instruments.
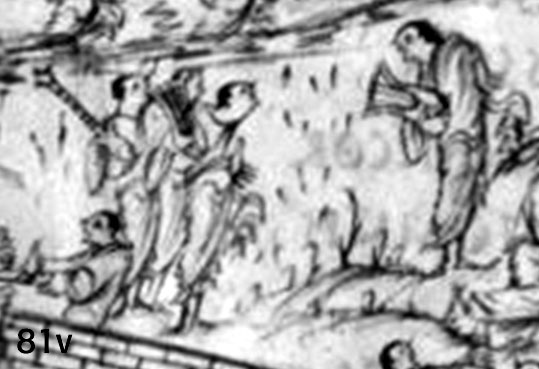
Then, of course, we hit the high period of the instrument in the 13th century, and the images are more numerous, but also more problematic. Take for example this set of images from the Cantigas da Santa Maria, from 13th century Spain:
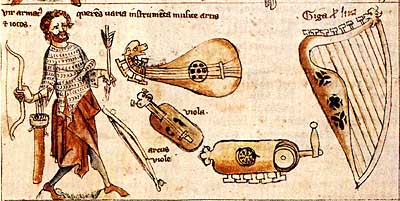
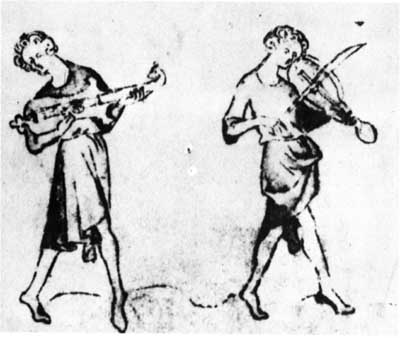
Here we have four pairs of instruments portrayed, numbered left to right, top to bottom, 1-4. The lower two obviously contain a bowed vielle (images 3,4). But textually (in the romance descriptions) the citole was often paired with the fiddle. Three images (1, 3, 4) have the plucked instruments with four strings, while a single (2) has both sickle shaped instruments as having three strings (indeed, they look very much like plucked rebecs). The left hand instrument in 1 and the right hand instrument in 3 are very close in shape and structure, both having the "holly leaf shape", a decided fingerboard with frets, a bridge of some kind. Number 1's however has a fixed bridge, and no tailpiece, whereas an end-nut is visible (if not the tailpiece) in number 3. The instruments in 2 and 4 both have sickle shaped pegboxes, but the 2 image has no fingerboard, is pear shaped and has three strings, when the one in four has a fingerboard, four strings, and a more rounded body, similar to the right hand instrument in 1. I believe what we have here is the instrument breaking up into its component types. Numbers 1(left) and 3 are citoles - they seem to retain the characteristic wings, frets and body shape of the earlier form. Whereas 1(right),2,4 are probably gitterns, as they seem to fit the later descriptions of the instrument as having a rounded body shape. (though I'm still tempted to call 2 a rebec, as it was sometimes played by plucking rather than bowing).
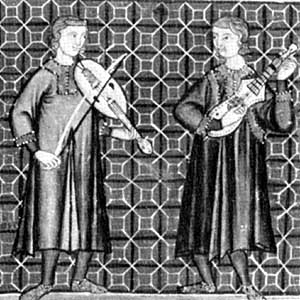
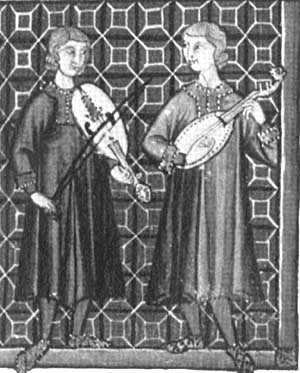
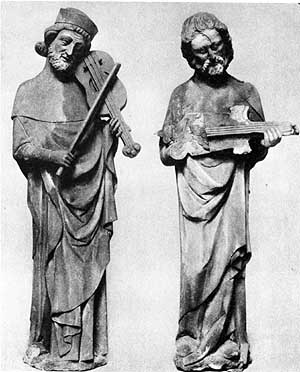
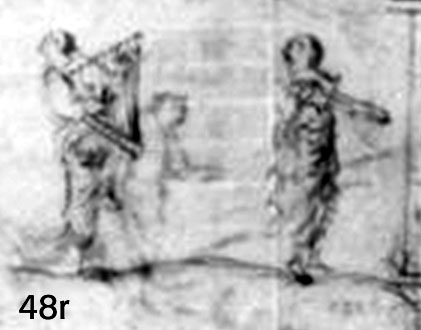
The left image is from Lincoln Cathedral, dating around 1270. The right is from Strasbourg Cathedral, the west portal, and dates from the 13th cent. Both show what are commonly referred to as BOTH gitterns and citoles. The Strasbourg sculpture shows the characteristic wings, end trefoil endpeg, and four strings of the citole like instrument. It also appears to have a flat back. The Lincoln image also has four strings, a tailpiece, a bridge, and is plucked by the arrow shaped plectum. However, the Strasbourg pegbox is sickle shaped, and the Lincoln image lacks a fingerboard with frets. The Strasbourg sculpture I'd categorize as similar enough to the citole to allow it to be so classified. The Lincoln image is tougher, as the defining wing structures are missing, and the instrument almost looked like a plucked fiddle. Wright claims it for the citole camp - though I am not quite as sure as he is.
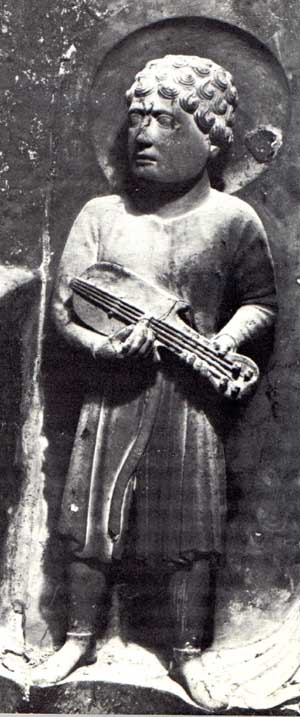
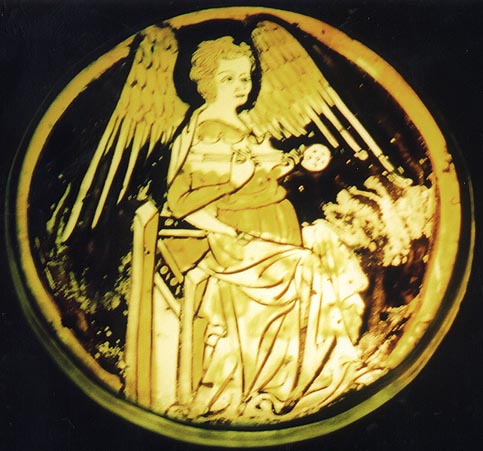
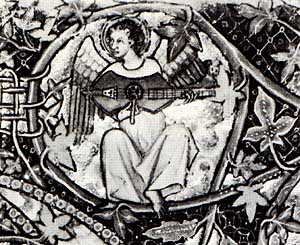
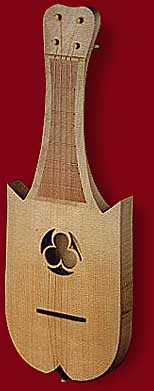
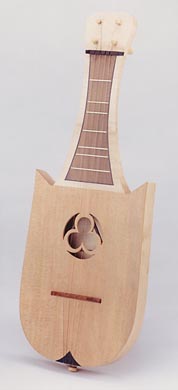
The left image is a sculpture from the Minstrels' Gallery in Exeter Cathedral, ca 1300. The right is the Coronation of the Virgin from The De Lisle Psalter, English c.1310. Both show a citole. The Exeter sculpture shows a strong resemblence to the Parma image, with four strings, flat body, tailpiece, rosette, bridge, fretted fingerboard. The wing structures are missing, but this somehow seems less disturbing here. The right figure is definitely our winged culprit - all the details fall together - the fingerboard with frets, four strings, wings, rosette, arrow plectum, tailpeg in trefoil. Only now this odd neck has developed, that is deep with a cut-out hole for the thumb. It is definitely the cittern in the making (see below), but seems a strange step here. Nonetheless, definitely a citole.
This interesting image I photographed at the Yorkshire Museum in York, England. It is a bit of the original late 13th century stained glass that survives from the ruin of St. Mary's Abbey at the same location (apparantly Henry VIII destroyed the abbey, and only ruins now remain, which they very interestingly built the museum around). This actually caught my wife's eye before mine, but it is truly intriguing as it literally is "holly leaf" shaped - with four points on the body on both sides. Though hard to make out in this image (the photo was a little difficult, as the roundelle was only about 8-10 inches across and backlit in a dark room) there were four strings on the body, but six pegs in the head. The instrument does have a tailpiece, but if there is a trefoil or quatrefoil at the end, it cannot be made out. There are no frets drawn. There is a large plectum, though it looks to me more like a stripped quill plectum than the heavy arrow-shaped ones in other images. Still, I definitely would have to class this instrument as a citole, if something of an outlyer in exact morphology.
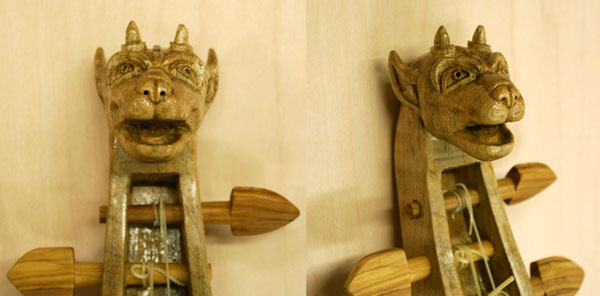
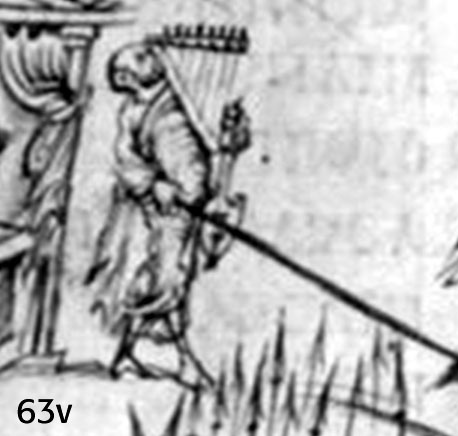
Stained glass window from Lincoln Cathedral, listed as probably 14th century. I don't know if this is original or restored glass. The instrument here is a wonderfully clear representation of a citole that looks almost like a picture of the Warwick Castle gittern below. Has the traditional body with trefoil leaf tail and wings, clearly fretted fingerboard, large thick neck with hole piercing it for the thumb, and a happy little dragon head at the termination of the pegbox.. Potentially interesting features are the number of strings, which appears to be six double courses (six strings are shown going across the instrument, though the pegbox has twelve pegs) instead of a more standard four. The other very interesting feature (and of possible relevance to the Warwick citole) is the lack of a tailpiece. Instead, it looks like a fixed bridge (like you would see on a lute or a modern guitar). Could be artists error, as the fixed bridge does get awfully close to the tail, but the width of the scalloped piece is suggestive of a true fixed bridge.
This interesting image I photographed at the Yorkshire Museum in York, England. It is a bit of the original late 13th century stained glass that survives from the ruin of St. Mary's Abbey at the same location (apparantly Henry VIII destroyed the abbey, and only ruins now remain, which they very interestingly built the museum around). This actually caught my wife's eye before mine, but it is truly intriguing as it literally is "holly leaf" shaped - with four points on the body on both sides. Though hard to make out in this image (the photo was a little difficult, as the roundelle was only about 8-10 inches across and backlit in a dark room) there were four strings on the body, but six pegs in the head. The instrument does have a tailpiece, but if there is a trefoil or quatrefoil at the end, it cannot be made out. There are no frets drawn. There is a large plectum, though it looks to me more like a stripped quill plectum than the heavy arrow-shaped ones in other images. Still, I definitely would have to class this instrument as a citole, if something of an outlyer in exact morphology.
These two images show problems with the citole line. Left is the Ormesby Psalter, 14th Cent. from Bodleian Library in Oxford. Right is "An armed man seeking pleasure with various instruments of music" Dutch astrological treatise at the British Library, early 14th Century. The right image has four strings, like the citole/gittern. However the sickle pegbox, and pearshaped body harken back to the three stringed instruments from the Cantigas. This is NOT a citole, though it is where the gittern, with its bowl back and four strings is headed. The left image harkens back to the Lincoln cathedral image, which vaguely resembled the plucked fiddle. This too has fretted fingerboard, tailpiece, four strings, and arrow plectum. The neck also curves back sharply and thickly, hinting at the deep neck from the de Lisle Psalter image. It shows a kind of continuity between them both, and seems to link those trends in the unfixed morphology of the instrument.
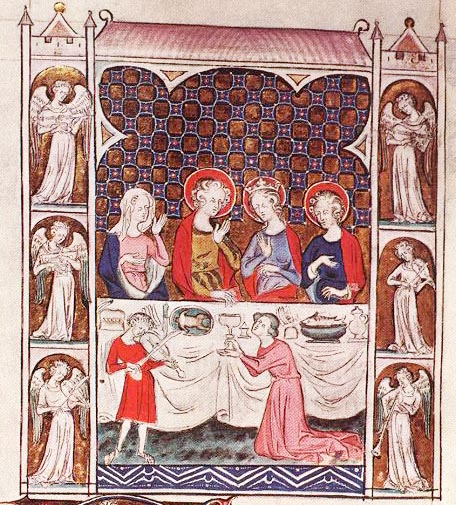
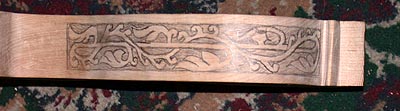
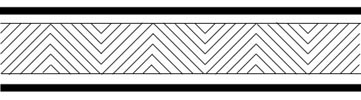
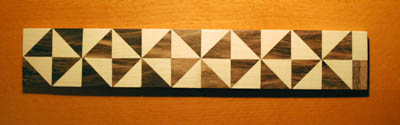
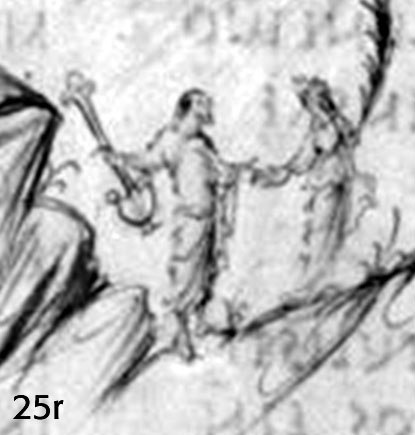
Image from a 14th Century French Book of Hours. This is actually the image from which I took the border pattern for the sides of my recreation (see below). I later noticed that it actually contained a pair of citoles in the image, which I found rather amusing, so I added it here. The two angels on the top left and right are both portrayed as playing standard design citoles. Rounded back region with tail (here reduced to a ball-like extension), short wings, tailpiece, etc. The one on the left is portrayed with four strings, the one on the right with three (hard to make out in picture, I realize), which I ascribe to artist ease. Again, note the pairing with psaltery and fiddles, as was common in the literature.
In the 14th century, we might be able to determine the Citole form from GLOSSED ILLUSTRATIONS. First is from 14th century Brussels MS. Folio 39 has a gloss to the word lira saying "Lira est quoddam genus cithare vel est sitola alioquin deficeret hic instrumentum illud multum vulgare" - "Lira is a certain kind of cithara or is a citole; otherwise that very common instrument would be lacking here". Below it is a drawing of a four stringed instrument with a holy-leafed shaped body ending in a trefoil. It has a fingerboard extending onto the belly, and an arrow shaped plectum attached by a cord to the neck of the instrument. It also displays that strange heavy outcurved neck, so would seem to be consistant with the images that are its contemporaries. From that, we can generally assume that what we've identified as citoles so far are so.
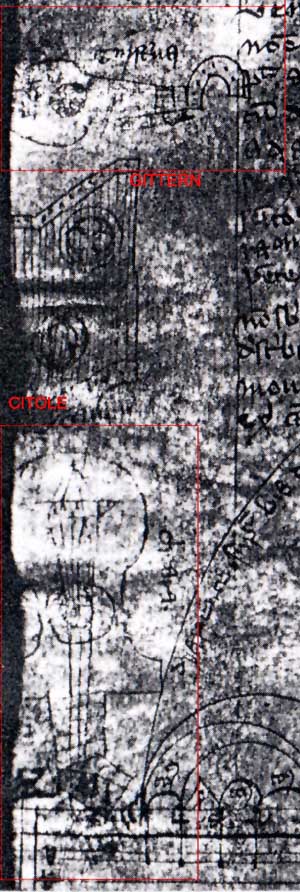
A Paris MS of the 14th century is badly damaged, but under ultraviolet light shows an instrument entitled a "chitarra" - ch/c often confused, according to this author. This shows a "winged" holy-shaped instrument with four strings, a fretted fingerboard, a bridge and and endpeg. I've noted that as "CITOLE" in modern type. Another instrument farther up the page shows a sickle-shaped pegbox on a rounded backed instrument called a "gittern," thereof showing this was what the gittern then looked like. I've noted that as "GITTERN" in modern type. The instruments seem to strongly conform with the models shown in the images above. The gittern definitely seems to be developing the rounded body with the sickle head, and the citole the winged body with simple head, but odd neck.
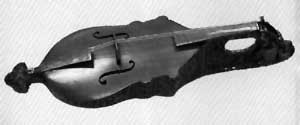
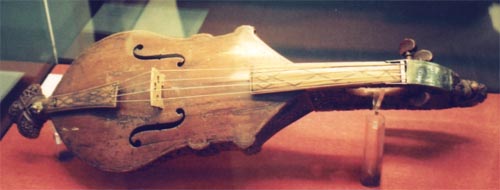
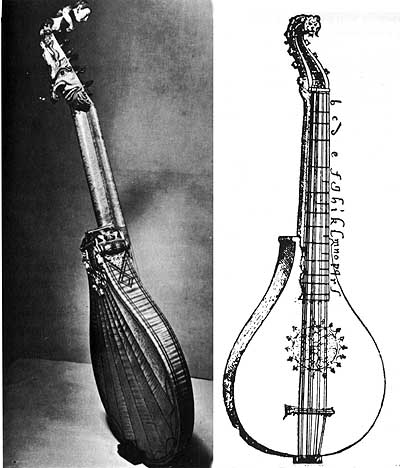
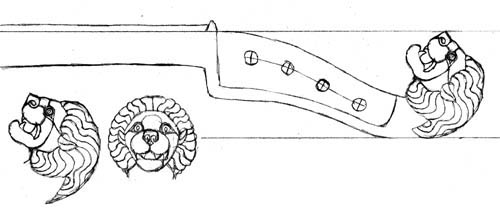
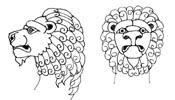
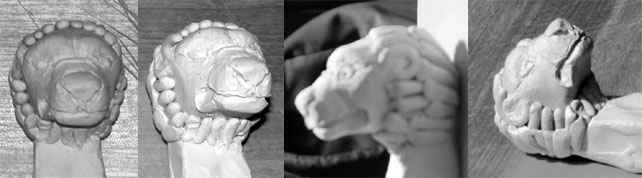
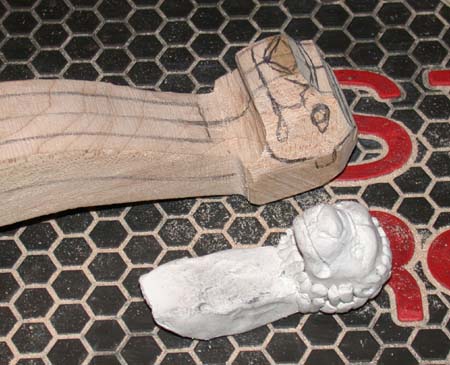
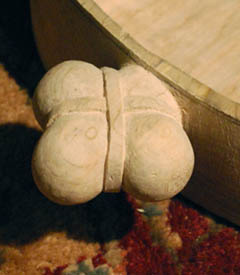
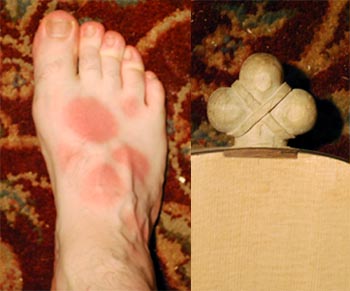
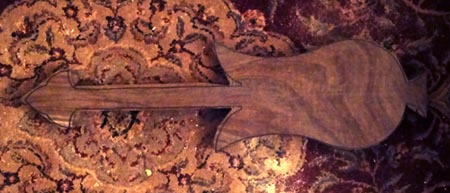
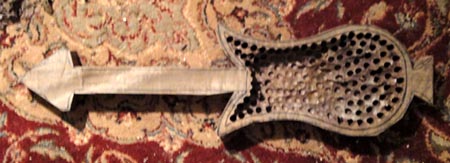
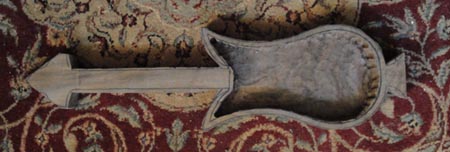
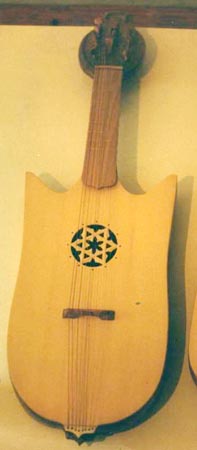
Strangely, a single surviving instrument comes from this period. The original body dates from 1330, but which was converted to a violin in the 16th Century (when it was presented to the Earl of Leicester by Queen Elizabeth I, no less). The soundboard and bridge are 16th century modifications, but the unibody and neck are from the 14th century. It is now known as the Warwick Castle Gittern, just to be confusing, as it appears instead to be a model citole! Note the large open neck, the trefoil endpiece, and flattened back. It is considered a true treasure of the middle ages, and presently resides in the British Museum in the hall of Medieval treasures, just around the corner from Sutton Hoo and just next to the Isle of Man chess pieces. The first image shows the instrument as it was originally found. The second image is a cast of the original, with an attempt to remove the violin elements and see what the original morphology might have been. The remaining three images (in color) are pictures I took of it on display at the British Museum. The carving is absolutely amazing, and the end dragon is especially fun. I included the closs-up of the neck so that some of the detail could be made out. The fact that the corner is clipped where the neck joins with the soundboard suggests that the sides of the body were originally a little higher, and that the rounding of the soundboard might have occurred when it was converted to a violin (which has a rounded soundboard) rather than an original flatter soundboard.
The latest sculpture that might be of the form of the instrument appears to be the sculpture from the nave of Beverley Minster, early 15th century, As seen here. It harkens back again to the Parma Baptistry image with its simplicity, but lacks all the secondary shapes we have seen, including the wings, neck, etc. I would say this instrument is either a proto-lute, or an archaic attempt at one of the earlier instruments. It does not strike me as a citole, especially given the extreme form which it had reached by this point in time.
By this time, instead (the 15th century, that is), it has already started moving toward the cittern, which it becomes by the end of the century.
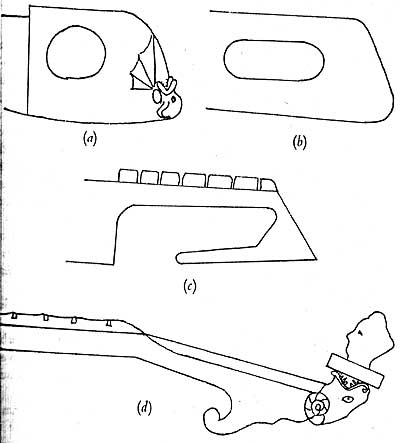
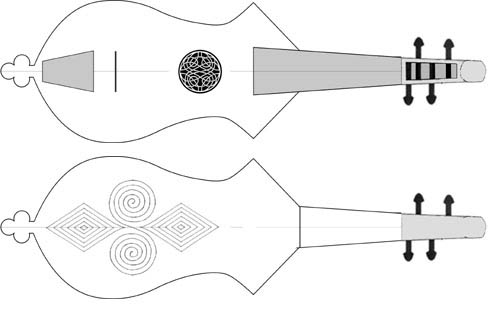
The citole is definite ancestor of the cittern. Thus aspects of the cittern can be backtracked into the citole. Lawrence Wright postulates this drawn progression. The heavy filled in neck with thumb hole of the earlier versions such as in the Warwick "gittern" lengthened into a slot (such as in the carving in Rheims Cathedral) and finally opens out, leaving a gap at the body end of the loop as in the Ormesby Psalter instrument. The resulting long hanger slowly shrinks until it becomes the traditional hook on the back of the head of the cittern. This combined with the common belief, within the period in question, that the citole was the origin of the cittern, point heavily in that direction. The cittern even has vestigal "wings" still left as small scrolls at the corners of the top of the body. See the image below.
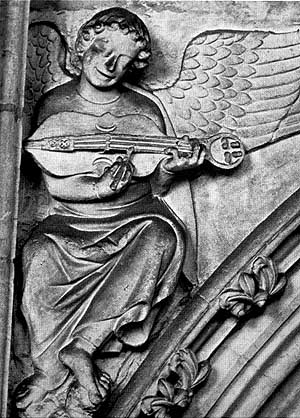
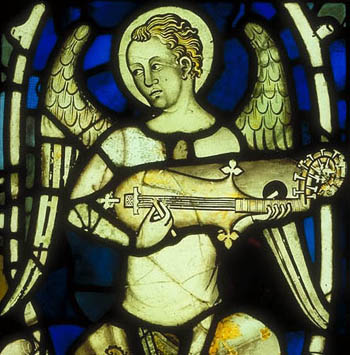
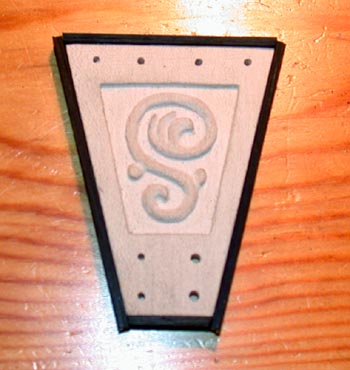
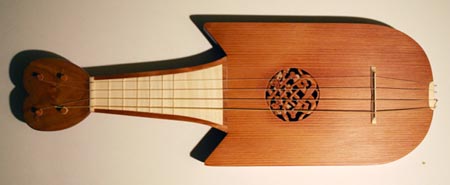
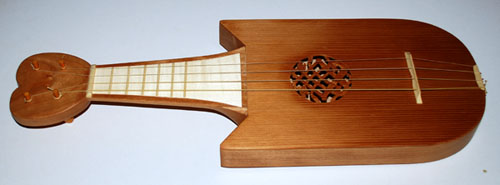
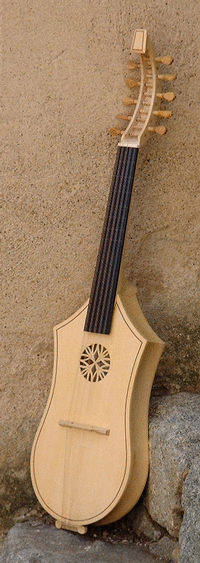
Thus, this last image, from the Queen Mary Psalter, shows the instrument in its most ideal form. Flat body, fretted fingerboard, with wooden frets (or bone, etc.); four strings of metal (per Tinct.); a holy-leaf shaped body with slight waist, winged projections at the top of the body, and a small trefoil at the the end tip. All plucked with a arrow shaped plectum of bone or wood, sometimes of an elaborate design.
ISSUE OF STRINGS AND TUNING
Possibly the most complicated issue in old instruments is what they were strung with and how they were tuned. Very few sources of information exist on the exact materials that any given instrument was strung with, and even when we do have sometimes very detailed descriptions of the instrument, we don't get much info by way of how it was tuned.
On the strings, modern reconstructions of the instrument have been done with both wire (silver, bronze) strings and with gut (usually sheep's gut, though ram, pig, and calf all show up in the medieval descriptions of "how to make gut"). The question of choice between these two comes down to two arguments. For metal strings, the lyre like instruments that preceeded the citole and from which it developed were metal strung, as were the citterns that descended from it. Continuity would suggest that the citole was metal strung. The heavy plectum depicted, along with the description of bone or wood frets would also suggest metal strings (heavy plectum not damaged by sharper strings, and tied gut frets not cut by them). Tinctoris' description above from "De Inventione et Usu Musicae" from 1487 speaks of four metal strings. The lateness of his date, however, makes it a harder to guess if it was always strung so - he is speaking of an instrument that he considers archaic at his time, but at a time when the metal strung cittern is already appearing (the re-entrant tuning he suggests for his cetula is more reminiscent of a renaissance cittern than a medieval instrument). However, generally speaking, the only instruments ever described as being metal strung in the middle ages are harps (including lyres, cithara, and the Irish, Scottish, and Welsh harps) and psalteries. All the lute-like instruments, including the proto-lutes, fiddles, etc., are all specifically described as being gut strung, with tied gut frets (or no frets). There is one specific reference made by Jean de Brie in his Le Bon Berger of 1379, a little closer in time to the heyday of the citole, which states that gut strings are best for "vielles, harpes, rothes, luthz, quiternes, rebecs, choros, almaduries, symphonies, cytholes, and other instruments that one makes to give sound by means of the fingers and of strings." This sweeping statement is the only direct mention of with what a citole might be strung during the time of its use, and almost, because of its broad encompas, may not be trusted (for example, there were wire strung harps and rothes, though not in the geographic region where he lived). But given that this is the only evidence that we have, I think that we are stuck with a situation that could go either way. For my reconstruction, I am chosing to go the way of gut, partially because I think it is probably more accurate to an earlier period instrument, and partially because its the sound I want from the instrument.
On tuning, we have two authors that give up potential hints. The anonymous author of the 14th Century Summa Musicae notes that fingerboard stringed instruments "are tuned in the consonances of octave, fourth and fifth, and that by putting down their fingers the players of these make tones and semitones for themselves." Thus we might see the instrument tuned in alternating 4th and 5ths, or in 5ths, or in octaves, such as g d g' d' or as d a d' g. This produces easy drone style chording that was popular at the time. Jerome of Moravia, writing in the late 13th century, discusses a similar style of tuning for fiddles, and he provides several tuning options for the 5-string fiddle using very similar structuring. Given this, an "open tuning" for the citole - something like the g d g' d' - would be appropriate, as opposed to a mandolin like tuning (or violin like) of g d a' e'. We also know that it was fairly commonplace to retune the instrument into the key and structure of individual songs, so a specific fixed tuning isn't truly necessary, but this at least gives us a point of reference.
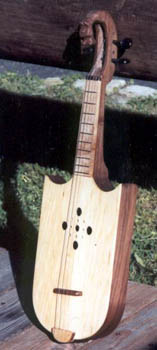
MY RECREATION
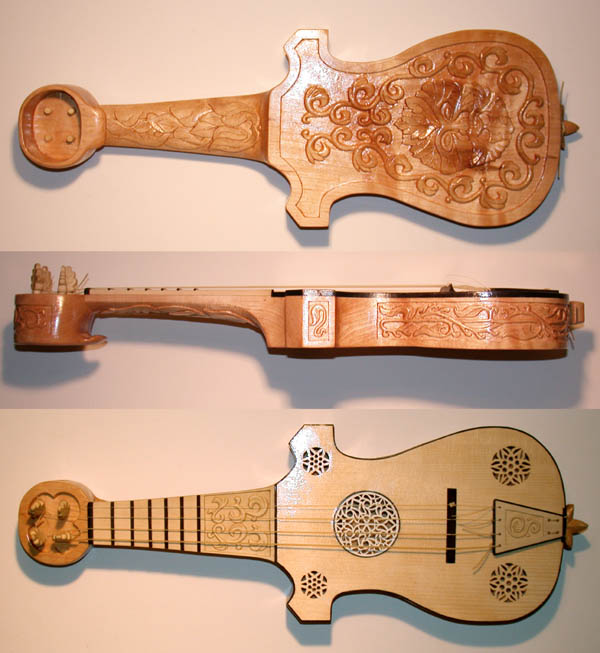
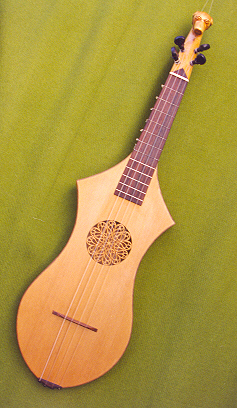
So, gathering from all the variations above, we can compile a sort of summary of forms that I can work from to do my recreation of the instrument.
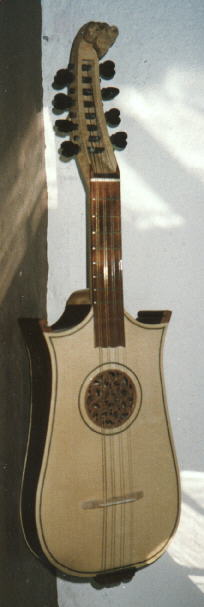
The consistant elements of the instrument appear to be the fretted neck, a central rosette, a tailpiece of some kind, a bridge, some sort of projections at the shoulders of the instrument, and four strings running the length of the instrument, fixing to an endpeg or tailpiece, and to pegs in a pexbox. The Parma sculpture, which has been used as the basis of most recreations I've seen, is only vaguely typical. It does not demonstrate the waisting evident in practically all other versions of the instrument. The Exeter Cathedral version shares that seeming atypical feature, perhaps because of the simplicity of the overall sculpture. I don't think a "representative" instrument could be directly based on either, though they of course add to the overall impression/morphology. I would also like to represent the instrument in its heyday, around 1300, so the Parma version (the earliest form/date) also seems a bit out of the direct running.
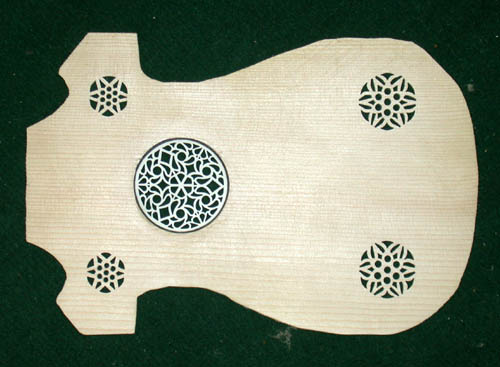
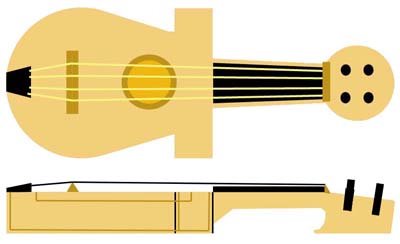
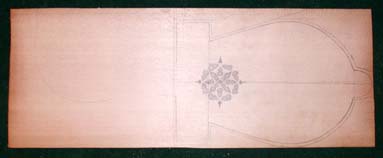
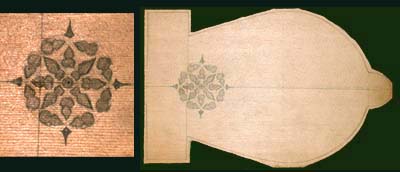
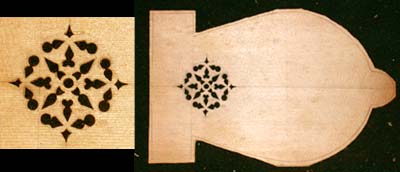
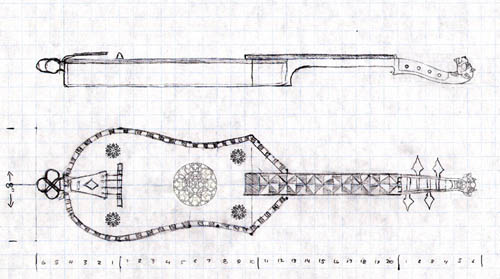
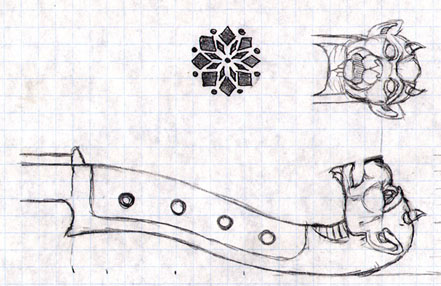
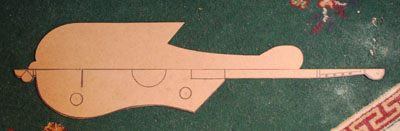
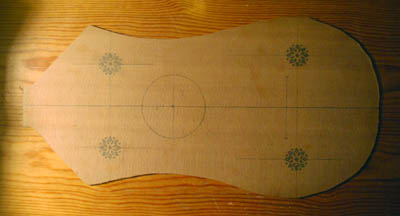
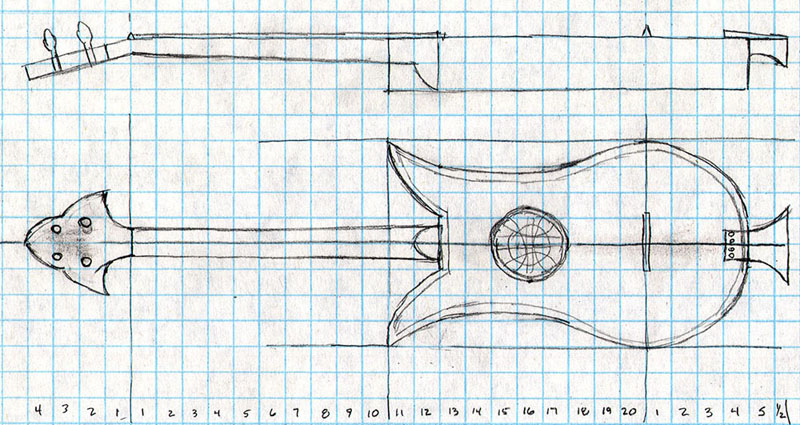
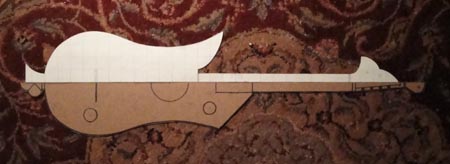
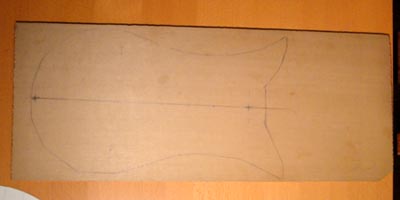
I have decided to kind of average the Cantigas, the Strasbourg, 1310 English MS, and 14th Cent. Paris MS forms into a kind of sampled final lines. As the rebec I made was a peasant style instrument (very simple lines and no decoration), and as the one surviving example of the instrument (the Winchester Gittern) is extremely ornate almost to the point of absurdity (and even dates to 1300 or so), I have decided to make this a more elaborate instrument, with more rich decoration. I have found and acquired tools for some detail work, and have found a supplier of legal ivory and mammoth ivory, so I plan on doing a richly inlaid instrument, with some carving and decorative work. The widest piece of spruce I can get for the soundboard is 20cm wide (to keep it in one piece), so that fairly determines the baseline dimensions (20cm wide!). The final finished plans are below. For those interested, you may click on the image to get the hi-rez printable version, which should print at 1/2 scale (though a ruler is provided on the image to scale it appropriately). That file is large (like 900K) so it may take a while to download.
As I plan it now, the bridge, tailpiece top add, and inlays on the corner trefoils will all be ivory. The carved head will be added on as a separate piece, but will be carved out of the yellow cedar I'm using for the body (from the cutoff scrap). I will probably inlay the face, or something like that. The frets in the original were to be wood or bone - I will continue to use the ivory for them. I conveniently found a program to calculate fret spacings for a chromatic scale of any length, so that is what the fret spacing is based on - it is chromatic, as opposed to the probable period diatonic. Also, the backplate, much as in other instruments, will probably also be decorated. This will either be an inlaid pattern of holly leaves (echoing the shape of the instrument), or some kind of acanthus vines. I will put up that design when I have a chance to work more with the ivory for the inlay, and see what is realistically possible. There is also a good possibility I may carve a pattern of leaves into the sides of the instrument (wrapping around the back curve), but that design has yet to be exactly worked out.
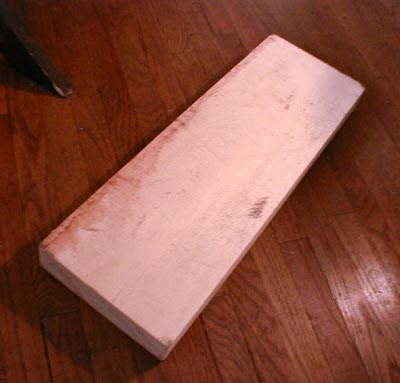
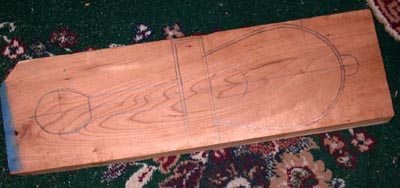
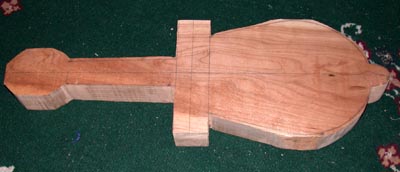
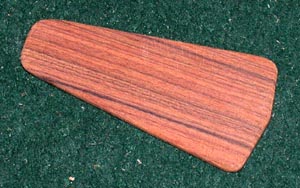
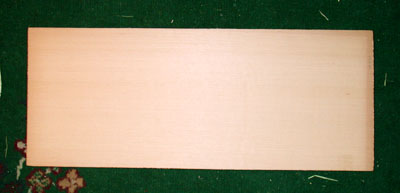
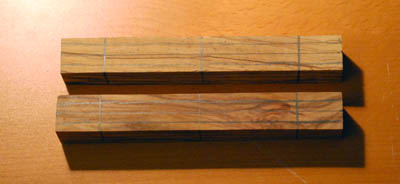
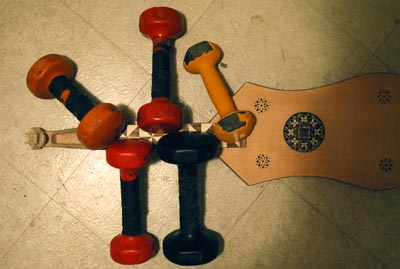
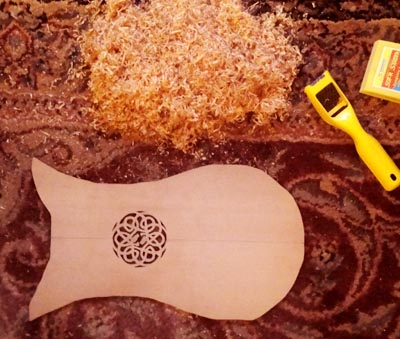
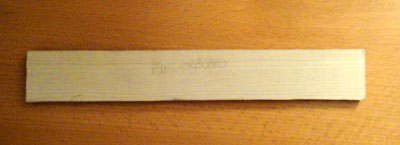
So we now start with the block of wood. In this case, I've chose a nice block of yellow cedar that I acquired from NW Wood at a very reasonable price. It is close grained for a nice dense piece and good stiffness, but is significantly softer than the rock maple I used for the rebec, and I feel a need for something a little softer to work in for the intricate carving necessary in this piece. If it turns out that this is TOO soft, I will try to again get a maple block, but I'm hoping this will work. The pure untouched block is here:
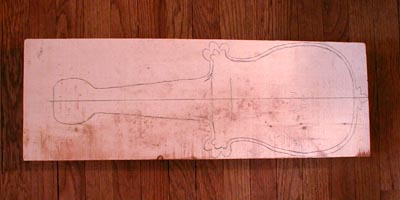
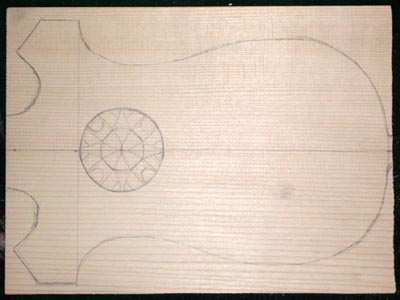
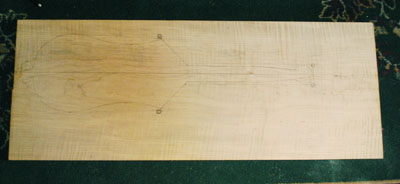
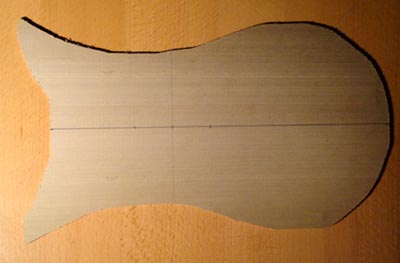
First, I draw the body plan on the wood.
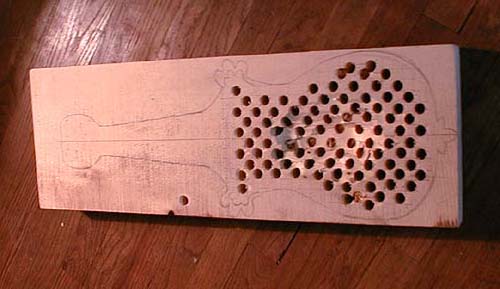
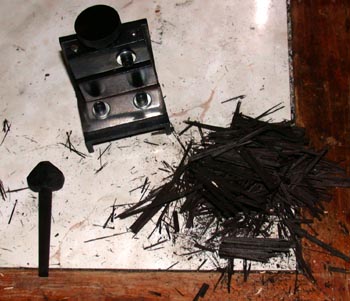
Second, the hollowing out of the body cavity. This is easier to do first, when the block isn't rounded or having pointy bits on it - a lesson I learned from the rebec. Unlike with the rebec, I am not concerning myself with using only "non-power tools", so I will be drilling out a good portion of this with a drill as follows:
I drilled out a mosaic of holes over the area to be hollowed out, using a drill bit that I had put a kind of stopper on to keep it from going in too deeply. This could have also been achieved by using a drill press - but I only have a mini drill press that would not take a bit any bigger than 1/8 inch, and wanted to work a little larger than that. These holes are 3/8 of an inch. This took about an hour and a half, between drawing out the mosaic and drilling the holes. One thing with working with the yellow cedar - the entire house smelled of cedar for two days after doing this!
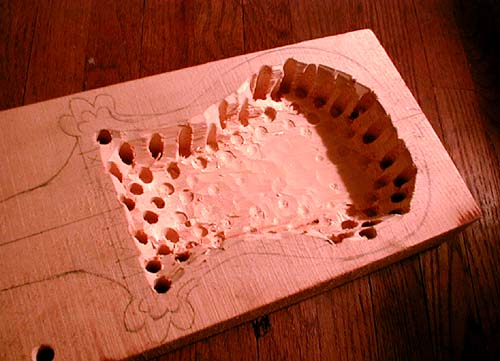
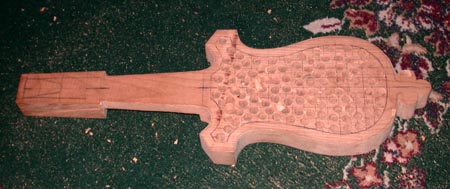
Next, I took the scoop chisel to it and whacked out the inbetween spaces. Since the wood is already "cut" at the drill holes, its easy to take out large chunks quickly, simply snapping them out. Also this wood is a LOT softer than the maple I used for the rebec (and for the vihuela neck and head, which I'm also doing presently and kicking myself for not using the cedar for), so it works much more quickly and easily. This picture shows how much I was able to cut out in one evening's work.
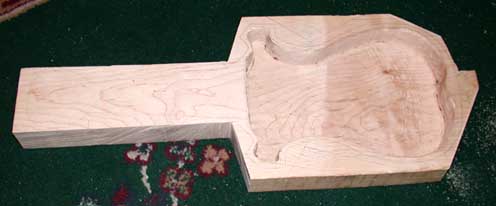
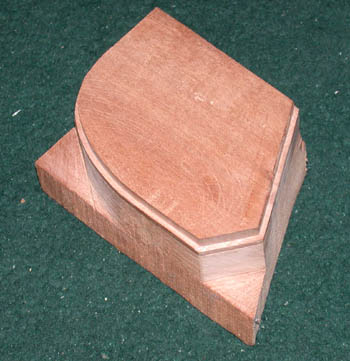
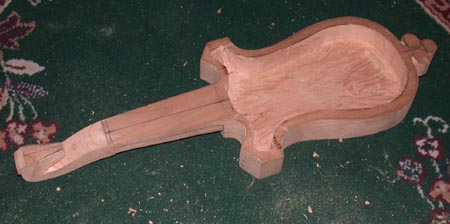
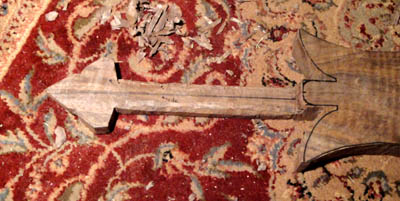
The remaining bits, including right-angling the rest of the sides took a bit more work and about three more sessions of whacking at it with the chisel, but the final roughed out hole can be seen here. Before sanding it down and working out the area of the trefoils, I intend to cut out the instrument from the block. That way I can thin the walls with better control.
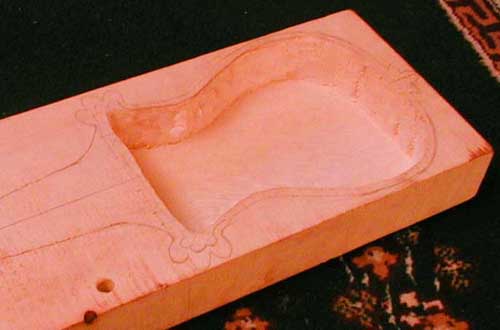
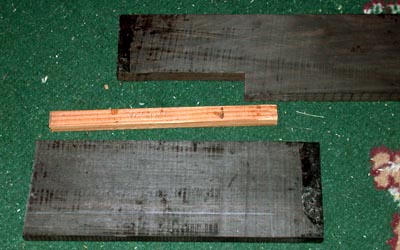
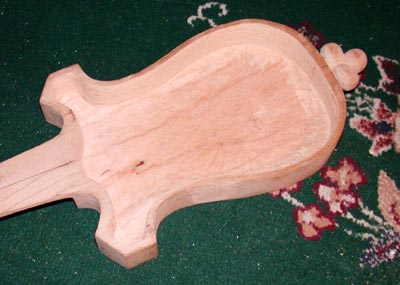
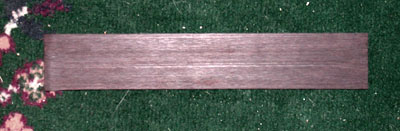
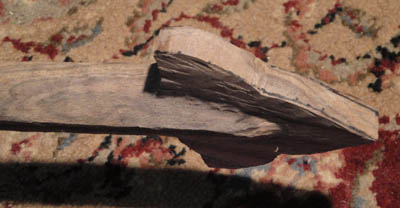
Third, I cut the body out from the block of wood with a hand saw and a coping saw (the scroll saw I have won't get through the almost 3 inch thick wood of the body - its just a little too thick). Unfortunately, in the process, disaster strikes! There is an internal crack in the wood, which emerges as I cut the wood out. I have it separated out here to show it (held apart with a screw). Bummer. Well, back to the starting block.
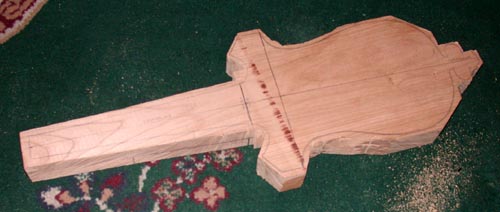
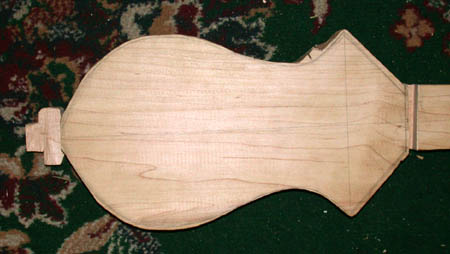
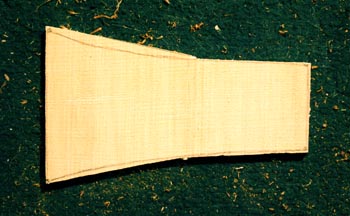
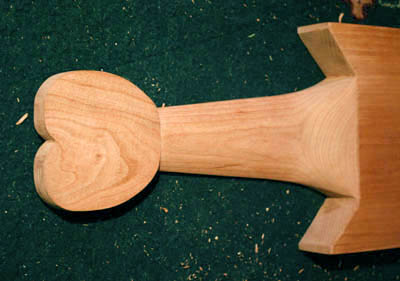
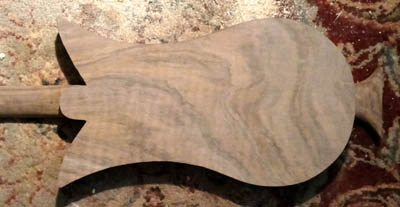
As of this point, I have acquired another block of wood (actually two, in case this happens again) to begin work again. This block is eastern maple, and is a bit harder than the cedar, but no where near as hard as the tiger maple of the rebec. In a recent trip to England where I got to look at a couple of originals and reproductions (see the Warwick Castle Gittern photos above, for example), I have decided to redesign the instrument a little bit. First, I am thinning it down from three inches thick to just over two inches thick in the body. Partially done for ascethetic reasons, partially because almost all of the examples of reproductions I've seen so far have been only about 2 inches deep, and partially because it makes sawing the thing that much easier. I've also decided that the trefoil corner designs are more abnormal than standard, and have decided to square them off more, something like an averaging of the Queen Mary Psalter rounded corners and the 14th cent. Paris MS drawing. The trefoil design will still appear in the inlay.
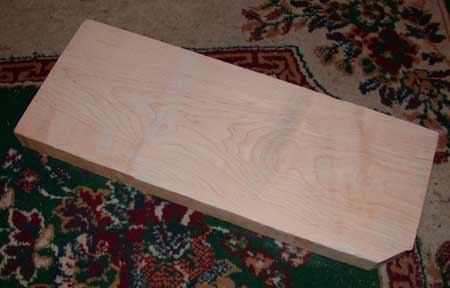
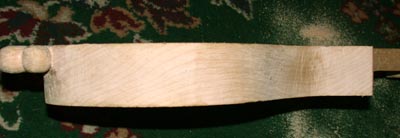
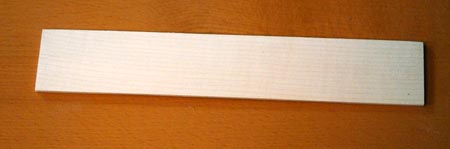
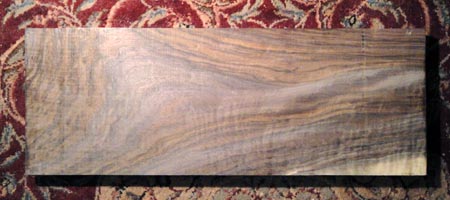
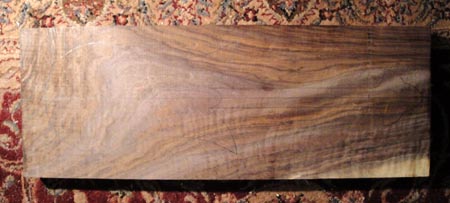
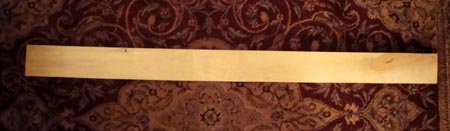
Here is the new happy maple block. It is eastern maple, measures 22 3/4 inches long by 8 3/4 inches wide by 2" thick, and weighs a whopping 10 1/2 pounds! I sawed a corner off of it to see if it was as hard as the tiger maple from which the rebec was made; it proved softer, but still a lot harder than the cedar. Still it was workable, so I began.
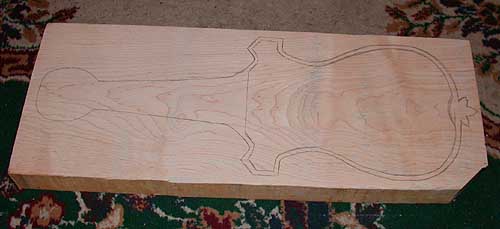
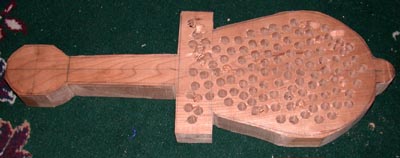
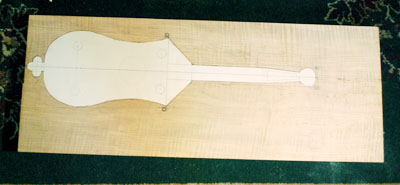
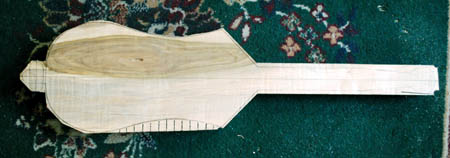
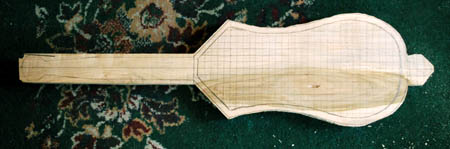
Step 1: draw out the pattern on the wood. I had to sand off the sealant that was on the wood to get a good look at the grain. I tried to let the grain pattern of the wood dictate the orientation of the instrument. The large whorls I tried to roughly center the body-cavity on, and where the grain draws thinner I aimed the neck. Note also the more squared off corners as I was mentioning earlier.
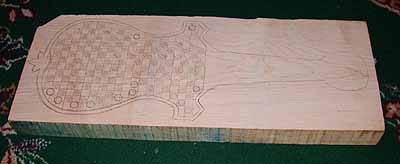
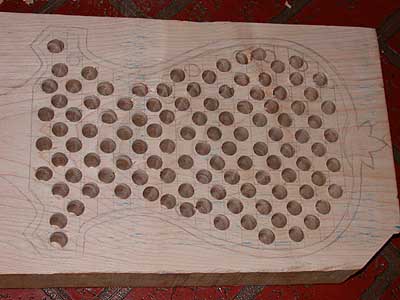
Next we draw the mosiac to drill out the holes. It makes it easier to do quickly. I don't necessarily follow it exactly, but it acts as a decent guide. The blocks are 1/2 inch squares.
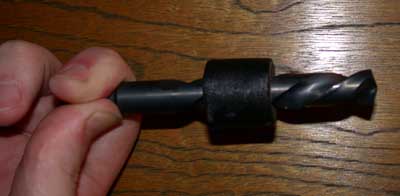
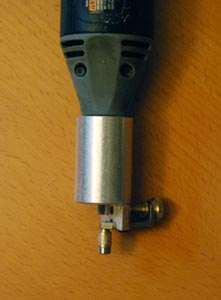
Then I take a 1/2" drill bit and add a "stopper" onto it, as seen here. I'm only using a hand drill, so I use this method to keep from drilling too deeply into the body. The depth is set at about 1 5/8 inches or so. The stopper is made with cloth tape.
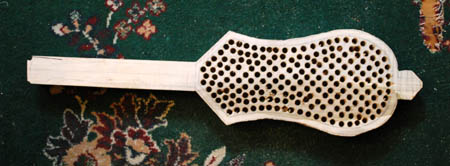
Step 2: drill out the holes as best I can. The maple is definitely a lot harder than the cedar. This took three sessions of drilling, as the drill super-heated very quickly trying to bore through the wood, and I think by the end the drill bit had been dulled somewhat, as it seemed to be chopping though the wood rather than slicing through it. Nonetheless, it has been accomplished. My wife claimed that the smell here was of chocolate chip cookies baking.
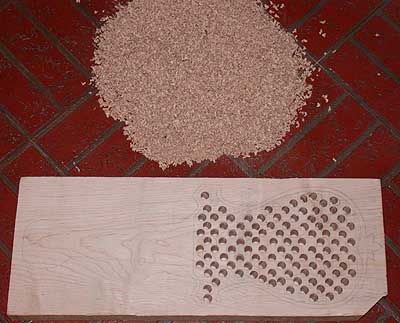
And yes, it makes a lot of saw dust! We decided not to give the maple pile to the bunny... Here you can see the instrument in total with the drilled holes.
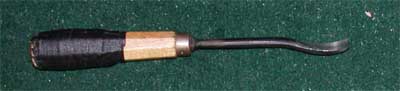
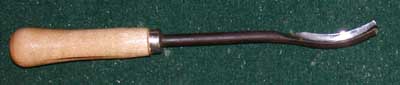
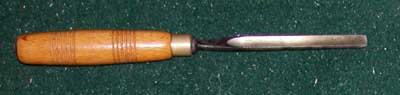
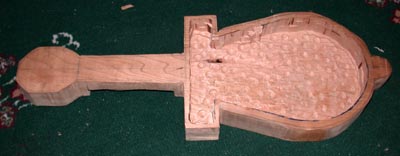
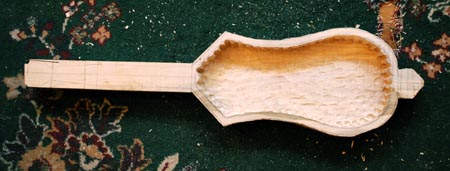
Next comes carving out that space cleanly. For this, I used a couple of tools. The primary gouging was done by a 1/2" straight edge scoop gouge shown below. As you can see, it has seen a lot of use, and the handle has been practically beaten to death, thus the tape wrap. For the smaller corner areas, the V scoop gouge proved effective.
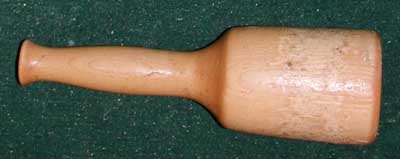
The most difficult portion of the hollowing out was actually getting the back and front walls vertical, as this meant direct cutting perpendicular to both directions of the grain of the wood. The larger 1/2" scoop was just dulling itself trying to cut into that, so I used a small 3/8" curved (about a 20 curve)chisel hammered straight down to try to shape the walls. That is the one below. With it see my happy new mallet, of really hard maple. The marks you see on it are just scrapings of the wax that coats it - the wood itself hasn't been dented yet! Works MUCH better than the normal hammer I was using before.
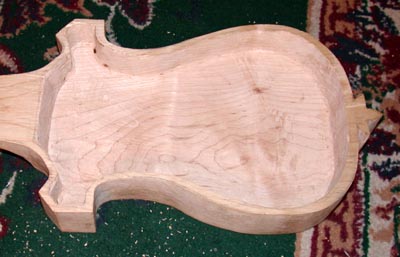
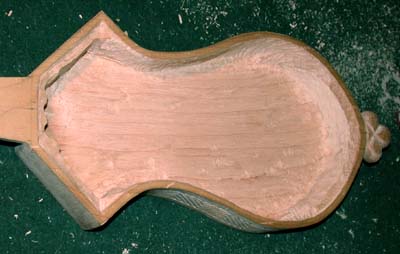
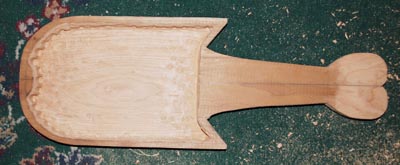
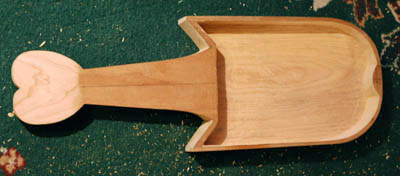
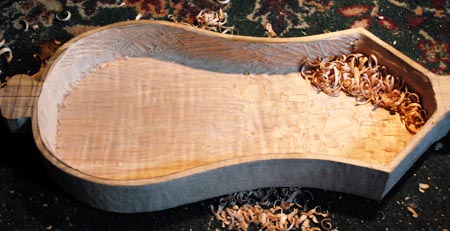
And the finished hollowed space. I've run a plane over the floor of the hollow to basically smooth it, and used a rotary tool sander to smooth out the side walls, resorting to sandpaper in a couple of corners. The floor has been left about 3/8" thick. About 1/8" of that will be lost to smoothing and leveling the bottom, and at least another 1/8" to the relief carving that will be done on the bottom of the instrument.
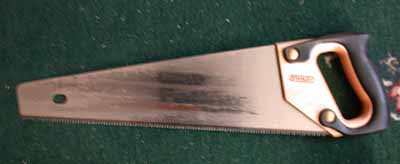
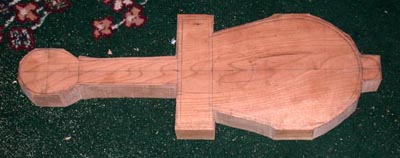
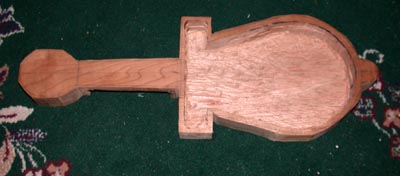
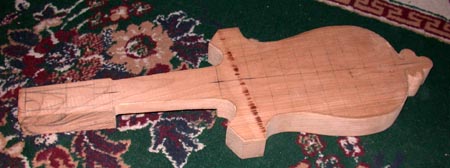
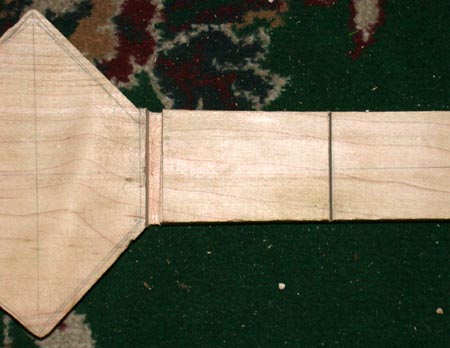
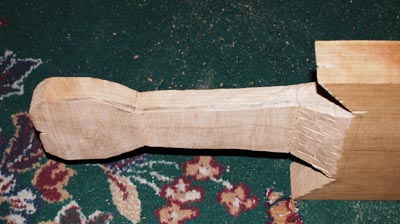
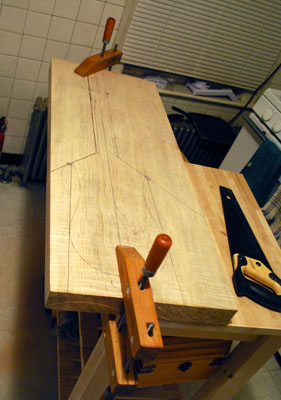
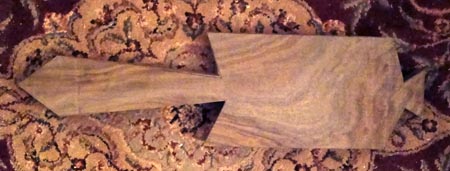
Next is to cut out the rough shape from the block of wood. For this I am using my trusty Stanley Saw, shown below. Cutting through the maple is tough, harder than the cedar, but still easier than the tiger maple of the rebec. Also, this saw is a lot better than the one I was using to cut the rebec block. This is with the first couple of gross cuts done.
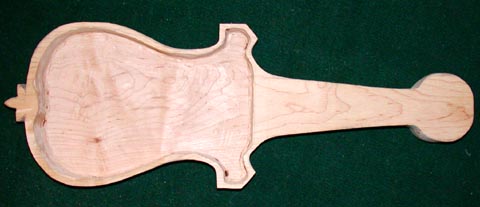
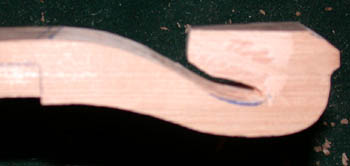
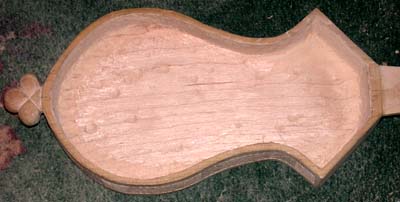
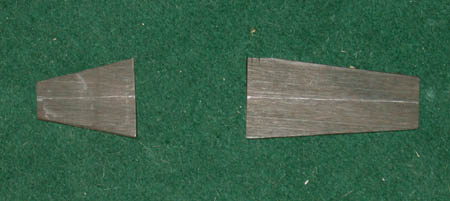
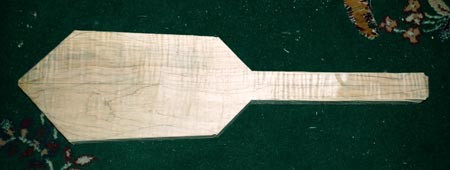
The remainder of the outer body shaping was done with a combination of the big saw (cutting out the indents on the sides), coping saw (used mostly around the tail trefoil), chisels (straight edge and curved edge to shape various bits of the sides), my heavy handled file (to straighten out the wings, and to do final shaping all around), and a small amount of rotary tool work (mostly to clean up the tail trefoil and the indents between the neck and wings).
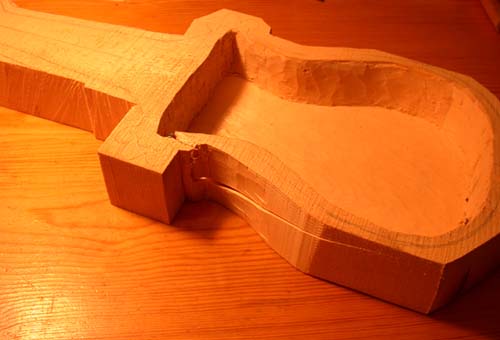
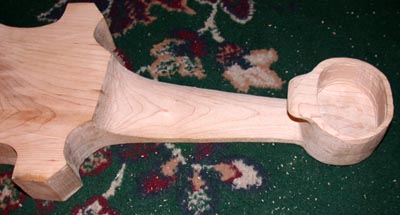
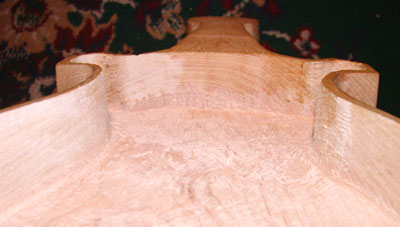
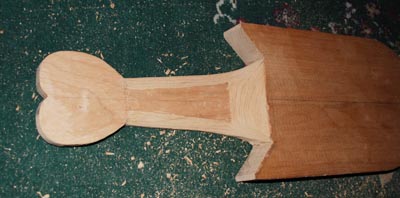
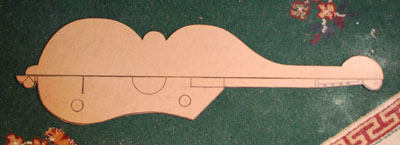
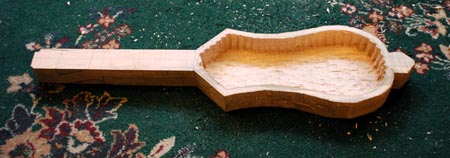
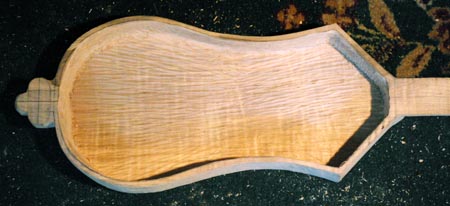
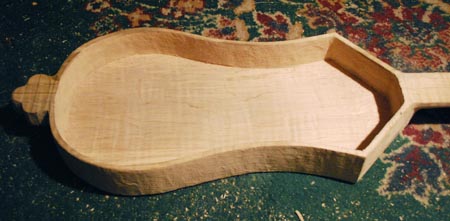
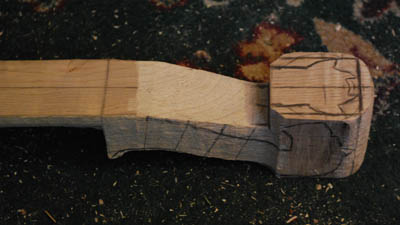
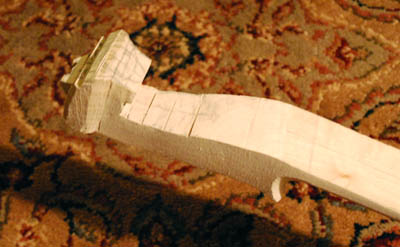
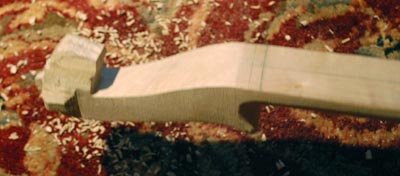
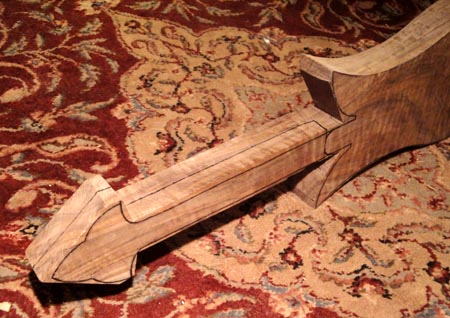
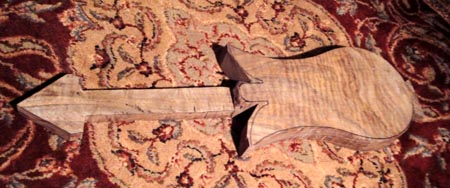
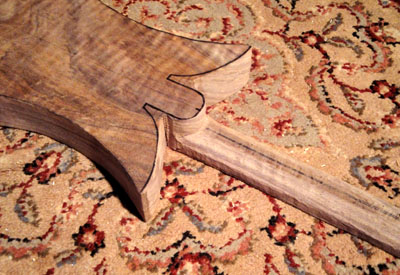
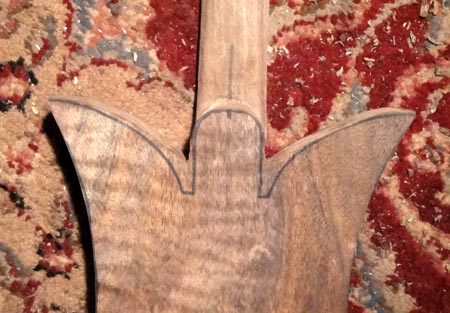
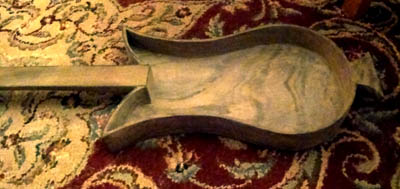
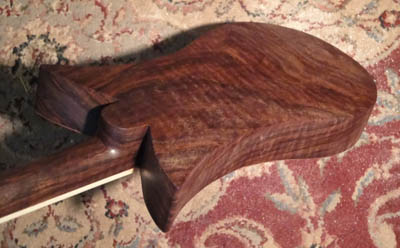
These two images show the more or less final outer shape of the body. The angled view shows the tail trefoil going all the way to the bottom of the instrument. The original plans had it only going half-way down, but I think it looks better this way, and the tail trefoil of the Warwick gittern was the full thickness of the body, so its probably more accurate. I've started thinning out neck - still needs some thinning out from the images that are here. But the pegbox has its fully rounded shape, the wings are clean and crisp, and the curve of the body is in its final form. The walls have been left a little thick, especially at the tail end, to accommodate the relief carving that will be done on the sides.
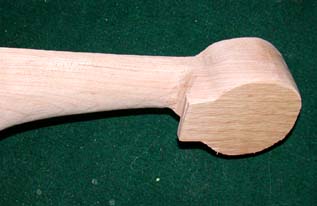
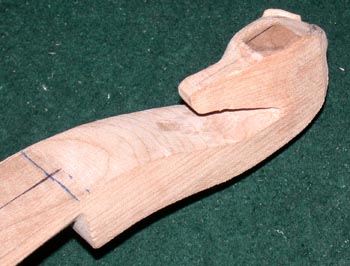
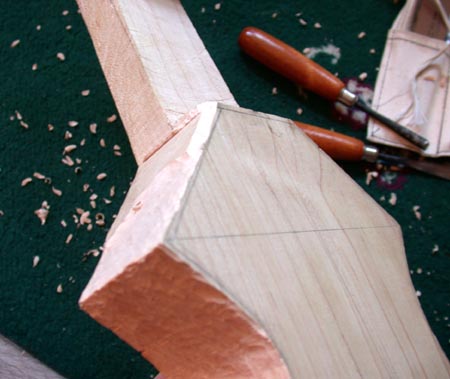
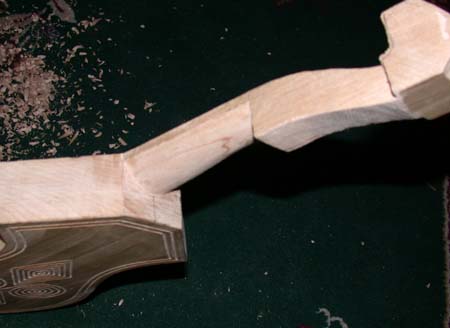
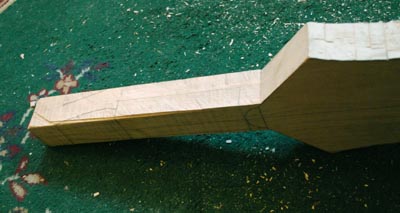
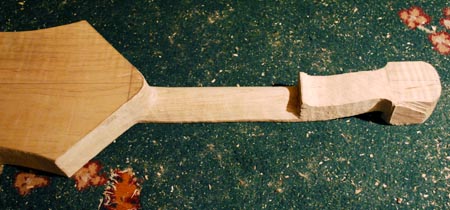
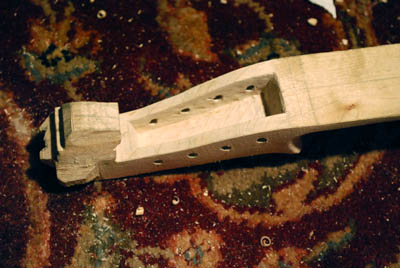
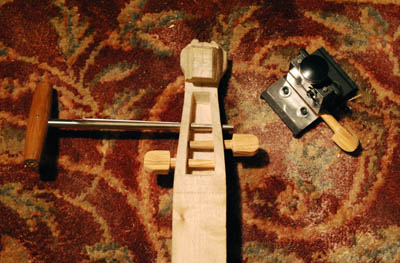
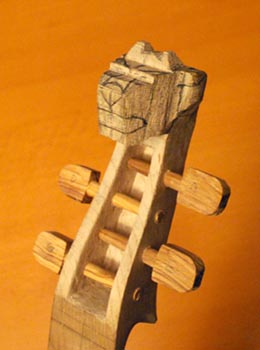
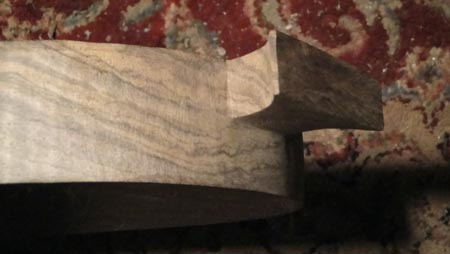
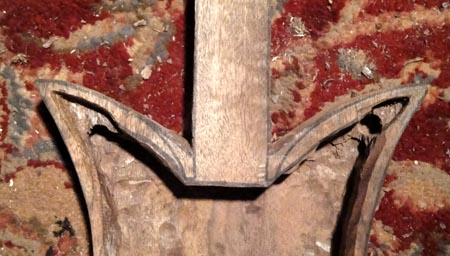
The next bit on the body is to fully shape the neck and the pegbox. The pegbox starts out as a thick cylinder with a stubby tail pointing back toward the body. I need to carve out more space in the "hook" of the tail, enough to fully get my thumb in there (as that is the described method of play) easily. The neck also needs to be significantly thinned out (mostly with chisels and the big file). Next the back of the pegbox needs to be hollowed out from behind. This is done 1.) to lighten the instrument significantly and 2.) so that the pegs don't have to get through two solid inches of wood - rather only a half inch or so. Images of that will follow shortly.
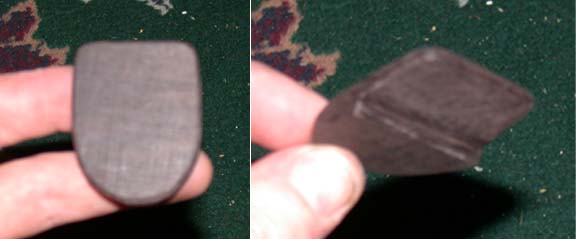
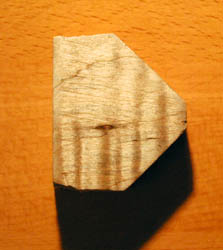
Meanwhile, I also did a quick test to see if carving the sides was feasible. I hadn't tried carving the hard maple yet to see what can of detail could be done, so before I wrecked the main block, I decided to do an experimental bit on some of the scrap blocks. This is a piece that was cut from the neck area, and is about 2" tall. I tried roughly carving out a fairly standard ivy leaf pattern (much as shows up on the borders of contemporary manuscripts), and it was a lot easier than I was expecting. I did a little bit of experimental binding on the top (of ebony) just to sample that a bit, and that also proved rather successful. So the instrument will indeed be carved on the body sides and back.
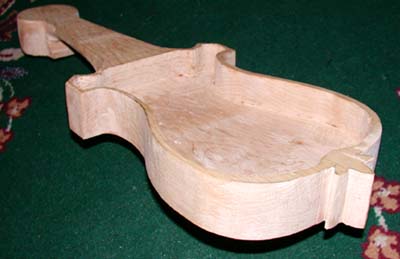
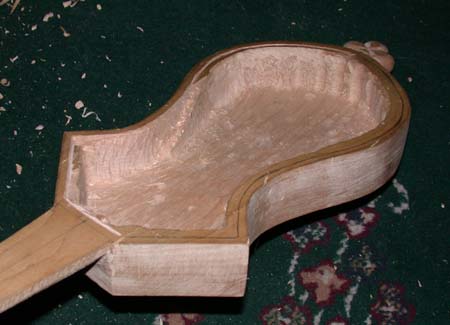
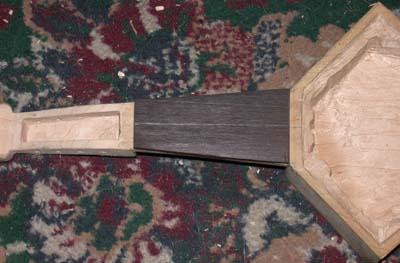
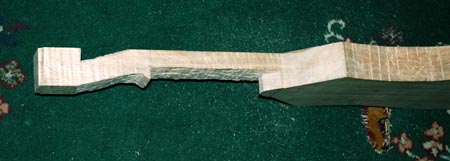
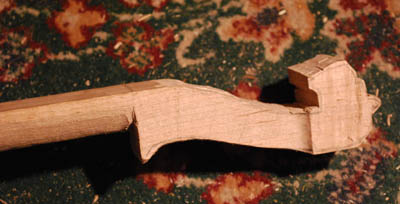
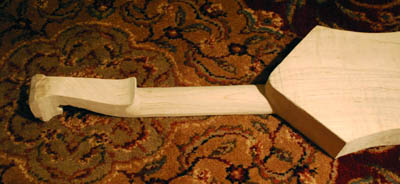
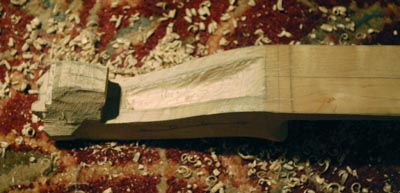
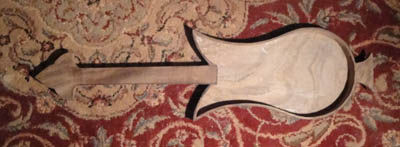
This is the roughing out of the neck and pegbox complete. The neck has been fully thinned and rounded somewhat. The hook has been sliced out and curls slightly back toward the neck. This was done with a combination of my new mid-sized chisels (more on them a little later when I do the side/bottom carving), the heavy file (which actually removes a surprisingly large amount of material quickly), and a some work with the dremel sander bits, which helped smooth out the hook joint and the hard angle where the neck and body meet. The hollowing of the pegbox was rather successful, and was done in a similar fashion to the hollowing of the body. I drilled a series of holes in the space, leaving about 1/2-5/8 of an inch at the bottom for the pegs to penetrate. Then chisels were used to chop out a fair amount of the wood in the interspace between the drilled holes. However the narrow deep space was hard to straighten the walls easily (not enough space to maneuvre with the chisels, so I resorted to the router attachment on the dremel to router the walls to straighten them (you can see a couple of the router ridges near the bottom on the photo). All this has yet to be sanded, of course, pending the surface carving.
Back on the other side of the instrument, with the neck shaping mostly finished, I was able to extend the body cavity forward toward the neck another 1/2 or so (removing more weight - yeah!), and decided that with the tail trefoil extending to the bottom of the body, I didn't need the back wall of the instrument to be quite so thick, so I thinned that down to the smooth curve of the rest of the walls (compair to the "outer body" image above to see the differences).
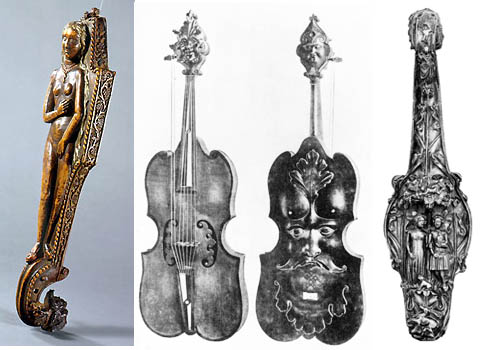
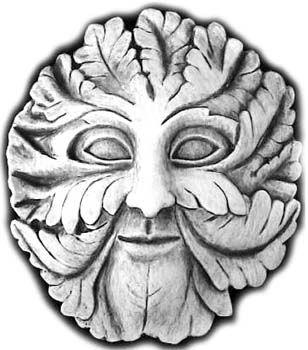
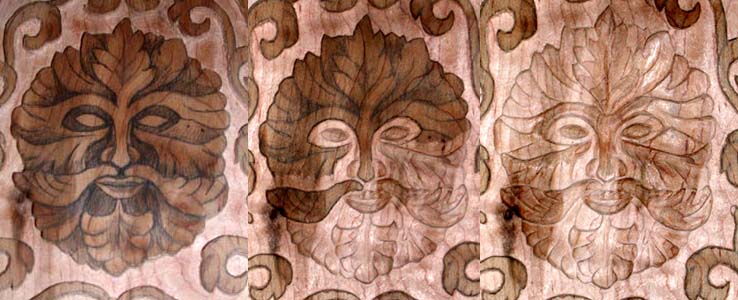
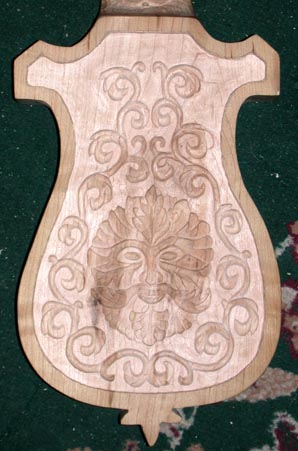
So now that the body has been fully roughed out, the detail surface carving can be added. Like the Warwick Castle Gittern above, instruments were often highly decorated in relief carving. For additional examples, I have here the Venus Rebec from 15th Century Venice from the Kunsthistorisches Museum in Vienna (note particularly the side floral carvings), a lyra di Bracchio from approximately 1500 (present location unknown), with a wonderful greenman theme, and a 14th Cent. Italian Citerone from the Metropolitan Museum of NYC with a pair of lovers hidden amongst the elaborate greenery. I have decided to carve some designs on my instrument to make it more of a noble instrument.
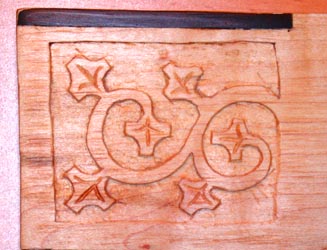
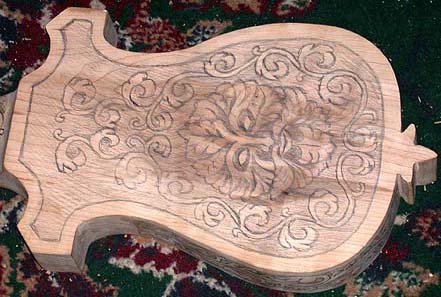
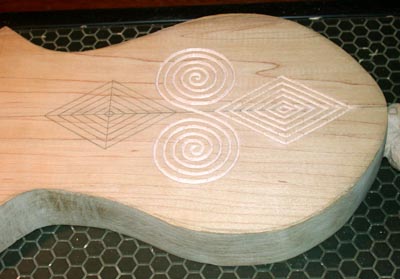
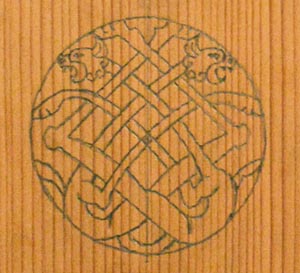
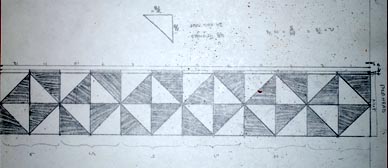
In keeping the with the "holly leaf" theme, I've decided to decorate the instrument in a leaf theme. Several areas of the instrument will be carved: the back plate will bear a greenman design with leaf pattern around it, the sides curling up to the wings will have a leaf motif relief carved into them, the neck will have some leaves curling up it, and the endplates of the wings will have some leaf patterns carved in. I decided to try to mimic fairly directly existing historical patterns. To that end, I found the leaf border pattern from the 14th century French Book of Hours above, and a pleasent Greenman from LeMans Cathedral in France. Using as a reference point, I will draw up the designs to put onto the citole.
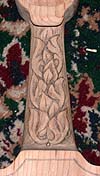
Here are the pencilled designs I plan to carve into the citole - perhaps went a bit overboard, but looks really nice to me. Wrapping around the curved sides is the leaf pattern from the Book of Hours. It will probably prove the toughest to carve, as the curved surface will be difficult to work with. One the back plate I have centered the greenman in the lower body - he's a variation of the LeMans greenman, but still has a strong resemblence. He is surrounded by swirling leaf patterns designed in the same mode as the leaves on the sides of the instrument. The neck has similarly been decorated with curling leaves stretching up the back of the neck. I plan to start on the neck, as it should be easiest bit to carve (grain is going with me, and even though slightly curved surface, there is little danger of carving too deeply).
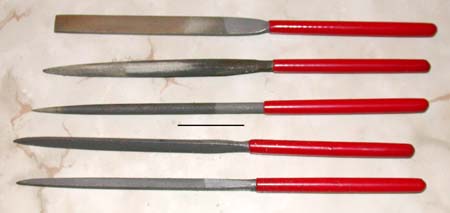
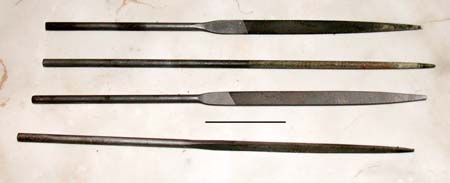
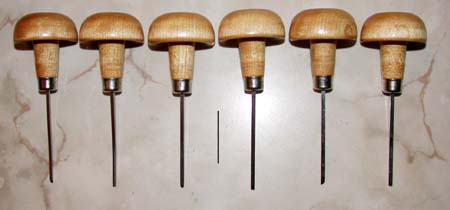
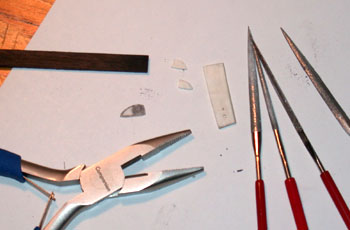
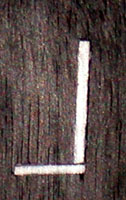
Tools, tools and more tools! The images here are of the the medium, small and micro tools I'm using to do the carving. The files with the red handles are the medium files, used for some cleanup of edges and shaping of the body. The small metal files are used to do some cleanup and shaping of the small carving. There are also the micro-files (also red handled, but REALLY tiny - most only 1/16 of an inch across) that you'll see below with the rosette carving in the ivory. The black line in the image is one inch long, for scale.
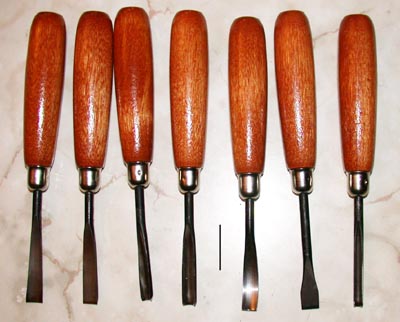
There are also three sets of chisels. The large set is used to shape parts of the body (including the heal, neck etc.) and for gross removal of wood on the neck and sides carving areas. The dark handled small chisels are the primary carving tools (most are about 3-4 mm across) that I use to shape the forms. The light handled micro chisels (about 1-2 mm) are for working in the really tight corners, or for carving the lines. They also will help with the rosette carvings. The black line in the image is one inch long, for scale.
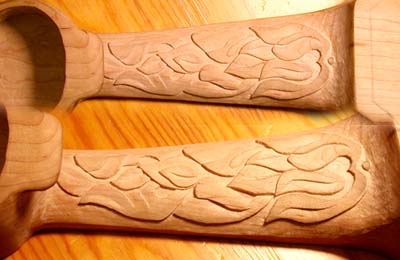
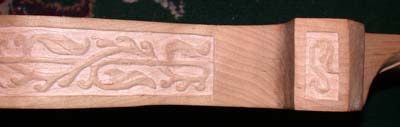
Here is the relief carved neck. Primary carving was done with the small chisels, additional finishing with the small and micro files. Final sanding will wait until I get the rest of the carving done (I only want to do one long sanding pass), as I also want to do a little dremel work on the peghead and the neck/body joint. Came out pretty well. Next up will be the back (the greenman).
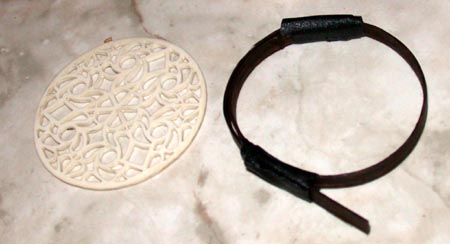
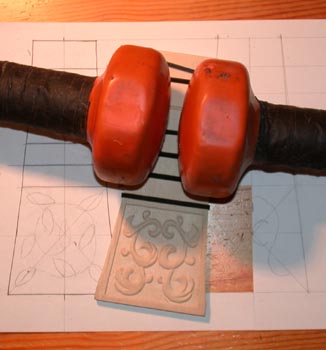
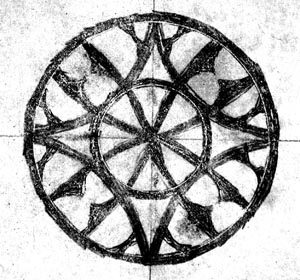
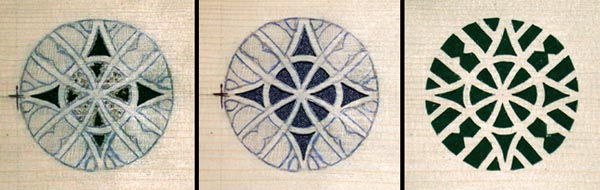
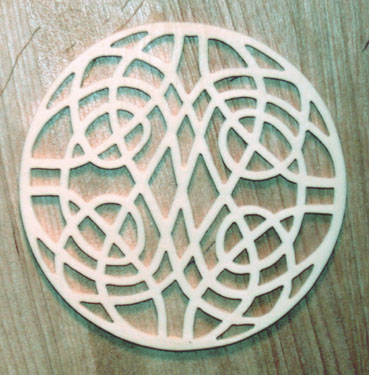
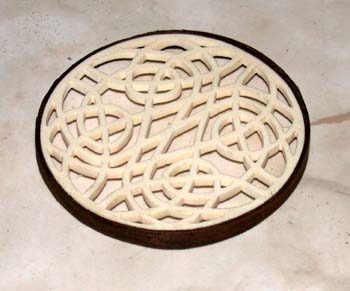
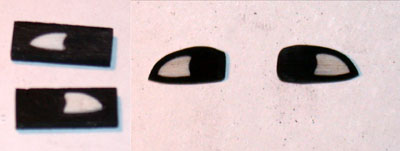
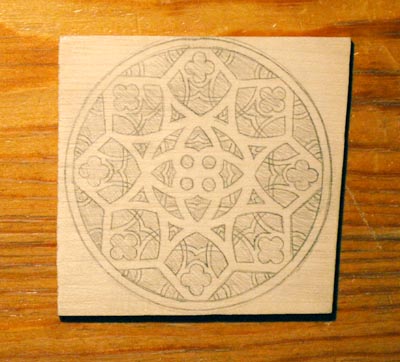
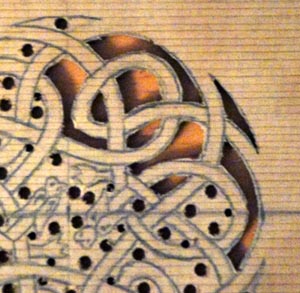
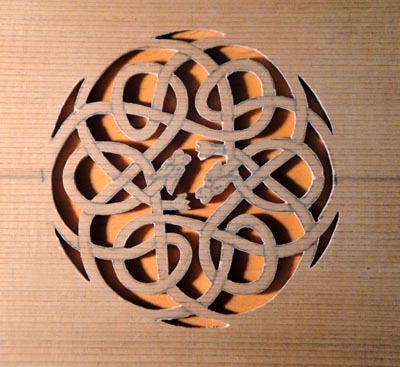
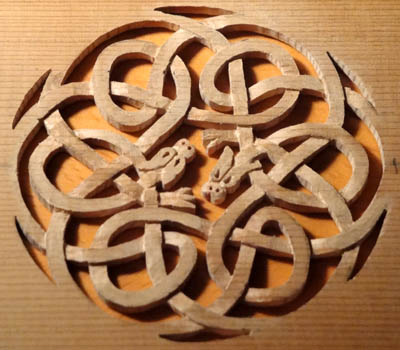
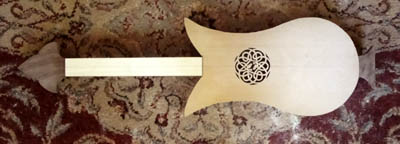
In the interim, I've also been working ahead on some other parts and problems of the instrument. One very elaborate piece will be the ivory rose that is going on the front center. It will be bracketted at the corners with smaller ivory inlays. Here is the pattern (actual size 2.5 inches) to be used on the ivory rose - it is adapted (and simplified, if you can believe that) from a lute rose from about 1500. Next to it is the piece of antique elephant ivory that will be used to carve the rose. This was obtained from The Warther Museum, who sells legal ivory from cut up antique tusks, mostly to artisans (he also makes really amazing ships!). This piece is about 3 inches square or so, and about 1/8-3/16 inch thick. The next image is the pattern drawn onto the ivory. All the darker bits are to be removed. The next image shows the holes drilled out. This was done with tiny finger drills (picture to come), hand spun into the ivory to make all the holes. After this, the micro-files are used to shape each of the holes into the appropriate forms (next image shows this in process). The filing is very slow and tedious, and I tend to carry it around with the micro-files in my pocket and do the filing in little snippets while waiting for movies to start, waiting for trains, etc. Sort of like women used to do knitting. The whole rosette then was thinned down a bit, as it was too heavy at its original thickness for the soundboard and some of the smaller holes were actually smaller in diameter than the thickness of the ivory, which made for very difficult work. The fifth image shows it getting really close now, with a good portion of it now open space. As you can see, for a variety of reasons, I've altered the design a bit as I've gone along. The ultimate goal is to get a kind of lacy look. The final stage shows the finished rose.
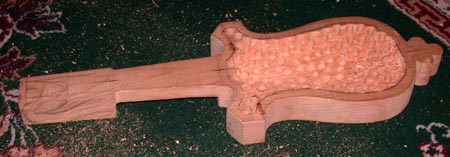
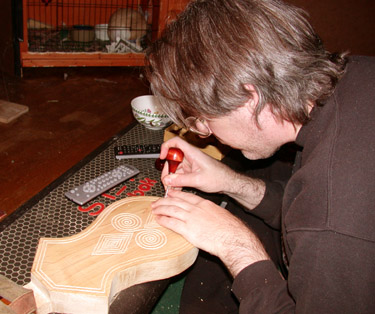
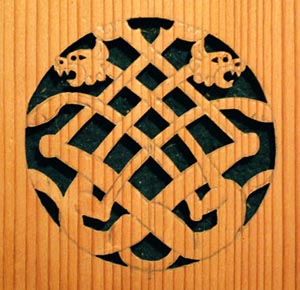
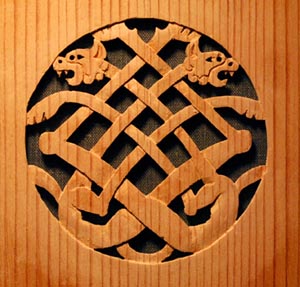
Doing demos and such I went back to carving out the back of the decorated citole. The first stage of carving the back is now done - all the "background" area has been removed, and the back floor roughly leveled. This is done with the small chisels above, and took way too long. Next up is the carving of the raised bits into 3-dimensional relief, which hopefully shouldn't take nearly as long (actually did take less time).
Continuing the carving on citole one with the greenman. Carved in simple relief - the grain of the wood makes it a little difficult to make out, but that will change a lot when the finish is added. Started with the deepest cut areas (around the eyes, around the nose), and then worked mostly bottom to top. Again, this was done mostly with the small chisels, with smoothing via the medium files. Its about 1/8 - 3/16 inches deep. Next we carve all the leaves!
Rounding out all the leaves was rather tedious, involving beveling them with the chisels, and then filing the bevels into smooth rounded edges. This is the final back image. All of the leaves and vines have been finished. The final sanding will be done with the final pass of all of the body (not particularly looking forward to that...) The edges of the carved out area still need to be cleaned up a bit - I was debating between beveling them at about a 45 degree angle, or leaving them as harder right angles. The right angles seems more appropriate, I think.
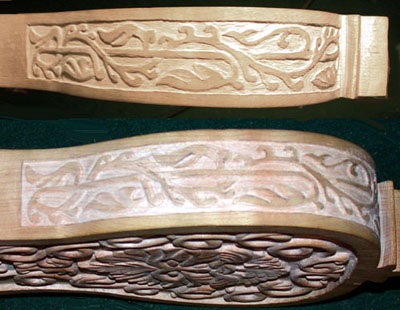
Next part on Citole One is to the do the side carvings. The curves of the body sides make it a little more difficult, as its hard to get a surface to brace it against carefully when working (I tend to work either on a small coffee table, or literally with it on my lap on the floor, not having access to or space for a proper workbench), but the start shown here proved easier than I was expecting.
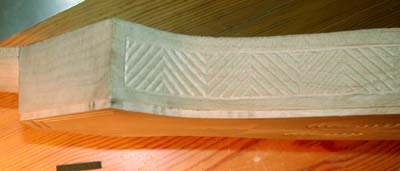
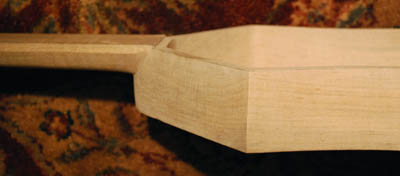
The side carvings are now done. The top image shows one of the finished sides. The relief carving follows the curve around to the narrowest part of the waist, and buts almost right against the tail. The second image shows that the side carving is definitely shallower than the back carving (also shows how rounded the leaves/vines are on the back). The walls need to be rather thin in the final instrument to keep the weight of the block down for good resonance. The third image shows the little leaf curl that was carved into the outer face of the wings of the instrument.
Now that the carving on the body is done, the floor and walls of the cavity have to thinned out to about 1/8 of an inch, and made sure that the walls meet the floor at right angles (rather than scooped angles they presently do). First the floor had to be dropped about 3/8-1/2 an inch, which is getting increasingly more difficult as the wood is drying and aging (harder and more brittle, and chipping my chisels). In the image here on the back wall you can see the chisel marks showing how much farther down it had to go. I've also started thinning out the walls (esp. visible on the left in this picture).
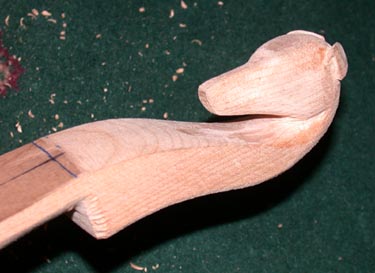
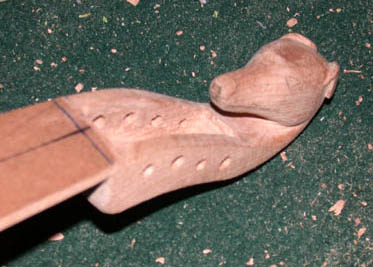
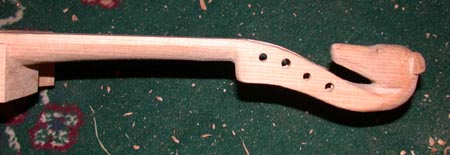
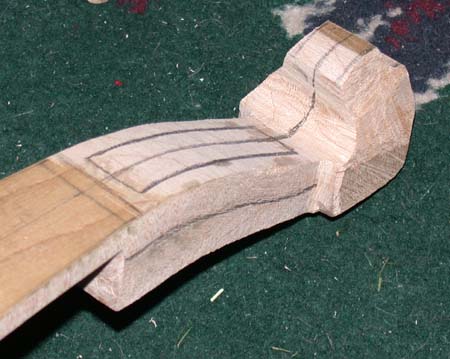
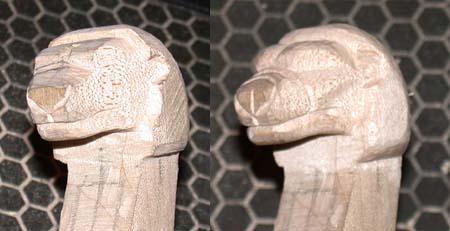
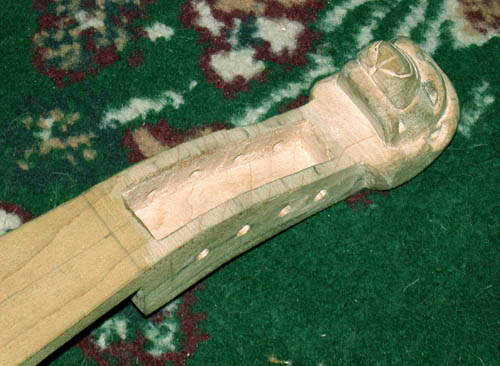
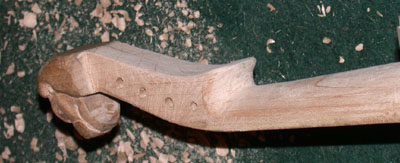
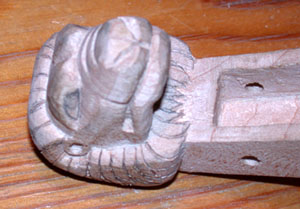
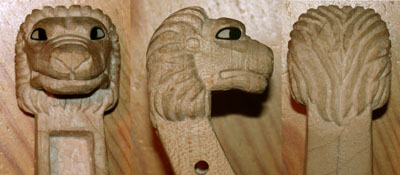
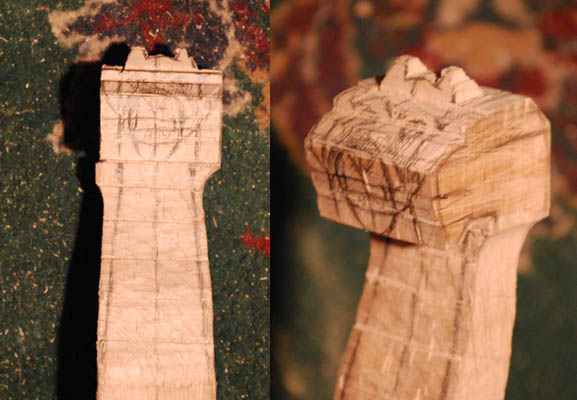
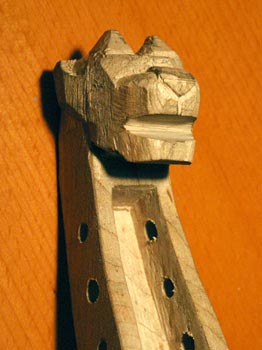
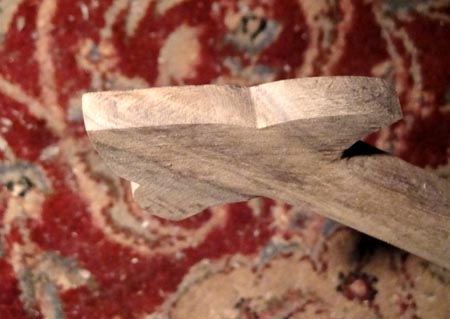
Having finished the decorative carving on the back and sides, time to move onto the peg head. I abandoned the idea of attaching a additional piece of wood for an overhanging head as both not true to historical instrument construction, and also because it would look attached and out of place. Practically it also would overweight the head, and make holding the instrument awkward. So instead I decided to continue the relief carving around the peghead. Since dragon/animal heads seemed to be the norm for the end of the head, I carved a small dragon face into the end of the peghead. The curling vines found on the other parts of the sides were then continued around the curve of the head.
On the top of the peghead (where the pegs will stick out), I need to lower the level of the floor a bit so that the endnut could be held in place by the downward tension of the strings. So I decided to give the top of the peghead a little design, as per the original plans. This will probably be taken down a bit farther and evened out a little more when I get the fingerboard in place, but I wanted it at least started.
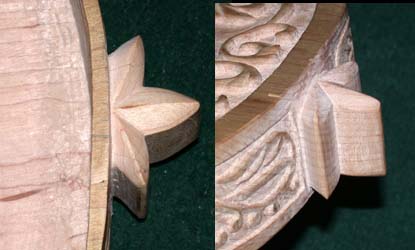
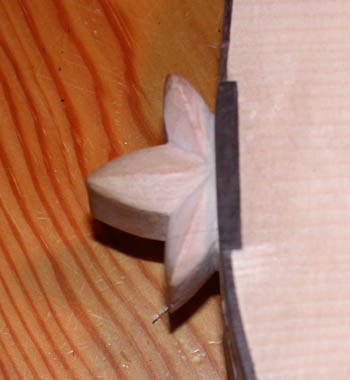
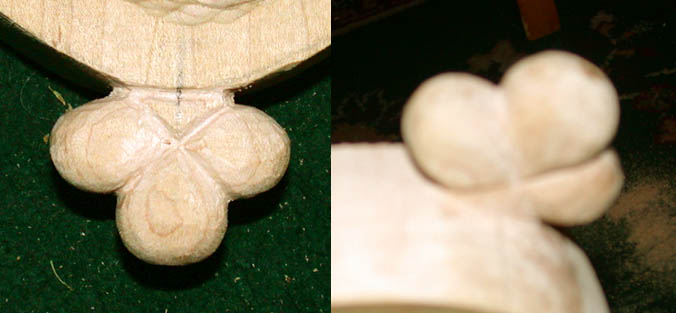
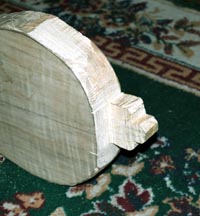
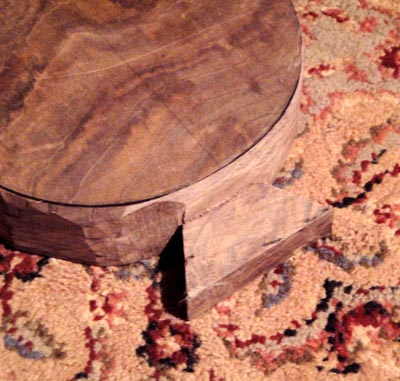
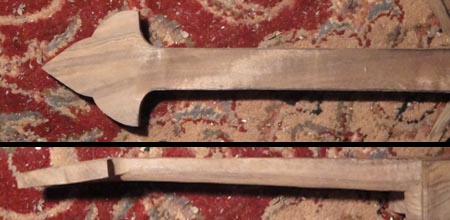
At the other end of the body was the little tail trefoil, which was left barely roughed out. I didn't want to finish it until last, as I tend to handle the body a great deal while doing the carving, and the pointy bits on this would have been annoying to hold. But now the rest is done, I finished it off, beveling the faces and raising the bottom end up a bit. What is not immediately evident from these pictures is that the bottom surface is actually angled upwards, but the perspective of the image doesn't show that very well..
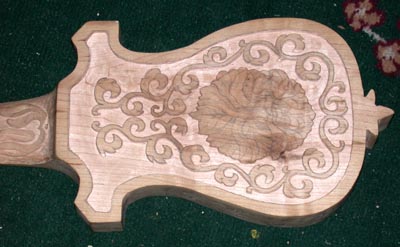
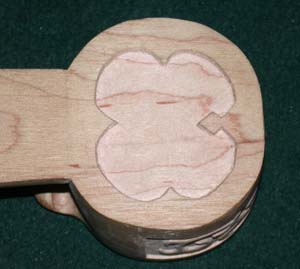
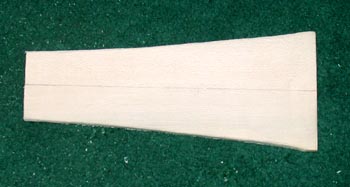
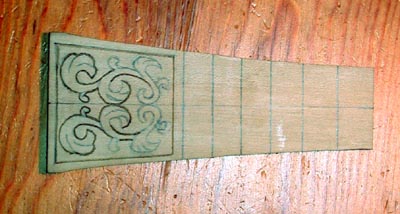
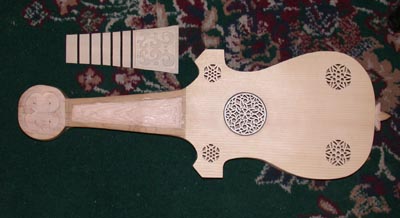
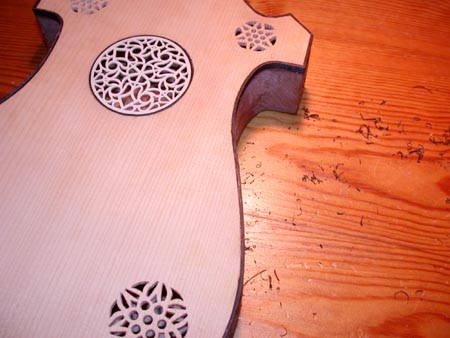
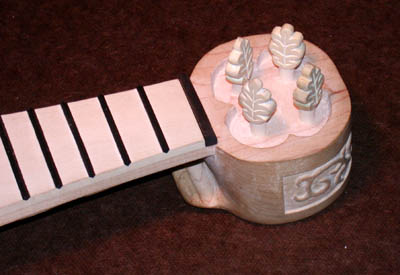
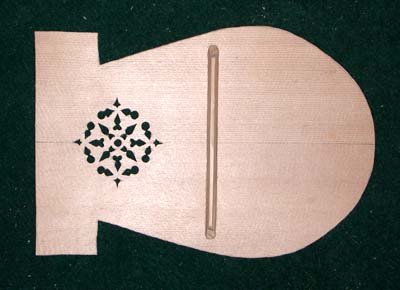
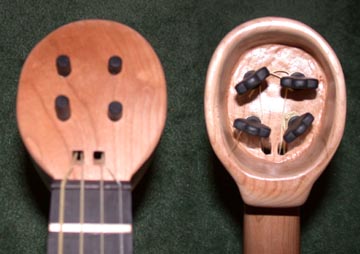
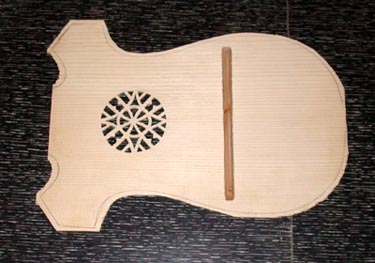
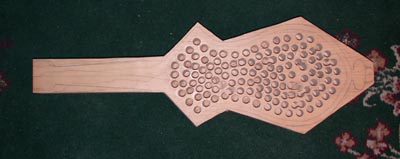
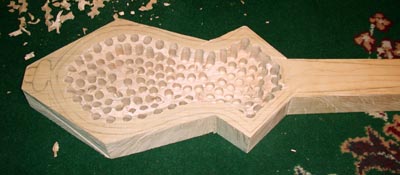
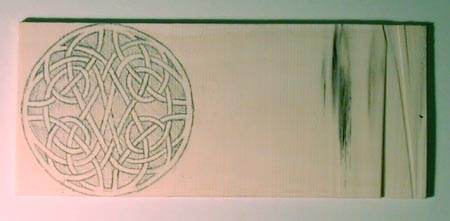
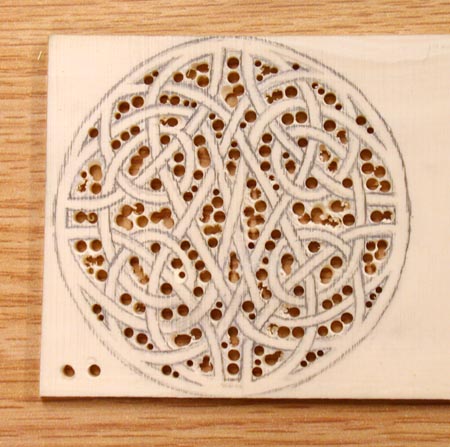
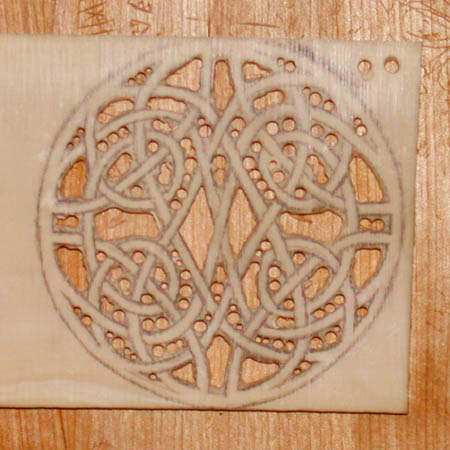
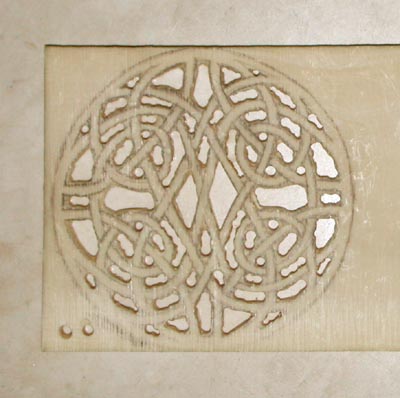
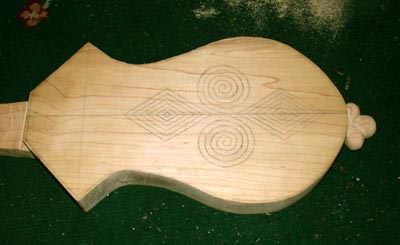
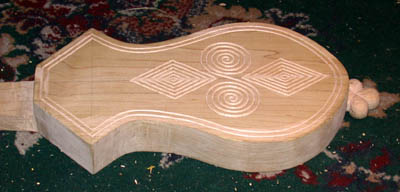
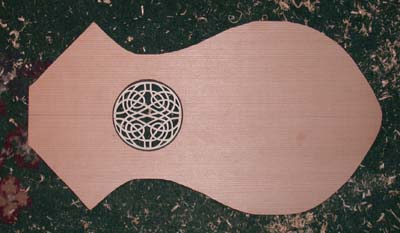
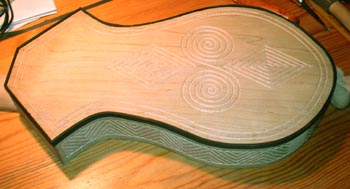
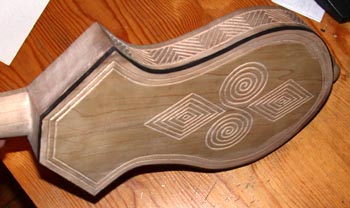
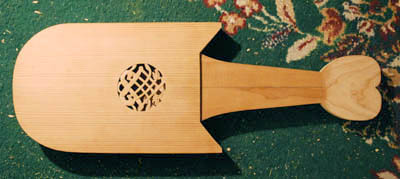
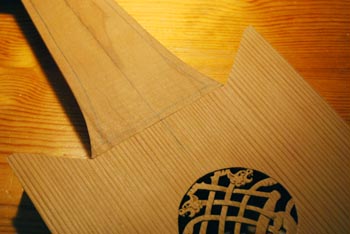
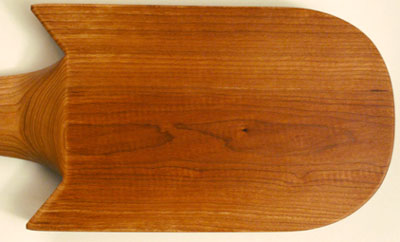
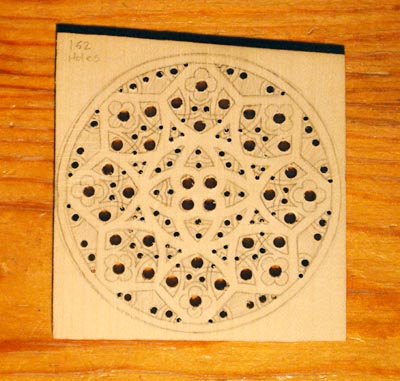
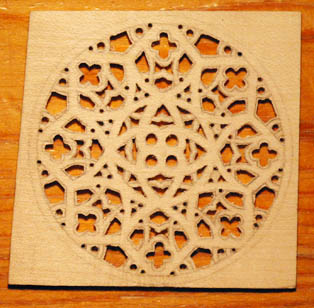
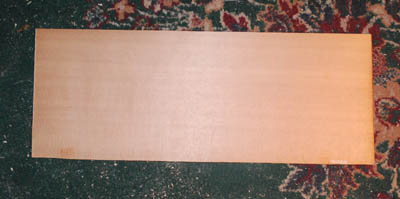
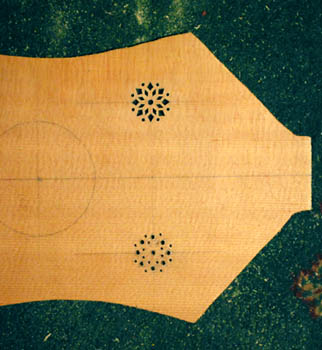
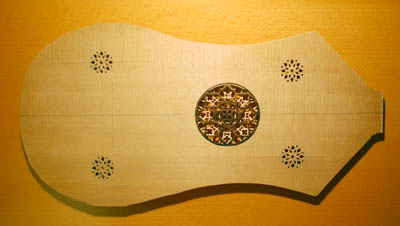
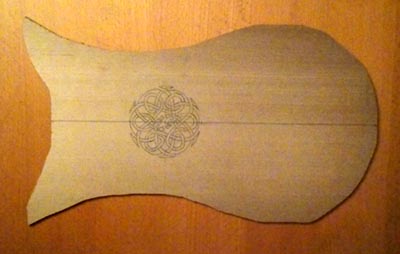
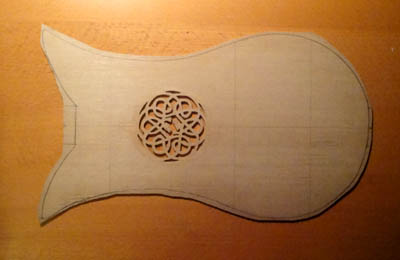
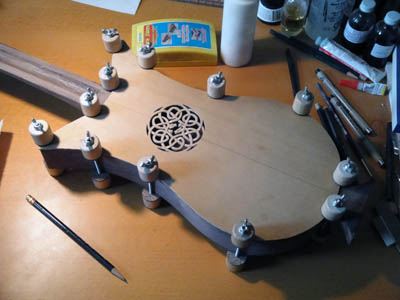
FINALLY, getting away from the body block to the other parts. This is the soundboard. It starts off as a piece of Carpathian white spruce (a master grade piece, very nice, from LMII. You will note the positions where the tailpiece will end, and where the bridge will ultimately go. I've decided not to inlay the other decorations on the soundboard, as I think it will make it too heavy. The large central rosette will be the ivory one above. But instead of the inlaid flower patterns I'd originally planned, I've decided to use four smaller rosettes carved directly into the board. Their locations can be seen marked out on the piece (this is actually the back). Next to cut out the board and start work on the rosettes.
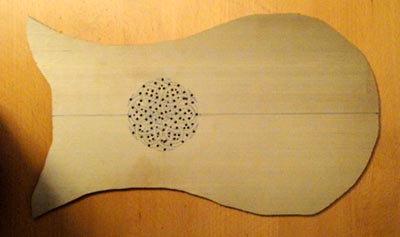
This shows the rosettes in process. The upper left has had the pilot holes drilled with the micro finger drills, which is the first step. From there, I take the micro-files and start opening up the holes to shape, as can be seen in the upper right side. The two lower rosettes have been completed. This is slow and tedious work, as not only do the rosettes have to be internally symmetrical, but they have to be lined up as close as possible to their opposing duplicate. I did encounter an interesting problem with this spruce. The dark grain wood is VERY much harder than the light grain wood, so there is a marked tendency of files/drills/etc. to skip off the hard bands into the soft ones, making the fine precision work even more slow.
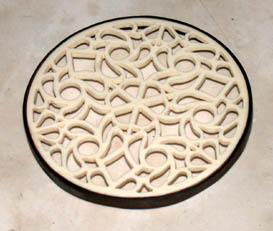
The corner rosettes done, now turning to the central rosette. The ivory rose has been finished. It is going to be edged by a strip of ebony and then inset into the soundboard. The strip of ebony first is steam bent into shape using a bending iron, and allowed to dry overnight taped into shape (it is slightly smaller than the rosette, but overlaps at least half of its length. This turned out to be a "learning" experience, as I hadn't done much bending before, and the ebony is quite brittle, so this took two tries to get correct.
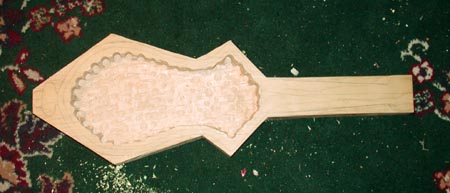
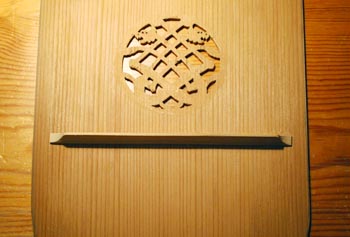
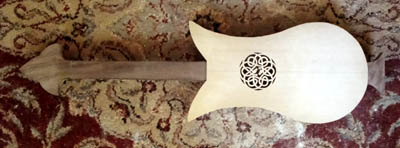
The rosette has now been fitted into the ebony edging and the ebony sanded smooth so the jointing isn't visible. Now comes the careful process of cutting a hole in the soundboard just exactly to shape.
The rosette fitted into the soundboard. There is still a bit of leveling that needs to be done carefully with scrapers to bring the level of the rosette flush with the soundboard. The differing hardnesses of the ivory and spruce make sanding impractical until final smoothing.
In the interim (there is no picture here as nothing really to see) is the long tedious process of scraping, filing and chiseling the carved portions of the body smooth and clean, so that the rough chisel marks are removed where-ever possible. It is long and slow, but the new scrapers make some if it easier, and I've discovered the flat chisel blades can be used as a kind of scraper. One change was made to the body - the tail trefoil was thinned top to bottom to take up slightly less than half of the body width, rather than the 3/4 it previously had, as I've decided to loop the tail-rope around it entirely rather than cut a hole through it. Otherwise all that clean-up is finally done!
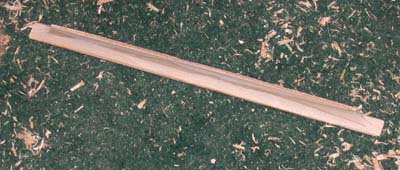
Starting now on the other parts at last. This is the brace that will be attached under the soundboard to help support it. It is carved of the very light wide grain spruce, and shaped to an inverted T cross-section (see small insert). It will be positioned about 1.5 inches behind the bridge on the underside of the soundboard at its widest point.
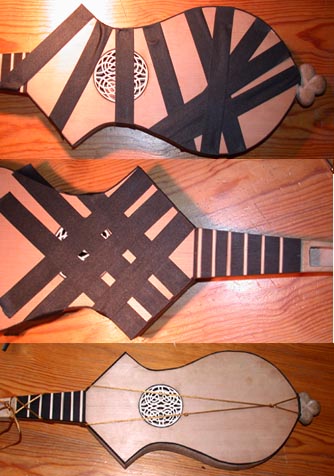
Anticipating the assembly of the body, I've been experimenting with different ways to cut the channel for the edge binding. For Citole 2 below I used a chipping method by hand with the mini-chisels. While that worked, it was horrifically slow, and ran the perpetual danger of cracking the edge. The maple is significantly more brittle at this point (being long aged now unfortunately) than the cherry of that instrument, and I'm not sure that I want to take the chance with that method. The "normal" ways of doing this are one of two options. First, a violin purfling cutter going around the edge and then chipping out with a sharp knife on the side. This is only mildly more efficient than my first way, and still runs the danger of cracking the very thin edge. Alternatively, it is routed out. My previous attempts at routing had been not horribly successful, as I found it difficult without a table mount to control the router, especially around the sharp corners. However, I discovered a piloted binding router bit at Stewart McDonald luthier's store, which proved promising. I made a mock body to try it on with my dremel router attachment, including sharp corners, soft corners and a curve out of a spare block of cherry wood (cut off from instrument #2 I think). I cut this edge binding channel in about 10 minutes. Very clean. Extremely easy. Guess how I'm going to do the real instrument...
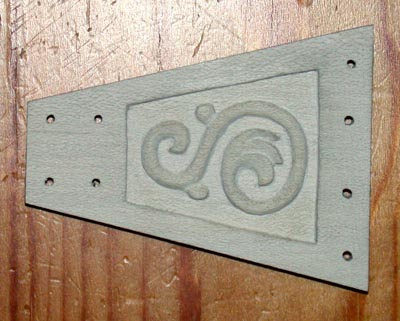
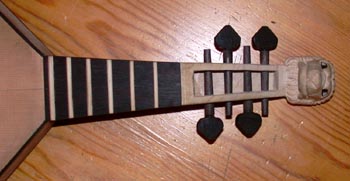
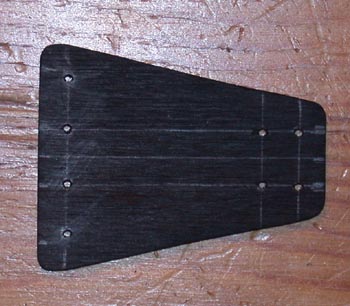
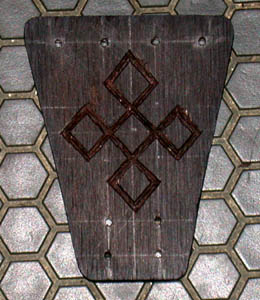
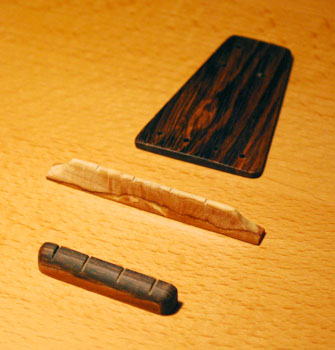
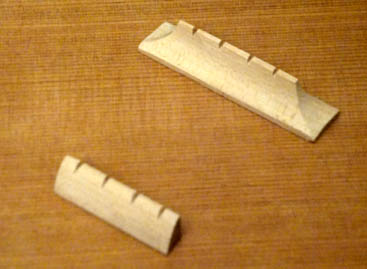
The top fitting are now being tackled. The tailpiece was cut from a block of American holly wood. The original intention had been to carve out the design on the tailpiece that you see drawn onto it. You can also see the placement for the holes.
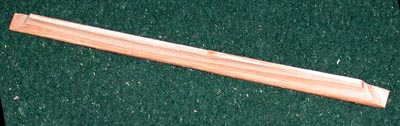
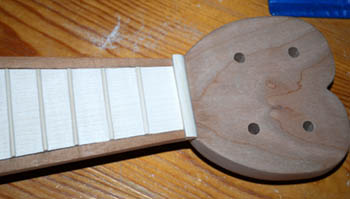
The fingerboard piece was cut from the same block of holly as the tailpiece (they actually are the same color, but had to get closer to photograph the tailpiece and the flash whited it out a bit). The frets will be cut from ebony.
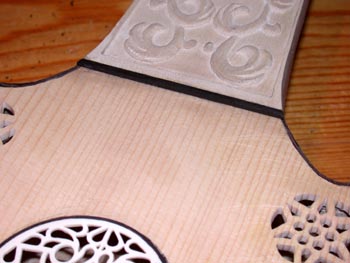
It is here that I decided that I didn't want to carve the tailpiece and leave the fingerboard plain. The elaborate carving all over the body made the top of the instrument suddenly look very simple. I initially had planned to edgebind the top, including the fingerboard, with ebony binding. Then I decided it might look interesting to do the same with the tailpiece - edge it in the ebony as well. With the high contrast of the white woods and ebony binding, however, the tailpiece carving would barely be visible. I also initially considered it impractical to relief carve the fingerboard, and just carving the tailpiece seemed not sufficiently decorative. So I started to go overboard, and inlay the leaf and vine pattern into the tailpiece, which would in turn allow me to inlay a similar design into the fingerboard. This involves taking the ebony wood I have (a bass guitar fingerboard is what I am using), and cut it into two thin plates to try to then cut out the inlay pieces.
However, as often happens when working through this stuff, I did a little bit of test, and decided that 1) the inlay was going to take forever 2) it didn't mesh well with the relief carving elsewhere on the instrument and 3) that I couldn't find any pre-Renaissance examples of inlaid instruments, but there were many relief carved ones. SO, after due consideration, I decided instead to relief carve it as originally intended. The tailpiece and the lower, unfretted portion of the fingerboard were thus decorated using a very similar pattern to the rest of the instrument. The fingerboard piece is actually only a minor variant of the scroll work over the greenman's head on the back of the body.
Using the small chisels and files, and the little finger drills, the tailpiece now has the surface carving and the string holes. The holes may need to be widened, especially the tail-gut holes, but I'll worry about that when it comes to stringing the instrument. Still haven't decided whether I'm going to add the ebony edging on the tailpiece. I probably will, but am going to make sure I have enough to go around the whole body before wasting it here.
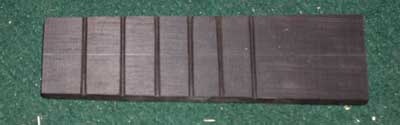
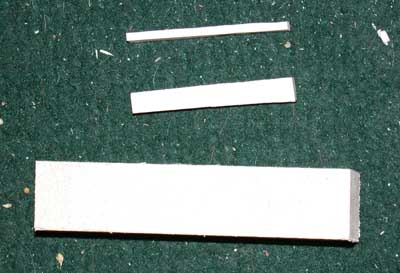
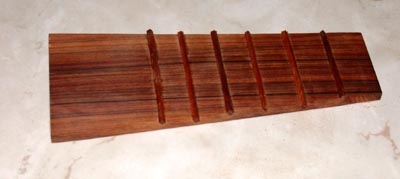
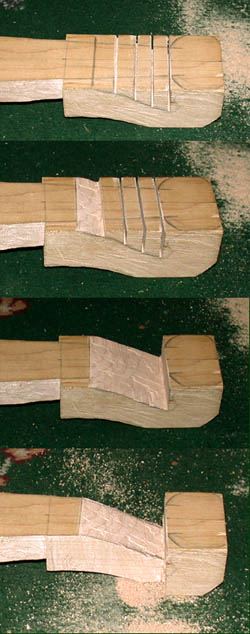
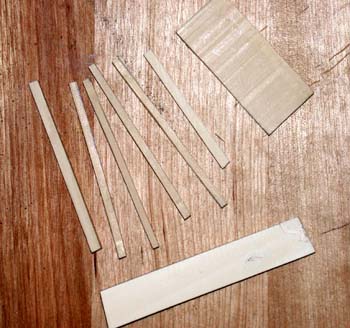
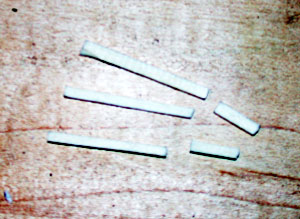
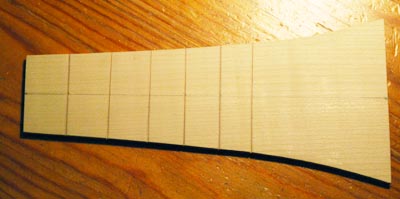
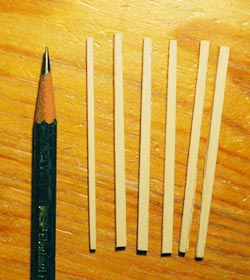
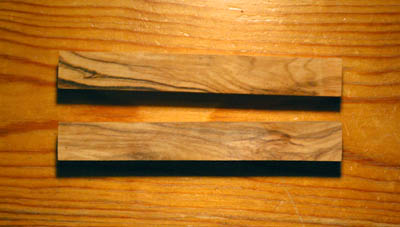
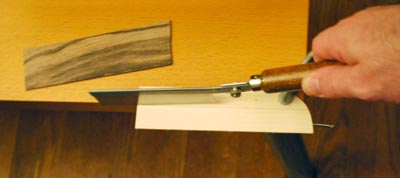
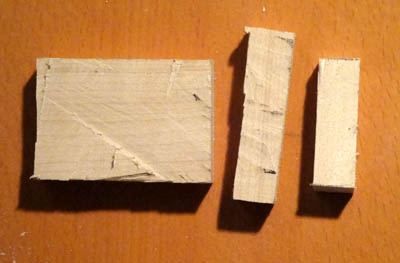
Cutting the ebony frets. The first step is to cut a thin flat piece out of the thick ebony fingerboard chunk I have. I ended up clamping it upright to a wooden chair back and using a fret saw to slowly cut down the piece. Took a very long time, as the wood is 3+ inches thick. That thin sheet is then sliced into a "comb" of equal width teeth, in this case six teeth (as there will be six frets). The teeth are then cut off, and equaled out into clean square cross-sections with the files. A good portion of the rest of this flat piece became the backing on the ivory rose on the Three Dimensional Art page, just so you know the remaining wood and effort into cutting it doesn't go to waste. It all gets used for something.
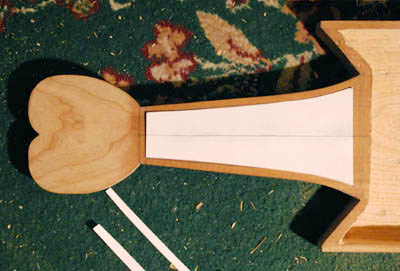
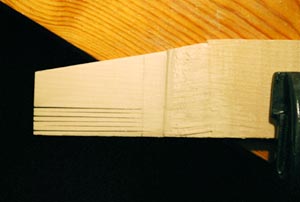
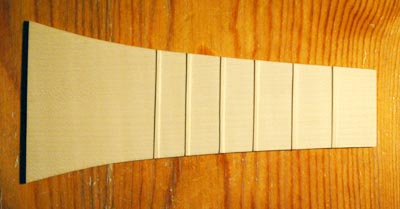
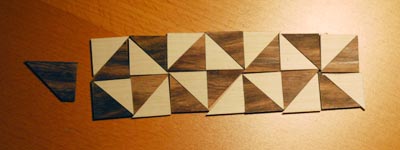
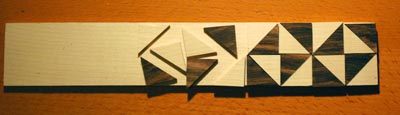
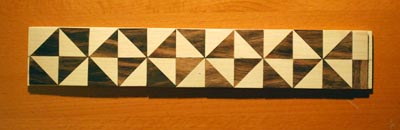
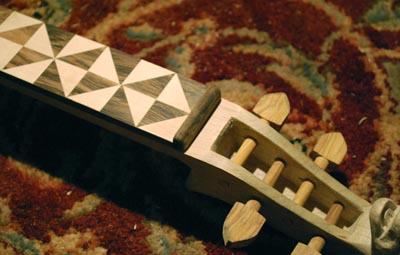
Carving the design and marking the frets onto the fingerboard. The functional string length will be 13.75 inches, and I used a fret calculator to set the spacing. The carving went through a number of designs before I realized I could match the back design pretty closely, and that tied in together well. Here you can see the first bits of cutting into the edges of the design.
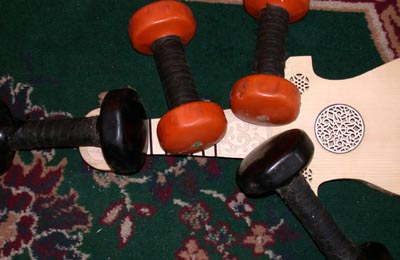
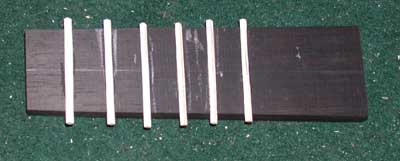
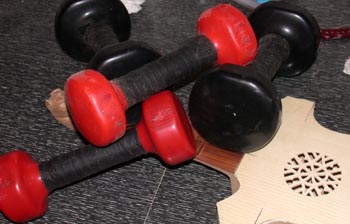
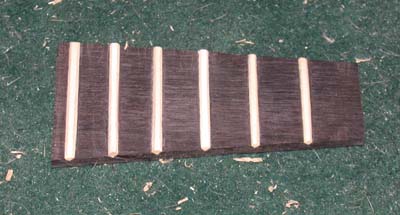
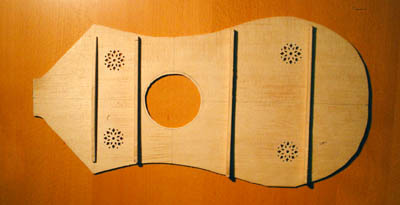
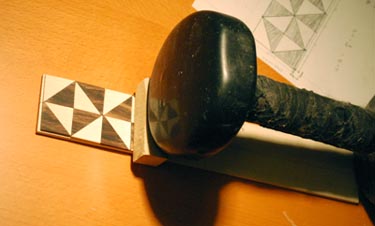
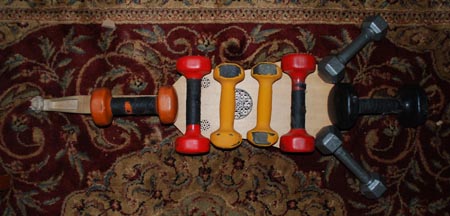
Here are the final fingerboard piece all carved and leveled, with the slots for the frets widened to receive them, and the pile of frets. The second picture shows the gluing in of the frets (you can see the earlier sketches of the fingerboard designs below), "clamping" them down with handweights.
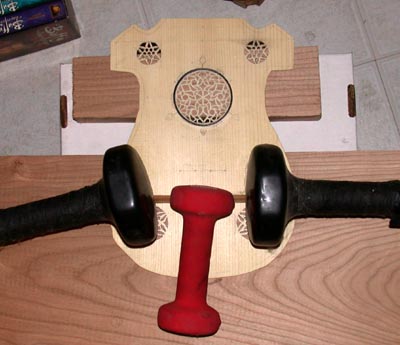
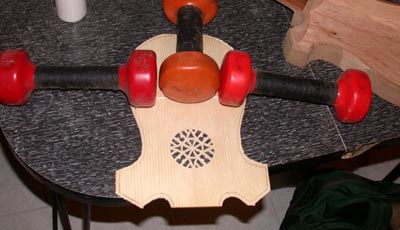
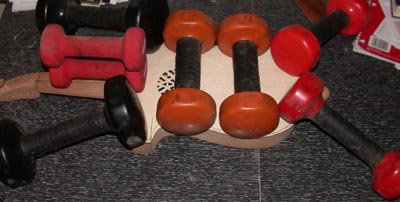
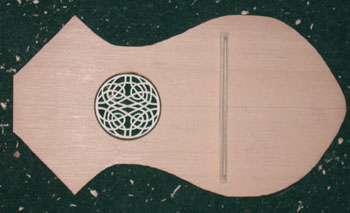
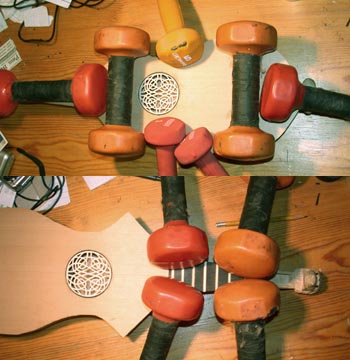
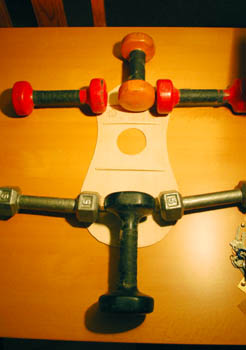
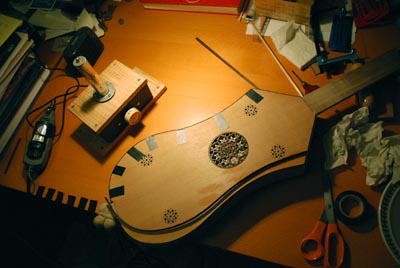
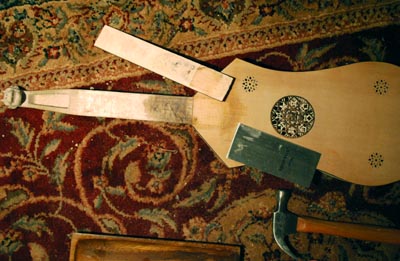
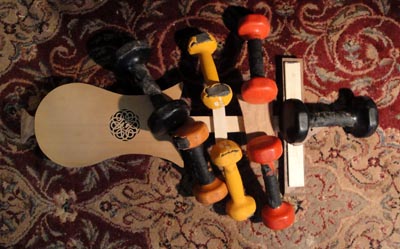
Turning now to the soundboard, here is the clamping (again using handweights) of the brace to the back of the soundboard. You can see the marking for where the bridge will be (on the other side, of course). Anybody want some free Buffy videos? We have all the DVD's now...
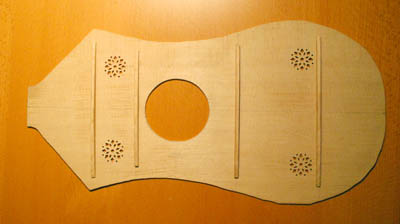
With the brace dry, the soundboard is then carefully lined up with the body and glued down. Again, using handweights as my clamps.
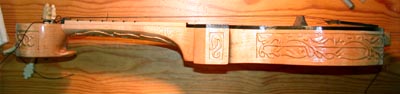
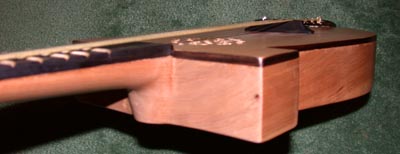
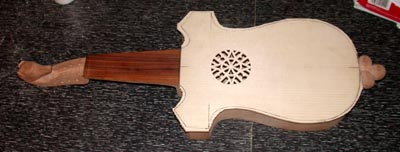
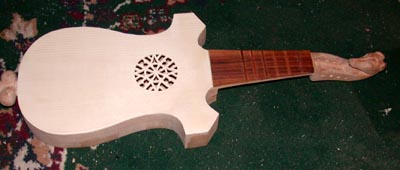
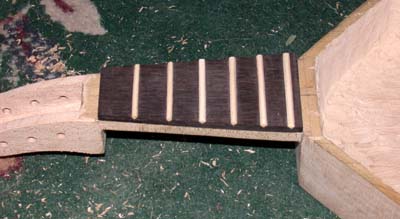
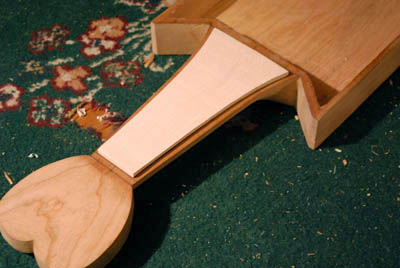
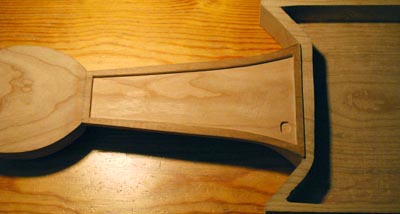
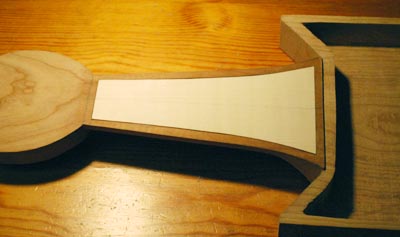
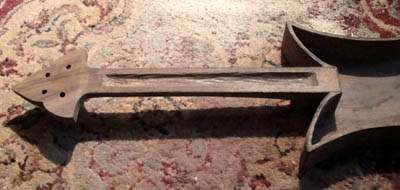
The soundboard edge is cleaned up more or less flush to the body. The neck is then hollowed out (to lighten the instrument and make it not quite so nose heavy) in preparation for attaching the fingerboard. Normally I'd have probably just thinned the whole neck, but the carved designs make that not an option.
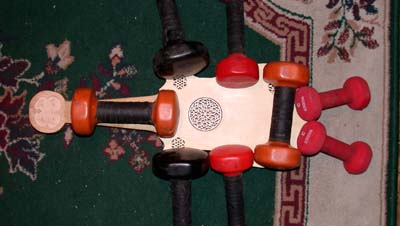
The fingerboard is glued down, once again clamped by the handweights. Then the edges are cleaned up all around the fingerboard as well, being very careful to not chip off the frets.
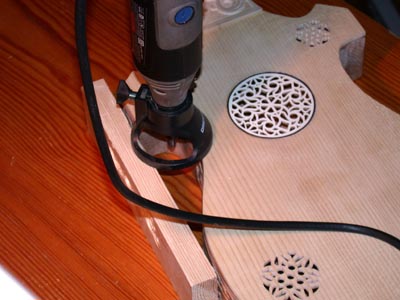
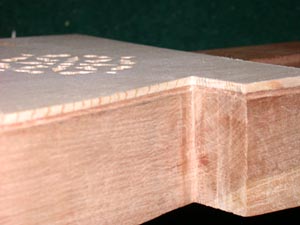
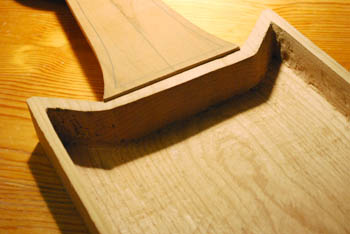
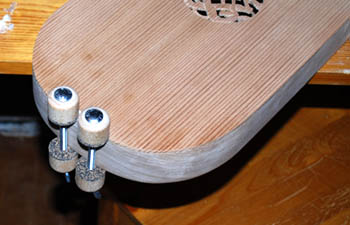
The next task is to cut the edge for the edge binding on the top. After having done several experiments (see above), I settled on the dremel with a router bit attachment. I cut a scrap piece of pine wood to act as an outer brace to make sure that the dremel wouldn't tilt. The whole body was clamped to the table by a C-clamp attached to the pegbox. It was difficult to make sure that very soft soundboard didn't chip badly, but overall it went well.
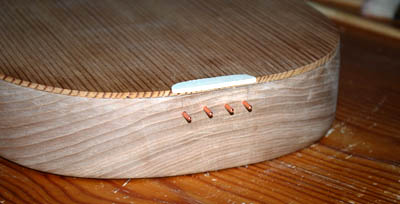
Showing the finished cut edgebinding ledge. You will note that at the tail, where the tail-loop will pass over the edge of the soundboard, I've cut a slightly larger ledge to fit a larger piece of the ebony. I've had the problem of the tailgut cutting into the soundboard before, and took note of Marco Salerno's solution to that problem - inlaying a small rectangle of hardwood where the tailgut crosses over the edge. I will be doing the same here.
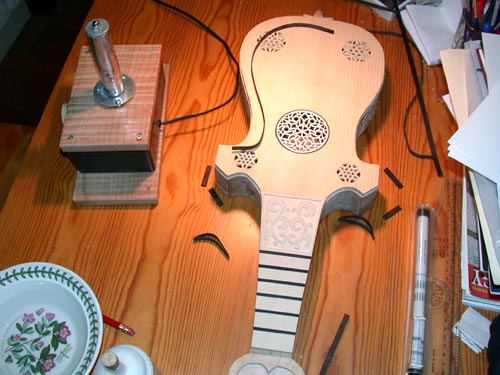
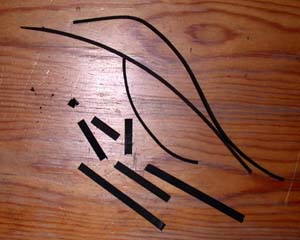
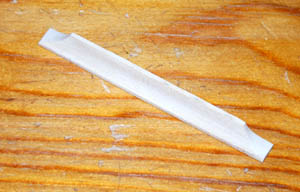
This image shows the process of steam bending the edgebinding into shape. I have a violin-body style bending iron (more or less just a metal rod that gets hot, to about 220 degrees or so). The idea is that you wet down the wood, and then the softened and swelled grains are able to be better manipulated. The steaming further softens them, and helps to "set" them when they dry. Leather works in a similar way (though if you get leather too hot, it actually polymerized, and you end up with brittle plastic). However, in practice I ran into several problems here. First, the original edgebinding that I had gotten to put on was solid ebony about 3/32nd inch thick, which nicely matched the ledge-cutter width. Unfortunately, the practical right angle turn at the backside of the wings proved to be too severe to bend the ebony into shape. After snapping the pieces about 10 times, I decided this was impractical. So I used progressively thinner pieces of ebony until I got one that I could bend without snapping into the severe curve. The problem with this was that the thickness that I was finally able to get to shape was too thin for the ledge, and meant that I now had to laminate the edgebinding. This meant cutting and bending twice the number of pieces, and then gluing them together. So I set about doing this. Each side of the instrument had four pieces - the short curve from the neck to the peak of the wing, the two short straight lengthes on the outer edges of the wing, and the long single piece that goes from the back corner of the wing to the tailpiece. Each had to separately fitted to its space and bent to shape. The alternating process of fitting it to the body, steaming to shape, refitting to body, etc. had a somewhat amusing side-effect - I accidentally steamed off the soundboard of the citole! It was sitting too close to the bending iron, and the repeated application of steaming hot wet pieces of wood eventually undid the glue (which, technically, is how the luthier glue is supposed to respond). So, after a break of cleaning off the top and top edge of glue, and re-gluing the soundboard back onto the body, I was able to finally (more carefully this time around) finish shaping the remaining bits of the edgebinding.
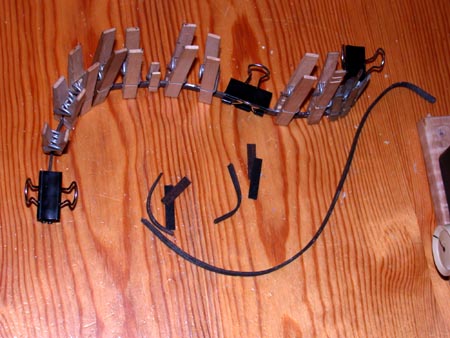
The edgebinding layers then had to be glued together. Using piles of clothespins and bear clamps, I was able to glue the two layers of the edgebinding together. Unfortunately I could only scrounge enough clamps to do one piece at a time, so this took a little while. You can see here the last piece going together - the rest are scattered on the table next to it.
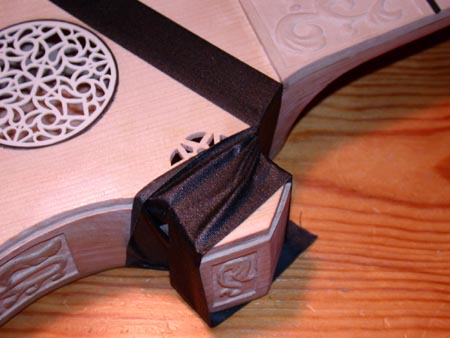
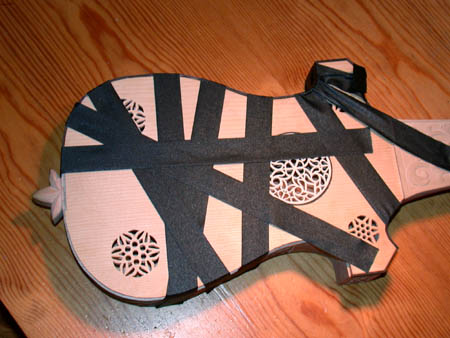
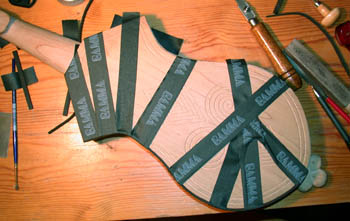
Next up is attaching the edging to the body. Each piece now had to be exactly fitted to its location, ends cut to exact length and the corners beveled so they met at clean angles. Then each piece in order (as they have to be fitted against each other) has to be glued into place. The first problem encountered was that the glued laminates proved not to be as flexible as the thick wood, so a little very careful reshaping had to be done (remembering this time that steaming it would functionally undo the glue holding them together). Once that issue was solved, the second problem was how to hold them under the slight tension necessary into place while the glue dried. Obviously clamps on the odd surfaces would be very difficult, and the soft wood of the soundboard could be easily damaged. The solution I came up with was cloth tape. The tape isn't horribly sticky, but sticks to itself well. As a result, it doesn't mark even the soft wood of the soundboard, but can hold things under tension. Starting with the front curves, I attached each piece. Sometimes the taping got a little elaborate (the large side pieces - my wife likes to refer to this as the "bondage citole"), but it all worked.
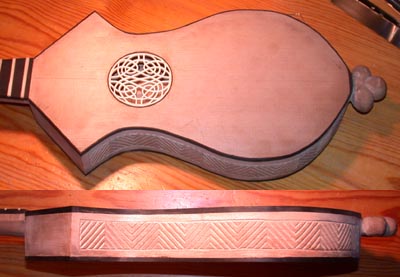
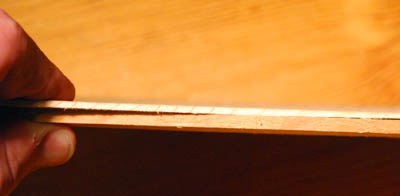
After the glue had dried, I took a very sharp knife (like an x-acto blade) and trimmed down the edges flush with the top of the soundboard. Done very slowly as carefully, as the very thin pieces snagged grain easily, and glue layer between them was quite hard. Became a balance of force and control. After that was a exceptionally tedious process of going around the whole body and cleaning up the sides to be flush with the edge binding. This was done with the scrapers and the files. I also took the opportunity to straighten out and better balance the top curves and points on the wings of the body, as they were a little angled from straight.
Two last little bits of ebony had to be added. First was the little block at the tail to keep the tailgut from cutting into the soundboard. I used a piece cut from the same piece that I made the frets from, as the wood was conveniently the exact same thickness necessary. The other piece was optional, but I decided to add it anyway. I decided to add an edgebinding to the exposed end of the fingerboard to "complete" the black line around the body that the edgebinding created. I had debated edging the fingerboard, but two problems argued against it. First, the edges of the design at the base of the fingerboard were too thin to be thinned further for an edgebinding. Second, the neck itself would have had to be thinned, which potentially would have affected the carving on its underside. Also I didn't like the look that much, so decided entirely against it. However I did like the little endbinder for the fingerboard, so that was made from a single thickness of the ebony edgebinding.
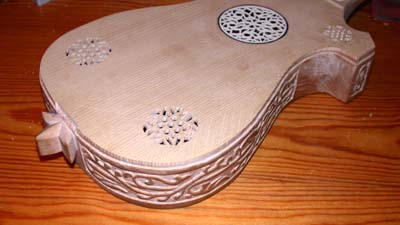
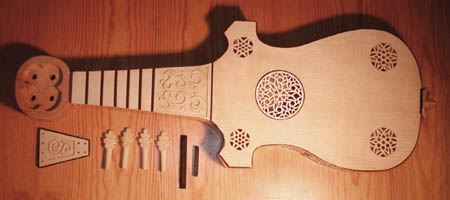
The finished binding all in place now. All that is left now on the body of the instrument is final sanding and applying the finish.
The tailpiece also was to acquire edgebinding. Four straight pieces of the thick ebony edging were cut and glued into place. Here you can see them having just dried. After that they are carved down to the surface level of the tailpiece, and sanded all around to smooth out and round the corners. Finally, the tailpiece has its holes widened (you can see two of the lower right holes have been started) with the needle files. I'll have a shot of the finished tailpiece in a bit.
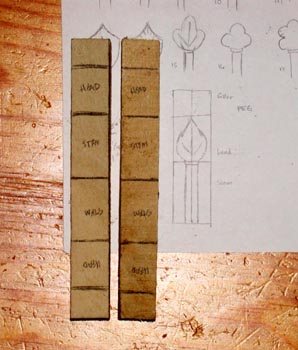
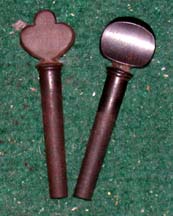
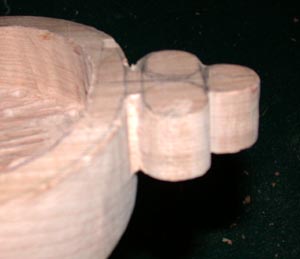
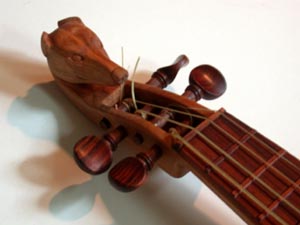
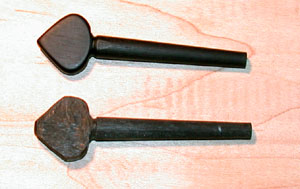
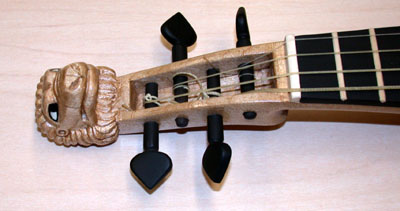
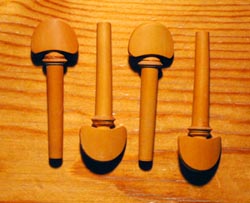
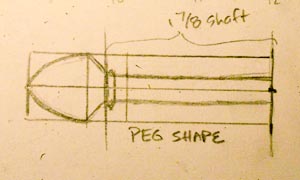
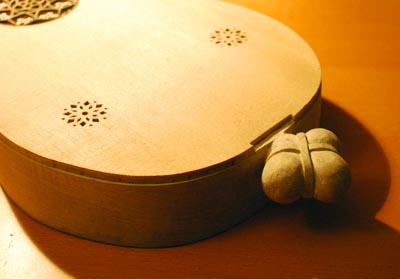
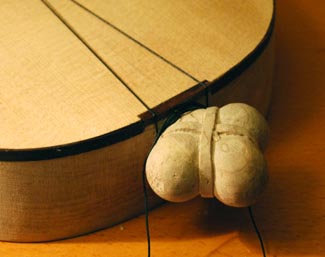
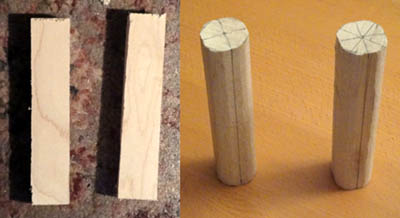
Turning next to the pegs. Did about 20 or 30 sketches of peg designs, and decided on a kind of oak leaf shaped one as the final choice. Here you see the pair of holly wood bits that will be carved into the pegs, with the spaces for the pegs marked out.
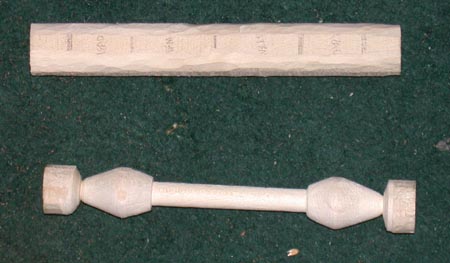
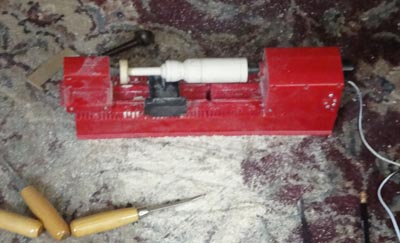
I have a mini-lathe that I then used to turn the blocks to cut two pegs out of each one. Top here is the rough block, below is the block after being through the lathe.
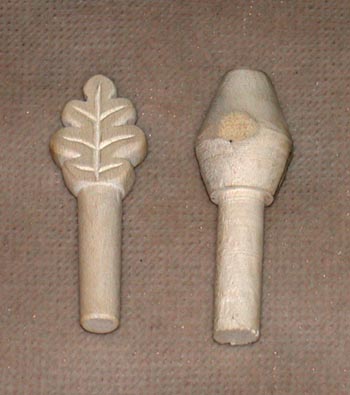
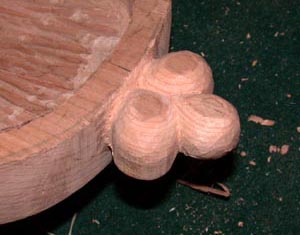
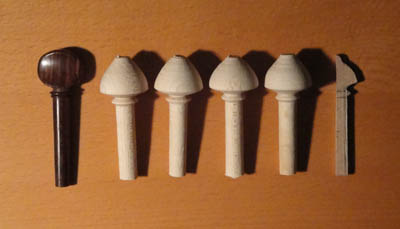
The turned block then is cut into two pegs that look like the right one in this image. That is then carved down into the oakleaf shape that will be the final pegs (left) and the peg stem run through the violin pegshaver to taper it appropriately. I had debated inlaying the lines of the leaf in ebony, but after a small test decided that if done correctly, they look just drawn on. And I think the 3-D effect of the carved lines better matched the rest of the instrument. My wife agreed.
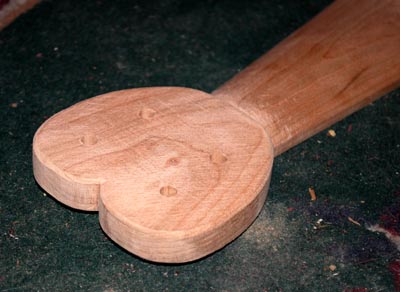
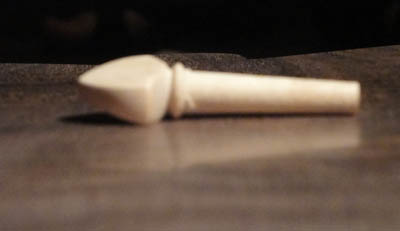
Here are the four complete pegs in place. I had deepened the depression in the top to allow for the strings to turn down to hold the nut in place. The roughed out nut is also visible here.
Finishing up the body. The fingerboard is finished with rubbed oil (several coats). The body is then coated with an oil varnish, applied with a small brush. The large number of nooks and crannies mean that each coat took about two and a half hours, and then that has to dry for at least 24 hours before the next coat can be applied, etc. Three coats were applied this way, with light sanding and burnishing inbetween each coat. The wood did not really tiger stripe, but the curling and swirls in the grain did come out nicely. The maple turned a nice golden color. The spruce however took several tries to get an even coat, and even so it darkened in a slightly uneven pattern. Not sure why. Doesn't look bad, just unexpected, as the sitka spruce I've used in the past didn't acquire that kind of mottling.
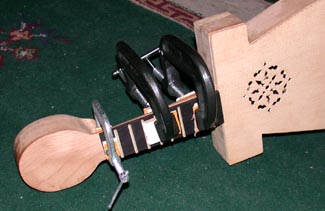
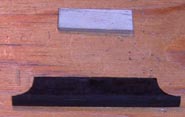
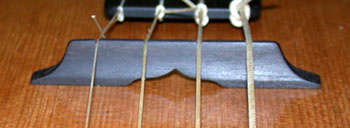
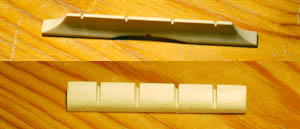
Setting the height for the bridge and nut. Both pieces are intially cut WAY too high, and then I file a notch into them and continually lower the notch until the action (height of the strings above the fretboard) is about where I want it. I use a piece of black nylon string as a mock-up for the gut strings (rather than wasting the rather expensive strings on such a set-up). Once the notches are set where I want them, I carve down the nut and bridge to a level with the notch, and add the remaining notches for the other strings at their appropriate spacing. The nut and bridge are then given a light coating of oil to seal them. With the gaboon ebony, this turns the dark brown wood a serious jet black! Neither is glued into place - both are held in place by the tension of the strings.
All the pieces are now down and ready for assembly with the strings. The four pegs need still to be drilled, which was done with the little finger drills. Otherwise it is ready for final set-up.
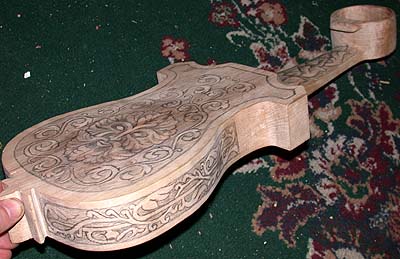
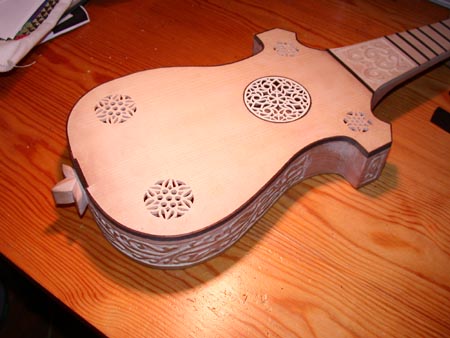
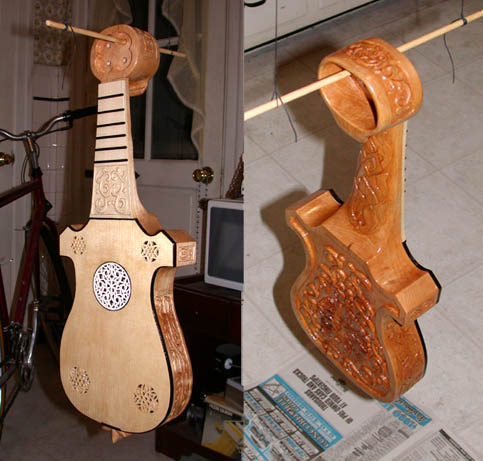
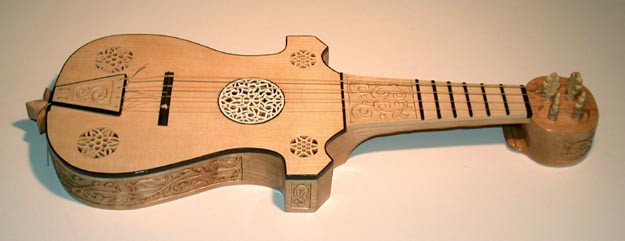
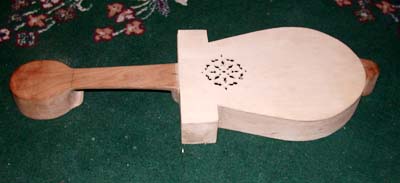
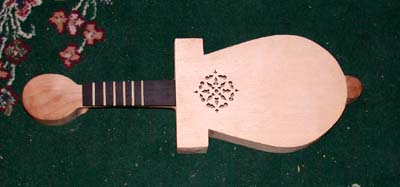
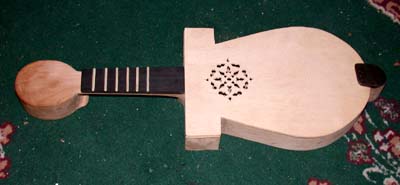
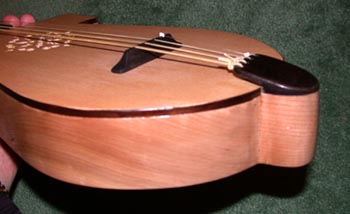
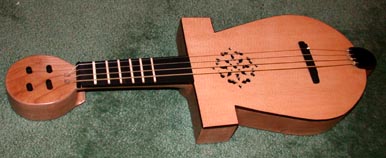
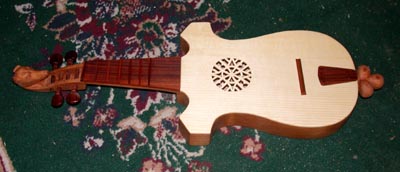
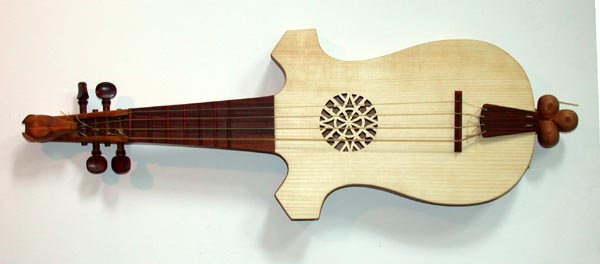
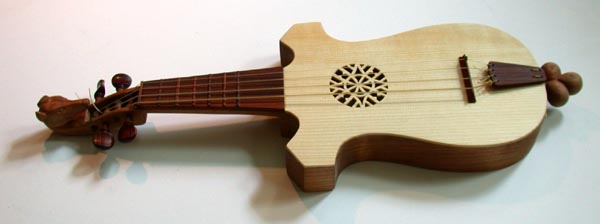
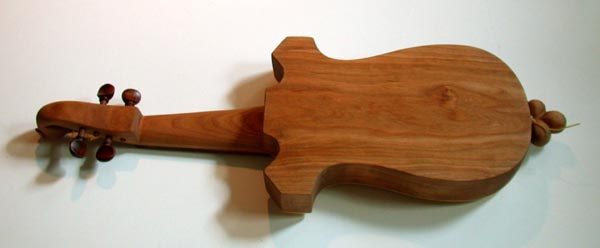
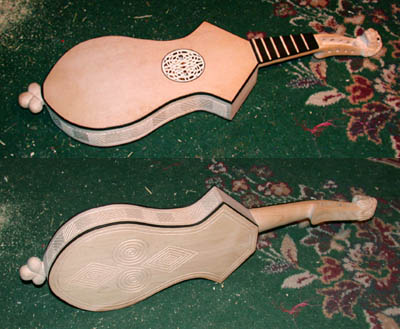
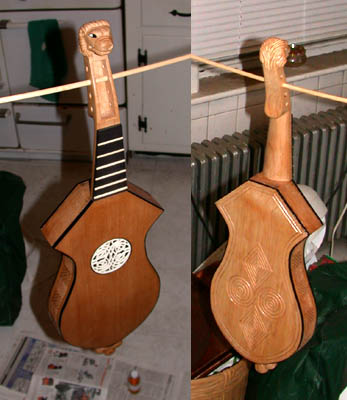
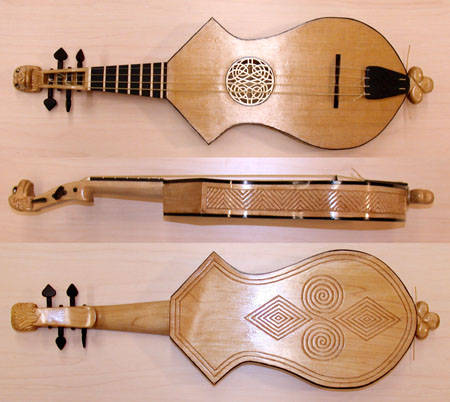
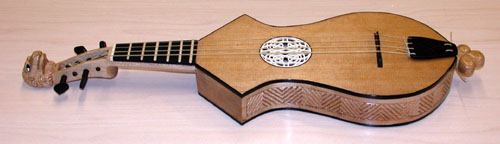
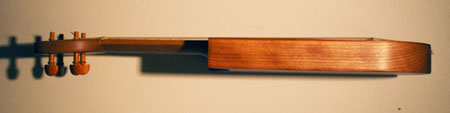
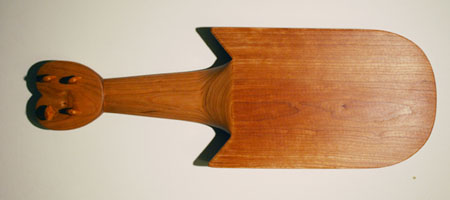
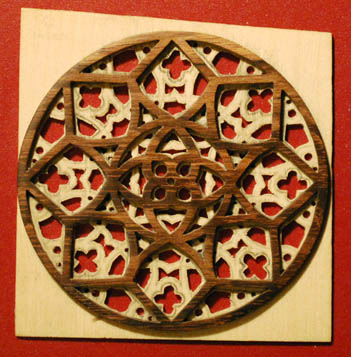
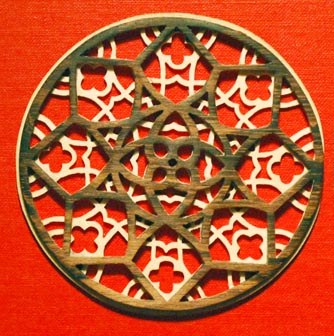
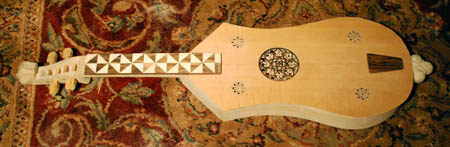
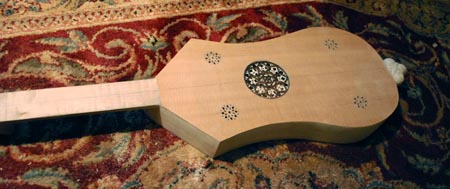
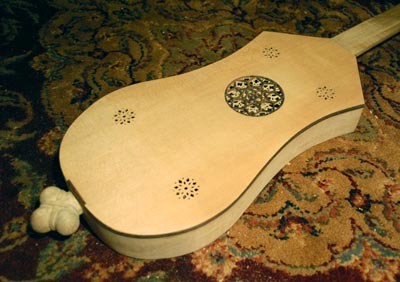
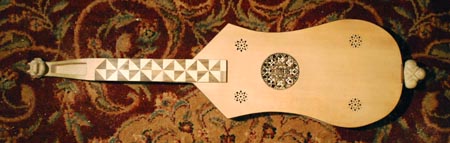
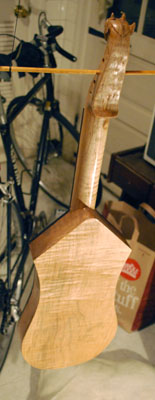
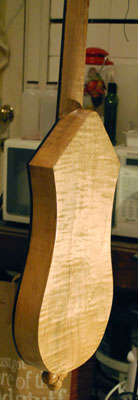
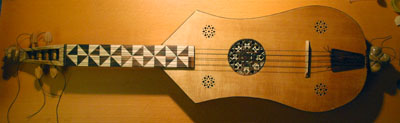
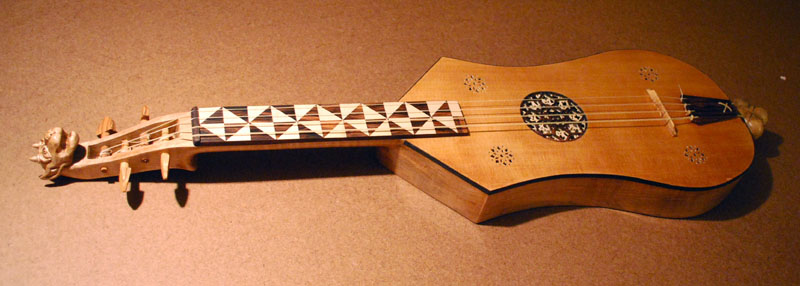
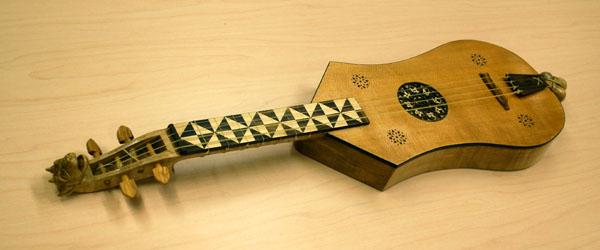
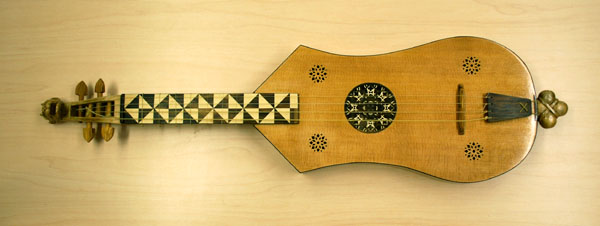
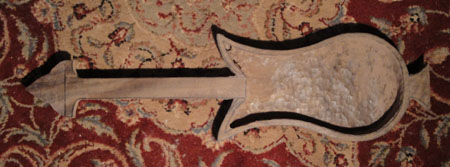
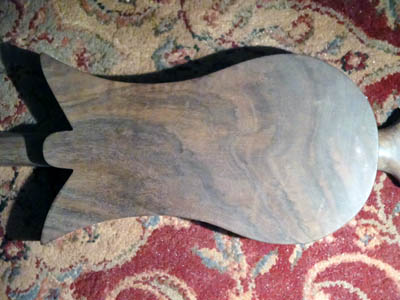
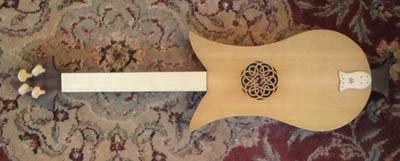
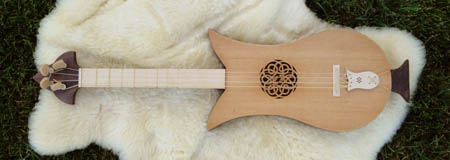
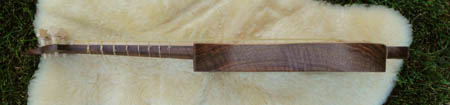
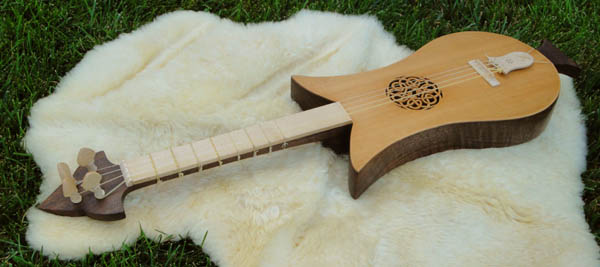
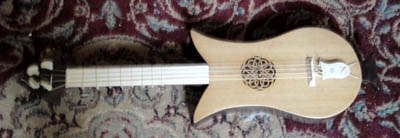
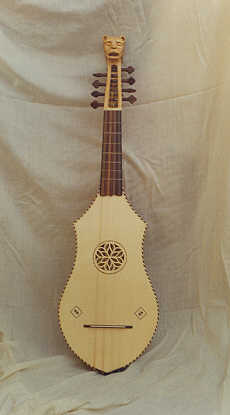
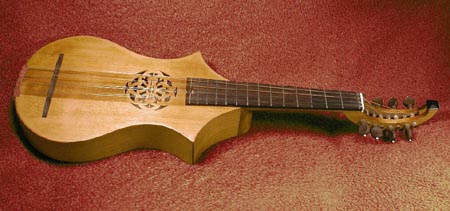
The completed instrument. The first image shows back, side and top, the second image a perspective view. Overall I think it came out very nicely, and the tone is brighter and stronger than on the other ones, probably because of the maple versus the cherry wood (harder usually equates to brighter). Strings are made of natural gut, acquired from Gamut Strings, run by Dan Larsen. I've used his strings almost exclusively for my vielles and harp, and they have worked really well to this point. The instrument is presently tuned G d g d', with the lowest two strings the same notes as the lowest strings of a violin. String diameters are (in mm) .52, .74, 1.04, and 1.50 for those that care about such things. The tail gut is some leftover 1.54 string I had from stringing the bray harp. As soon as I've had a chance to practice it a bit and get it to sound good, I will put up a recording of what the instrument sounds like.
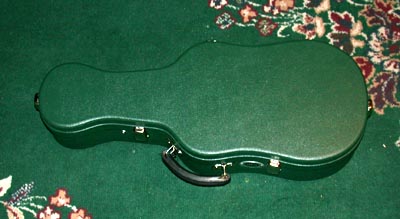
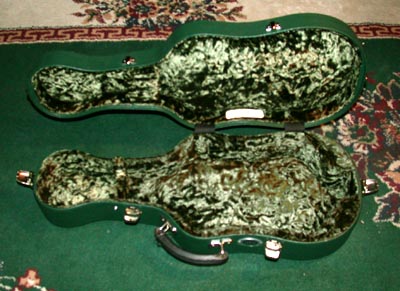
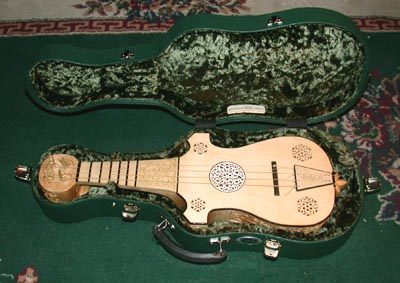
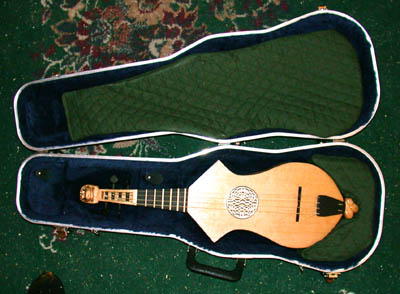
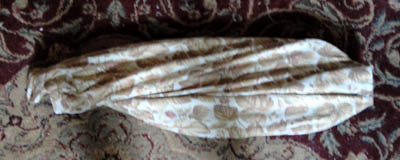
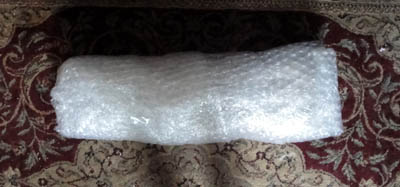
I ordered a custom hardcase from Kingham MTM Cases in England, which makes very nice cases for early instruments. Got a little whacked on the exchange rate (dollar sucks at the moment to the pound), but otherwise a very nice case. Wooden base body, covered in leather, lined with padding and crushed green velvet. You provide schematics to Kingham, and they build the case to match. Took about eight weeks to arrive, but came out quite excellently.
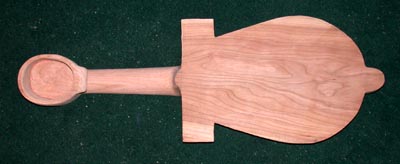
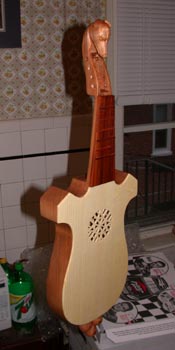
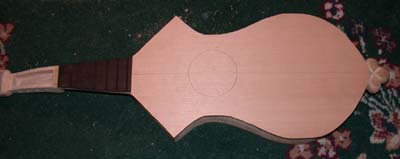
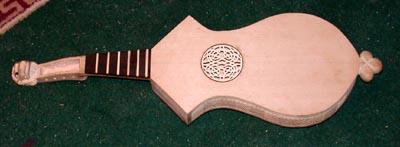
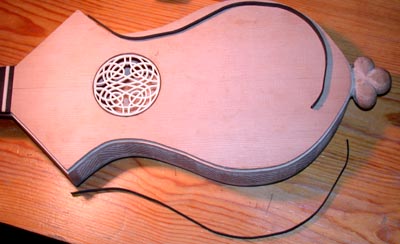
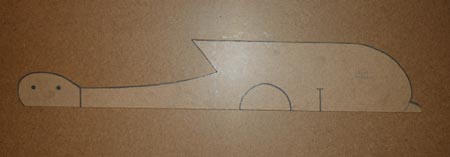
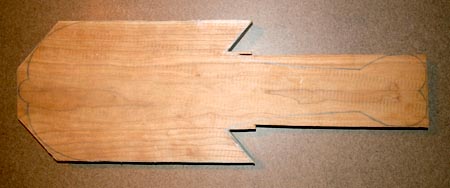
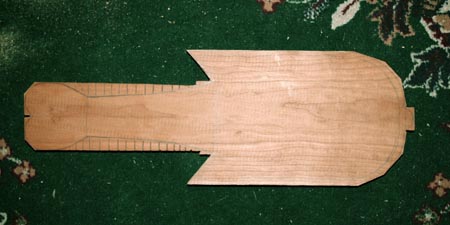
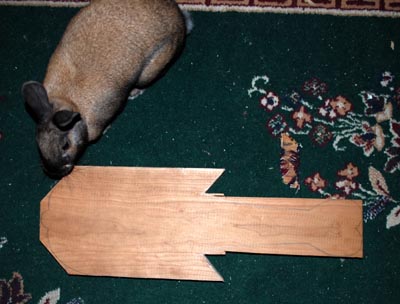
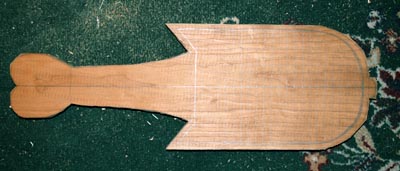
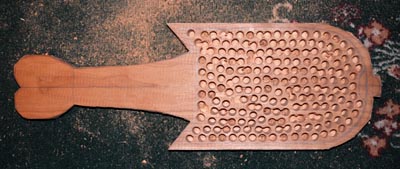
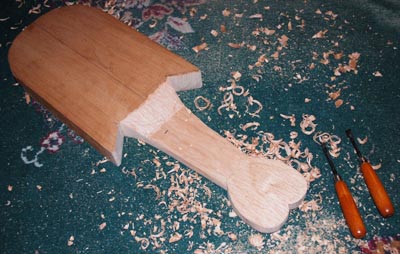
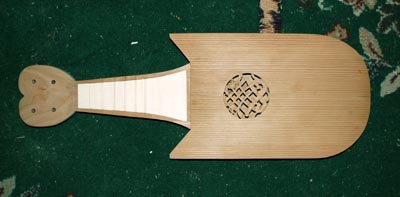
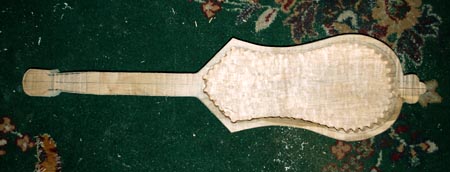
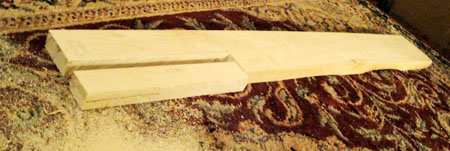
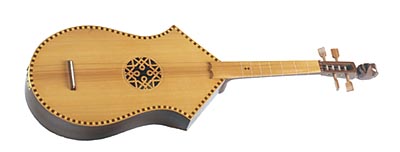
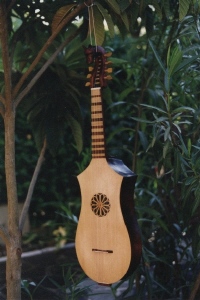
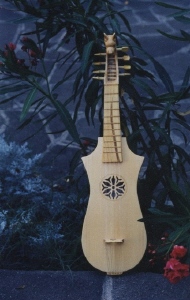
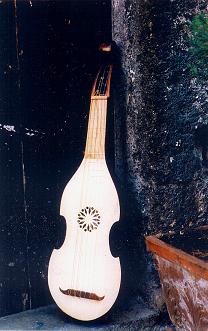
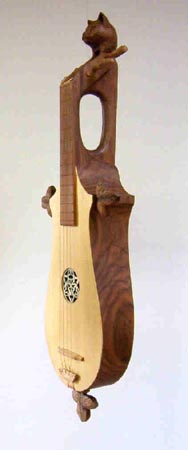
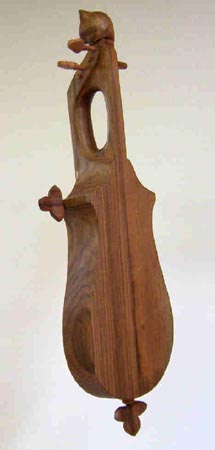
In the interim (while working on the carving of the body of Citole One) I have been having a little difficulty thinking out abstractly how I want to attach the fingerboard, how I want to do the edge binding, and such problems. So, when a friend really really wanted a citole, I decided to make one as a full-sized model to work out these issues before irrevocably damaging the body I'd spent so many hours on, esp. with all the carving. Dubbed "Citole 2" for the moment, this was going to be a much simpler instrument, with simpler lines, and practically no decoration other an a carved out central rose and some edge binding. I had a large block of cherry that was the backup piece to the eastern maple, so I decided to use that for this instrument.
Top is the set of drawings for this version. Next is the block with the pattern drawn on. Third shows the body rough cut - I did this using a scroll orbital saw I have - the cherry is much softer than the maple, and I can use the power tools readily on it. The fourth shows the more cleaned up body and its more or less final outline. The fifth image shows where I did the standard drilling out of all the holes to simplify the hollowing of the body block.
This is followed by using a full sized router to hollow out the body and the peg-head, which took only a couple of hours one afternoon, and then I used the saw and chisels above to rough out the neck. It is truly amazing the difference in the ease of working with the softer cherry - the wood removal is very quick and simple. And the block already weighs half what the maple does, even though it has a lot more wood in it - the difference in density is VERY obvious here. It also resonates really loudly, especially with the hammered chisels. The third picture is the floor of the body thinned down to appropriate thickness using the mid-sized chisels above. Still has to be finally smoothed out, but is getting there.
Here you see the body block more or less completed (little bit of cleaning up on the inside to do, but the shaping is done). The neck has been thinned down and rounded off. The pegbox has been rounded off cleanly, the hollowing smoothed out and cleaned up, and the little backward hook carved out. The heel (where the neck meets the body) has been shaped, and seems sturdy enough to hold the string pressure, though I'll probably change the joining point to a crisper line rather than soft slope it is now. And the little tail stub has been cleaned up and rounded off smoothly. Obviously the final sanding pass hasn't been done, but that will be done once the soundboard and fingerboard are on. Mostly this was all done with files, and some dremel work, especially to shape the hook. There a little more clean up off the primary cavity (to thin the walls and floor down a little more), but next is the soundboard, tail and fingerboard.
Here is the soundboard, made from a sitka spruce board (1/2 of a jumbo guitar soundboard piece about 8" wide). First image shows penciling out the piece (tracing the shape off the actual body). Next I rough-cut the soundboard out of the wood with a coping saw. After this, I drilled out the holes of the rosette, and then filed them into shape with the mini and micro files. Last image shows the board with the finished rosette. There were gouges on one side where the drill had chopped rather than sliced into the soft spruce, so that will become the underside. The top then took a number of passes through my handheld belt-sander to thin it down to about 1/8 inch or so thick.
Still on citole number two. These are the chunks of wood that are making the other parts of the citole. On top is a piece of scrap ebony that the tailpiece, nut and bridge will be cut out of. Next is the piece of red cedar that will be used (already cut to length before this picture) as the support brace for the soundboard (at its widest point, more or less). On bottom is the piece of ebony that will be cut into the fingerboard. The globby stuff on it is sealing wax to keep the ebony from absorbing moisture, which it tends to do in long storage. The second picture shows the finished brace, roughly a soft upside-down T in cross-section, with tapering ends. This was carved with knives, and evened out with the long file.
Yet more citole number two. The finished back-brace has been glued onto the soundboard. It is just a tiny bit narrower than the body cavity, though I initially centered it off a little, and had to correct that with files after it had been glued. The edges of the soundboard are cleaned up a bit more with dremel and files, and then it is attached to the body of the citole. As in the past, I've found that hand-weights work very well as clamps for this purpose... this is my kitchen table. The glue is luthier glue I acquired from LMII.
This is the tailpiece of citole number two. It has been cut out of a bit of the ebony with the coping saw, and shaped with files and the little chisels. It will fit over the tail nubby of the body. The string holes hadn't been added when I took this picture (see below).
This is the fingerboard construction for citole number two. First, I cut out the fingerboard from a chunk of the ebony with the coping saw, then leveled it and straightened the edges with the belt-sander. There will only be six frets (short fingerboard only played in first position, as generally was true for medieval instruments). The functional string length will be 13.25 inches, and I used a fret calculator to set the spacing. The frets were carved from holly wood, originally from 1x1 inch block down to 1/8 inch by 1/8 inch, starting with coping saw and ending up with carving knives and files. The slots on the ebony were first cut with an Exacto mitre saw, then broadened to a wide V with the medium files. The last image shows the frets glued onto the fingerboard. Each had to be separately glued and clamped, which I did with the 15 lb. handweight. The shiny bits are some excess glue that got wiped onto the board - it was removed (eventually) with an Exacto knife and a little file work.
Citole Number Two as it stands to this point. The soundboard is now attached, and I've clean up the edges so that they are flush with the body, done mostly with files. I also cleaned up the neck joint a little more, and the tail joint a little more. At this point I brought it and the fingerboard to its soon-to-be owner, to make sure that she could get her fingers around the neck (she has rather small hands). After testing, I decided I needed to thin the fingerboard some more, and thin the neck just a little bit. The neck was thinned (top to bottom) with the heavy file a little bit; the fingerboard was thinned (top to bottom, or thickness)down to about 1/4 an inch with the belt-sander.
Citole Number Two - attaching the fingerboard. First, I cut off the frets flush with the fingerboard (so they didn't stick out too far), and lined up the fingerboard with the centerlines drawn on the body. The fingerboard was clamped (I used folded bristol board to cushion against the marks of the clamps on the wood of the neck and fingerboard/frets). When that was dry, I refinished the edges of the neck and fingerboard so they were flush, and bevel-edged the frets.
Citole Number Two - attaching the tailpiece. The angle of the tailpiece proved a challenge to clamp - I tried bracing it with the bristol board, but that didn't work. In the end, I just used the tried & true 15 lb. handweight to clamp it. Seemed to work fine. You can see the string-holes in the tailpiece now, spaced about 1/4" apart. Like with the fingerboard, when that was dry, I refinished the tail stub so that all the sides were flush with the tailpiece, and the joint-point of the tail to the body was edged rather than soft-blended.
Citole Number Two - small bits. Here are shown the little pieces of ebony that will become the end nut (the piece at the end of the fingerboard that the strings sit in), and the bridge. Obviously they haven't been finished yet at this point. The other picture shows what is happening with the pegs. I don't have a lathe, so turning the pegs is difficult (I have used a drill in the past, but it is rather awkward). So instead of scratch making them, I got a set of four ebony violin pegs from a music shop, and have decided to reshape them into more appropriate medieval shape. I cut out notches of the corners with a coping saw, and then used the dremel to flatten the surface of the peg, and then used the files to shape it into a kind of tapered club. This picture shows the starting and finishing points. The pegs finally with oiled with artist quality linseed oil.
Citole Number Two - the edge binding. Here was one of the bigger logistical problems - how to cut the ledge for the edge-binding? I had acquired some nice ebony binding strips from LMII, about 1/4 inch tall, 1/16 inch thick. My first thought was to try to use the dremel router to route out the space, but tests proved to be difficult to control. Rigging up the dremel base to try to control the depth proved impossible to maintain around the curves, and was entirely impossible to reach into the acute corners (I tested on scrap wood). So, instead I resorted to what I did in the test above - I used the mini-chisels to actually carve it out. I wedged a line around the instrument, and then chipped off the wood down to that line, and filed it smooth. It isn't extremely efficient (took about four hours to get all the way around the instrument), but it was controlled, and seemed to work. Next the edge binding is glued on.
Okay, I had a slight problem with the camera, so we lost the intermediate photos, and only have the photos of the finished instrument of Citole Number Two. I'll try to go through the final stages as best I might.
These images show the edge binding fairly cleanly as it ended up. The edge binding was made up of thin strips about 30" long of ebony. I cut very exacting lengths for each of the straight sections around the "wings" of the citole and beveled the meeting points so that they met flush on the corners. The curved sides of the instrument each had one long piece that was bent into shape by soaking the piece in warm water, and then steaming it (over a teakettle) and finally taping the softened strip to the body to mold it. When it dried it held the shape pretty well, and didn't crack. The binding was glued to the ridges, held in place by tape. When that had dried overnight, using sandpaper and my "Mouse" powered handsander, I sanded the binding flush to the sides and to the top of the body. Then the hold body was sanded down, corners rounded a little softer, and the top and bottom plates sanded smooth.
The last actual bit of carving was the peghead. I spaced the four holes for the pegs by making little paper circles that were slightly larger in diameter than the pegs were wide, and making sure there was clearance space for the pegs to turn completely and still have some space between them. Then a pilot hole was drilled with a powered hand drill slightly smaller than the narrowest end of the tapered peg. I have a violin peg hole reamer, so that was used then to ream the hole to the appropriate taper of the violin pegs. I also have a violin peg shaver (I've played violin a long time) and used that to make sure the pegs were of the same appropriate taper. The pegs, once fitted basically to the holes, were way too long, so I cut the excess ends off, and sanded and re-oiled the pegs. The next part was a new experiment. The strings had to pass over the endnut, and then somehow to the pegs on the other side of the peg-head. I had seen several historical re-creations use the methods of pass-through holes, so I wanted to see if they indeed were practical. For the gut strings I think they work pretty well (though I think wire strings would carve into the wood too badly - they would have had to have been braced with ebony or other really hard wood). So there are two rectangular holes that are just beyond the nut, cutting diagonally forward into the underside of the peghead, so that the strings can then be attached to the pegs there. The holes were first drilled, and then shaped using the mini- and micro-files. The peghead was then sanded and smoothed down.
This is the completed instrument, from top, side, bottom and angled views. After final sanding, the body, neck, and peghead were lacquered using a polymer lacquer, given about three/four coats. The cherry wood darkened slightly to a dull reddish color (I used no dyes), and the spruce to a pale golden yellow. The ebony of course ended up nearly black. I lacquered the tailpiece, but the endnut, bridge and fingerboard are only oiled with artist linseed oil (I just started doing oil painting, so I have it around the house now). The bridge is a floating bridge (meaning it's only held in place by the tension of the strings, not glued to the soundboard), as is the nut. The instrument was strung with natural gut strings acquired from Gamut Strings, where I get my vielle strings, and have been very satisfied with them. They are a little longer than violin strings (sounding length about the same, but the tail is set farther back). I filed the notches in the bridge and endnut with the microfiles, and strung her up. The end result was quite nice - it has more volume than I was expecting, a little louder than a lute. It is tuned Gdgd' (the first two strings same as a violin, the upper two one note lower than a violin), to make a nice open chord strum. Presently it is with its happy new owner Wendy Gash, who is slowly trying to learn it!
I was happy with how it came out, and worked out the problems that I wanted to.
CITOLE NUMBER THREE
Yes, there is another one. This one has a couple of different features worth exploring. First it's going to have a scroll-like pegbox more like a violin, and will have a figurehead of a dog (specifically a greyhound) on it. Next it's going to have a full-sized fleur on the tail to which the tailpiece will be attached. So a couple of experiments to work out. This one is going to be made from cherrywood, like Citole Number Two, as that is much easier to carve, especially for the more intricate fleur and pegbox.
This is the starting plan. It is a fairly close variant of the Queen Mary Psalter citole above, only with a dog's head rather than a horse's. The fitting will be made from walnut.
The block has been roughed out with handsaws. I'm always amazed how fast the saws go through the cherry vs. the hard maple.
Block has now been cleaned up a bit on the outside. The body has been shaped, and the fleur has been shaped for the full thickness of the body, though it will eventually be shaped narrower. The peg-block has been left large until I work out the exact dimensions of the dog head. I'm doing a model of the head in clay to work from (to have a 3-D model to carve from is much easier than trying to work from 2-D drawings), so once that has been worked out, I'll carve down the peghead to a more reasonable size. You can also see the start of the guide lines for the drilling out of the body.
In the interim, working on the soundboard, since carving out the rosette takes a bit of time. This is the design for the rosette.
The soundboard is the other half of the Carpathian white spruce (a master grade piece, very nice, from LMII that I got for Citole One. The guitar soundboard wood is sold in pairs for joining to make a jumbo-sized guitar, but these little instruments only require 1/2 the width, so one guitar soundboard makes two citoles, or three rebecs, or two oval fiddles, etc. The basic outline has been traced onto the board from the body block, and the rosette has been lined up on it for cutting.
The body block now has had all the holes drilled into the area that will be the cavity. This particular piece of cherry was a bit harder than the one used for Citole 2.
Starting to hack out the body cavity, though its a little hard to tell from this image exactly how much has been removed (about half at this point). This particular block is a little "shaggier" in grain than the previous block, which makes me nervous about the block splitting as I'm working on it. But so far everything has gone well.
This is the sculpted (in clay) model head for the greyhound pegbox, showing side, top and front views. He ends up pretty small to fit into the height of the wood for the block - about 2 1/2 inches from nose to ears - but shouldn't be too difficult to work. This isn't an exact version of the final appearance - mostly just a shape guide. The eyes, nose and mouth will be cut more cleanly in the wood than just scratched onto the surface as they are here for reference.
Having the model for how large the head will end up, I was now able to cut the sickle peg-head into rough shape. Overall body as it stands now. I've finished the rough-out of the body cavity, though now the walls need to be thinned to appropriate thickness (a somewhat careful process, as the shaggy grain of this particular block of cherry is prone is splitting - hmm, I notice I say that alot with this piece).
Side view of the rough out of the sickle peghead, before even I rounded off the neck. Getting into the space under the chin is going to be annoying.
3/4 views of the peghead being carved. The first shows the block just starting to be shaped, the ears cut out, and the chin thinned down. The neck of the instrument (as opposed to the dog) has be rounded off at this point, so you can see the wide corner of the pegbox. The second image shows the final shaping of the head, but before the eyes, nose, and mouth have been cut into the surface. The dog's neck has been thinned considerably, and the nose is quite narrow, though that is a little difficult to make out from this angle. The large ears are folded back along the back of the head. The carving was mostly done with the mini-chisels (brown handle above), whose marks can still be seen under the chin a bit and on the front corner of the pegbox as I was softening the sharp front corner. Next I have to hollow out the channel in the pegbox. I have the impression it most likely will have to be open to the bottom of the box, as threading the strings under the dog's nose may prove too annoying.
The rest of the pegbox has been carved out now. The box has been hollowed (done entirely with chisels) starting from the end of the nut down as far under the dog's nose as was reasonably able to be reached. I wanted to give the pegs as much clearance space as I could. The holes for the pegs were initially drilled with the finger drills, and then widened with a normal hand drill. Finally a peg reamer was used to taper the holes to fit the pegs. The pegs themselves will be added later. The peg diameters are slightly narrower than violin pegs, but not by much. Overall the pegbox region is about the size of violin, but a bit wider across, as the neck of the citole is significantly wider than the violin neck. You can also see the prep for the final carving of the dog features, as I mark out where the nose, eyes, and mouth are going to be.
Side view of the neck and peghead. The neck has now been thinned down to its final thickness of about 1/2 inch at the nut. The fingerboard is about 3/16 inch thick on top of that, which should be far more than enough strength for the low tension gut strings that will be on the instrument.
Starting the carving of the trefoil tailpiece. The block is visible here, cut down to about 1/2 of the thickness of the body. The three "circles" of the tail will be each rounded off more into a ball, with the joint to the body dramatically thinned, and around which the tail-gut will wrap to support the tailpiece.
Starting to round off the "balls" of the tailpiece. This is done entirely with the chisels at first, to rough shape the balls into form, though ultimately will be smoothed down with the files.
The end trefoil has been finally shaped with the small chisels and the medium files. These images are from top and underside behind, to give an idea of the thickness of the endball.
The carving for the rosette. Many little holes are drilled in the opening with the micro finger drills. The center block is cut out with an exacto knife, and then the final shaping of the opening is done with the micro diamond files. In the left image, you can see a couple of the holes untouched, some of the inner circle with the drilled holes, the cardinal four inner ones with the center area cut out, and the outer three cardinals more or less finished. The rosette is about two inches across. The second image shows the inner space fully complete. The rightmost image shows the final rosette. The carpathian spruce has a very large differential in hardness between its grains, so is a little more difficult to work. But it is significantly stronger and lighter than the sitka spruce.
Back to the main body cavity. The floor has been leveled and thinned down to its final thickness. The walls have been thinned down until I could flex them with one hand spanning the waist (the side walls are about 1/8 inch thick plus or minus). The front wall connecting to the neck has been left thicker to avoid the potential problem with citole number two. In citole two, when I thinned down the front wall to the same thickness as the others, I could actually flex the neck a bit. It hasn't yet affected the action on the instrument, but I decided I didn't want to take a chance with this one. Still, the whole block weighs less than a pound at this point. The cherry is definitely much lighter than the maple. A little sanding cleanup is necessary at the edges where you can still see the chisel marks as I cleaned up the floor around the newly thinned walls. I honestly have no idea what the dark flecks are. They randomly appear in the wood as paper-thin bits - they aren't knots. There is one knot in the body, a little off center in the widest portion of the back area. You can just make it out in the picture.
Time now to start the actual assembly. This is the bracing bar that goes underneath the widest portion of the soundboard, just off the location of the bridge. It is made from red cedar, and is shaped like an upside-down T in cross-section. First it must be glued to the underside of the soundboard before the soundboard is attached to the main body.
The start of the fingerboard. It has been cut to shape and thinned down to appropriate thickness. Once I get a clean measurement of the nut to bridge position on the basic body (block and soundboard), I'll add the frets to it.
The tailpiece, cut to shape and thinned down to final thickness. This one is not like the rebec or fiddle tails in that it is perfectly flat, not arched. The holes will be drilled once I have the body together and can space everything cleanly.
Starting the actual assembly now. The first piece on is the brace for the soundboard. Back to using my handweight method to attach this to the soundboard. The attached piece is shown next.
Attaching the soundboard to the body. Again with the trusty handweights, this was lined up very carefully and glued down. The next picture shows the closed body as I'm fitting the fingerboard for trimming.
The fingerboard is next. The frets are made by taking a thin sheet and functionally turning it into a comb by cutting slots in it, and then cutting off the teeth. The teeth then become the square frets. The fret distances are determined by a fret calculator, such as this one at the Manchester Guitar Tech, though there are others. I used a 13 7/8 inch scale here. The slots are cut first with a fret saw, and then a square file is used to broaden the cut into a V shape. The frets are then laid into the slots and glued in place one at a time. Once all the frets are placed and dry, the overhanging edges are trimmed off using a coping saw, and the edges are beveled inward. In the previous instrument I used constrasting wood for the frets, this time I decided to keep it monochrome, as it were, and used the same wood from which the fretboard was made.
Last bit of actual carving done on the dog's head to finish off the features, and clean up the shape. This took several reference pictures of greyhounds to get something akin to correct. And yes, they really do have that line ridge all the way down their skulls.
The carving done, the fingerboard is attached to the body in the typical hand-weight clamping method and let dry. Both the bottom of the fingerboard and the neck of the instrument are given some skuffing so that the glue has a place to hold, and so that it is less likely to slide around as it is drying.
Once the fingerboard is dry, the final sanding and shaping of the body is done. This takes quite a while, and is probably the most tedious portion of the whole instrument making process. I start off with the carbide files, and work down to very fine sandpaper. This is about halfway through the process here. Once in place, the frets are also flattened using a fine grit long flat file to level them, and remove any sharp edges that might cut into the gut strings. The micro files are also used to straighten the edges a bit, and to remove any glue that might have gotten onto the fingerboard proper.
All the sanding done, the finishing is added. In this case, I used a rubbed oil finish. Three coats of linseed oil were applied and rubbed and cleaned between each application. This brings out the rich color of the wood (the cherry turned a very nice golden red color, which probably explains its brittleness - the board already had aged some, I think, before I acquired it). It is hung from its peg holes inbetween coats in a well ventilated area. Linseed oil doesn't run the risk of dust settling into the finish like varnishes or laquers, but is EXTREMELY flamable, and requires very good venting to keep from buring (rags saturated in oil have been known to spontaneously combust as the oil vaporizes off of them) or simply getting way too toxic.
The body is now done. Final reaming for the pegs is done to fit the pegs very precisely. I used unmodified rosewood violin pegs on this one as they matched the color of the fingerboard and other fitting almost exactly. The bridge and nut are lowered and slotted for the strings, and adjusted until the action is satisfactory.
The finished instrument, from top, 3/4 view, bottom and close-up of the dog-head on the pegbox. Overall I'm satisfied with it, and the pegbox was not nearly as annoying to do as I imagined it would be. It presently is with its new owners!
CITOLE NUMBER FOUR
This one is a requested design, based more on the Cantiga style, using older celtic geometric patterns as the carved decorations. The basic layout design is below:
Showing top and bottom view. This one will have a tail trefoil with loop much like the dog-headed one above. . The idea here is to carve the instrument out of maple (like citole one), but to have a Spanish cedar soundboard. The back geometric design will be carved into the body, and there will also be a carved geometric design down the sides of the instrument, as in citole one. The top will have an edge binding, and the intention at this point is to have an inset ivory rosette, though I am presently having a hard time finding another piece of ivory large enough.
It will also have a carved pegbox with an animal head, only this time the animal will be a lion, based roughly on Celtic designs.
The rosette will be carved into a knotwork pattern, based on a knotwork from the Book of Kells. The idea was to have it echo somewhat the diamond and circle pattern that appears on the back of the instrument.
So we begin. This is a nice, resonent piece of 2" thick eastern maple that is already somewhat aged, having been in the house now for at least a year (this was the backup piece for Citole #3 originally). One of the most common questions I get whenever people look at Citole one is "How long did it take you to make that?" While I randomly guess at least several hundred hours, I actually couldn't give people a known figure. So one of the things I decided to do with this one is to actually calculate the amount of time it takes to do each step. Here we've drawn the pattern carefully onto the wood. The centerline has been marked (and will continually be re-marked to maintain it clearly as we go along), and the area to be drilled out eventually gridded. Total time under an hour.
The first wave of cutting. This is done with the larger manual saw - not done extremely exactly, more just a gross removal of wood. The maple is again rather harder than the cherrywood, and is a little difficult to saw through. Total sawing time was about five hours, spread out over a couple of nights (as my arm fatigues after about an hour).
The body cavity clearing is started by drilling a bunch of holes with a 1/2" bit. Like before (see above) I used the "stopper" method to keep from drilling too deeply, but otherwise all this is done with a hand drill (power, but not a drill press). The drilling itself took about an hour or so, but had to be done over an evening's time, as the drill starts to overheat if used too continuously. The maple is, as already noted, fairly hard and the drill really has to work to get through it. I also learned (from working on the other citoles) that it's easier to carve out the cavity before cutting the outer walls close - it makes the wood stronger for the harder chisel hacking that has to be done to clear the cavity, and gives a little possible leeway should a mistake occur.
Starting the "hacking out" of the body cavity, using the scoop chisel and a mallet. The maple clears slower than the cherry, but still cut pretty quickly.
Finished the first pass of clearing out the body cavity, all done with the simple scoop chisel and mallet. This took a total of about four hours. Now need to take the smaller chisels (and potentially the dremel) to smooth out the walls and basically level the floor. Neither will be finally finished until the outside carving is done, as the thicknessing will be done from the inside.
Was finally (after much searching, as many of my regular sources have dried up) able to secure a piece of ivory for the rosette. This nice BIG piece came from Cue Components, which sells billard cue making supplies. Seemed an odd source, but they were very helpful, rather inexpensive, and very quick. Took about 1/2 hour to transfer the pattern from paper to the ivory and clean it up for drilling. Obviously I have enough on this one piece to probably make another rosette!
The drilling has been done on the rosette - this took about two hours with the dremel drill-press. Lots of little holes (no, I haven't counted). The two holes off to the side were tests to prep lining up the depth and targeting of the little press so I didn't damage the primary pattern.
About another two or three hours of chipping away (carefully) at the larger spaces with the mini-chisels has basically opened up the large spaces. The smaller spaces will then be done with the micro-chisels, and then all of them cleaned up with the mini-files. The ivory color is actually pretty white - it tends to look creamy or almost brown because of the slightly odd lightening of the photos, and to help make it more clear.
And another two hours or so have working with the micro-chisels opens up the remaining space. From here on out the rest of the work is done with the mini-files to shape the holes. After that the chisels come back to do the "knotworking" pattern.
About 10 more hours and we have the filing done, so the sillouette is complete. It has also been cut out (using a jeweler's saw) from the slab and the edges evened out with the files. All that remains here now is the over-under patterning and the ebony edging.
Back on the body block, the outer edge shape has been brought closely into line. This was done with two techniques - the first is to use a small saw to cut a series of notches and then to chip out the spaces between the notches (fairly quick, but risks cracking the wood). The closer work is done with simple small chisels - see below.
Cutting out the neck - start by lining it out, and then cutting a notch (two vertical cuts, with the inner space chipped out), and then using that slot to fit in the coping saw to undercut the rest.
Here you can see the technique of slowly chiseling down the surface of the sides to bring them to just the point I want. The chisels are still faster than filing it down, and throw a lot less dust in the air (since I mostly work on my living room floor, this is a fairly major consideration). You can also see here that the neck has been cut down by this point.
The body has now been fully roughed out on the outside. That took about eight hours of work. Next will be the cleanup of that, so I can do the decorative carving on the outer side of the body. Once that is down, the walls and floor will be thinned down from the inside. You can also see the sketch of the scrollhead on the block.
The sides, with a combination of chisels, files and the scrapers have been smoothed out, ready to have the drawings of the patterning done on them. This again took about 2-3 hours per side.
The tail trefoil is carved out into its more or less final form. Not finished - still need to final filing and sanding, but the shape is done.
Starting the shaping of the scrollbox. This sequence shows the rough steps I use to work it down (similar to what I did on the sides). Use a saw to slot the section, then a chisel to chisel out the sections between the slots, and then saw down the sides. The area for the lion head has been left large until I do the sculpture to see its exact dimensions.
The basic structural carving being done, I now start the surface detailing. Here the pattern has been drawn onto the back of the instrument.
About 3/4ths of the way done the back pattern. The initial line is "traced" with a sharp knife, creating an incision about 1/8 inch deep. Then a "V" channel is chipped out using the small chisels to either side of the line, and cleaned up with a V-chisel and the files. I tried on some scrap using the V-chisel directly on the line, but the changing direction of the grain, coupled especially with the sharp curves of the spiral design, made that very awkward, and I ended up with more mistakes than I could readily clean up. So went with this technique instead. After the full pattern is complete, there will be a double line done ringing the edge of the whole back, which will be then further edged with the ebony edge-binding.
The finished back carvings, though before the back has had a final scrapping/sanding. The sides have also been finished being prepped for having the designs drawn onto them, though still have to clean up the neck (which will be done once I've worked out the peghead design).
This is mostly an amusement image. I sometimes get comments about how people would like to do this kind of project, but don't have a good workshop like I supposedly have. Well, the simple truth is I do most of my work on my living room floor, usually while watching (or rather mostly listening to) television. It's a nice time to catch up on all those commentary tracks of the various DVD's I have. The 'table' is actually my wife's Rebok Step, which I plop down in front of and work away. My usual "live studio audience" as my wife puts it, consists of our pet rabbits, the male Apricot of which you can see in the background here (happily shreading the newspaper in his cage). Peebs (our female, on the other side of the room behind the camera from this angle) also likes to help by chewing on my projects, or most often chewing on the tools. Apparently there is nothing more fascinating to a rabbit than a fast moving hand saw cutting maple wood...
The side carvings will be a simple matrix of alternating diagonals, lined top and bottom with the ebony edge binding. Here is the design drawn out before worked onto the sides of the instrument. This pattern will run from the tailpiece to the tip of the wing on each side.
Slight reworking of the lionhead, based on a 14th century bronze aquamarile sculpture from the Cloisters in NYC. The person who this citole is for preferred a closed mouth lion to an open mouthed one. Not wildly different from the first idea, but probably in the end easier to carve, as I won't have to do the interior of the mouth.
The clay model of the lionhead, done to actual scale. As with the greyhound head, I find it easier to carve from a 3-D model rather than from 2-D sketches, so I make a scratch version of the carving in clay. Obviously the detail level is rough and the mane here is merely "suggested" rather than the actual mane, which will be a bit fuller (I just didn't feel like wasting time building up the full mane - was more concerned with the form of the head). The corners of the mouth will be cut more deeply in the wood, and at this point the intention is to inlay the eyes with ivory whites and ebony pupils.
Working on the neck and pegbox. This is the neck and pegbox now chiseled down into the appropriate block size. Next is rounding out the neck and drilling the peg holes.
The neck is then rounded and given a distal taper (narrows both side to side and top to bottom as it approaches the pegbox). The point where the neck joins the body is also smoothed out and made more crisp.
Next I turn to the pegbox. The basic guidelines are penciled in where the peg holes will be drilled, where the box will be hollowed, and the centerlines for the head. The double line at the base of the pegbox is where the nut will be going.
Starting off with the head, I penciled the block design for reference from the slightly smaller sculptural model.
Carving the headpiece. The right hand side shows where it will remain until I do the inlay for the eyes. Some final texturing and the mane will be detailed when I do the sanding and finishing pass after the pegbox has been completed. Next drilling the holes and carving out the box.
Marking where the peg holes will be. The spacing is taken from a traditional violin pegbox. Always makes me nervous, as I don't have a drill press, so I'm drilling straight by eyeballing it, which doesn't leave a lot of room for error.
But all turns out fine. Here is the finished pegbox, awaiting final sanding and surfacing. The hollowing channel has been carved out, and the sides thinned and straightened.
With the pegbox done, it's back to the main body cavity to thin out the walls in preparation for the fitting to the soundboard. Here you can see the chisel-work chopping happily away at the side.
Before finally thinning the walls down from the inside, I needed to do the outer decorative carving to verify how deep it would go. The design continues with the parallel line patterning done on the back. First the pattern is drawn on the side, the lines of the drawing are then cut into the wall. The lines are they chisel/chipped in so form a cross-section V cut. And the edging is finally cut. Then I ran a triangular small file through all the groves to smooth out as many irregularities as I could. This process is repeated on the other side. The design follows the curve of the body (so the grain is constantly changing direction, making the chiseling a little difficult). They do not "meet" in the back, as the tail trefoil interrupts the pattern. They are skewed a little higher than vertical center, as the soundboard will add a little thickness at the top.
The side carving done, the cavity walls can now be properly thinned down. The gross wood removal is done with the chisels, with the final pass (especially in the wings) using the dremel. The walls are thinned down to about 3/16th inch thickness (to allow for the cutting in of the sidewalls with the design). The floor has a little smoothing out yet to do, but that will done shortly.
Other bits coming together. The top image is the soundboard piece of cedar. It will end up a bit redder when any finish is applied. The lower piece is the bit of black (lots of glare in photo) ebony that will be the tailpiece, fingerboard, bridge, and nut.
The rough cuts of the fingerboard and tailpiece.
The fingerboard has to be thinned down. The very hard ebony wood is chiseled down (as the brightened photo here shows) and then planed and filed smooth again to about 3/16th inch thickness.
The fingerboard is then centerlined, and cut to more exact shape and length to fit the precise space of the neck of the instrument. (as you can see, this was done before the thinning of the walls)
I decided to use contrasting ivory for the frets and nut. This image shows the frets having been rough cut (from the piece in the upper right corner) and the chunk of ivory (old piano key rough) that will be used for the nut.
The vibrating string length will be 13.5 inches (34.3cm). Using the (now standard) six frets and the fret calculator (see above), this generates frets at 1.93cm, 3.74cm, 5.46cm, 7.08cm, 8.60cm and 10.05cm from the nut edge respectively. Next up will be to cut the grooves using the fret saw at those point, and then add in the frets.
The distances from the nut are carefully marked on the fingerboard, and starting slots cut into the piece with a fret saw (seen partially on the right). The slots are then widened into a deep V shape with files to admit the square cross-section frets (set into the fingerboard at a 45 degree angle, so that the cross section would like like a diamond).
The frets are then evened out using the files, and then set and glued into the slots. Overlapping end material is sawn off (using the fret saw), and thus we have the basic fretboard.
This is then fit and finally shaped to the actual neck of the instrument, and is ready to be glued into place.
Adding the edging ring around the rosette. A strip of ebony is soaked and steam bent into a circle just a hair smaller than the outer edge of the ivory rosette, and allowed to dry and set in that shape (see the mess on top). The ring is then glued together, the overlap scraped down to a skive joint, and the inner edge filed to just admit the ivory rosette, as shown here.
Working on the soundboard, the soundboard is rough cut to shape, and then thinned down to appropriate thickness using a planing tool (I've found that the scraper plane works better on the thin soundboard than the finger plane I have). The piece is then scraped smooth with the scaper, and the long sanding block is run over it to make sure that it is flat and even along the edges where it meets the body.
The rough plate is then trimmed to almost exact size and lined up on the body (it has to be matched against the fingerboard to closely seal the top. Here you can see the slotted fingerboard (sans frets). All of the pictures of this type of citole place the soundhole at more or less the thinnest part of the body, so that is where I centered the hole. The actual circle is traced around the finished edged rosette.
The soundhole is then cut out (using a minature hand saber saw) and filed to match the shape of the rosette as exactly as possible (mostly by fitting it against the hole, seeing where there is overlap, filing out the overlap, refitting it, etc.). When the hole is finally as close as I can get it, the rosette is glued into place.
The soundboard brace is then set. This is fit under the soundboard between the soundhole and the bridge. Generally I've found that the body is small enough that it really only needs the single brace at the widest part of the lower bout just to avoid sag in the soundboard from the pressure of the bridge. The brace is cut from a piece of spruce, and is shaped to a tapered T intersection. It is then test fitted (to make sure it doesn't bump the inner walls of the body), and then glued into place.
Back to the main body. Now that the basics of the body are done, the edging of the lower side should be done before the top is assembled, as I will have to have the instrument upsidedown for most of that process, and didn't want to damage the rosette or fingerboard in the process. The edge binding is done in black ebony strips about 1/4 inch wide and 1/8 thick. First step is to cut a channel around the bottom to accept the edgeing. This is done with a routing attachment on the dremel (see above).
Next the strips are bent into shape using a bending iron (seen here more or less center). The wood is wet down and slowly pressured under heat to accept the new shape. Unfortunately this edging is quite thick. The curves aren't really hard (like in the citoles one and three, both of which had sharp curves), but the thicker wood was harder to bend and required a bit of practice to get to work. The fret saw is also visible here as I trimmed excess length from the strips to get them to fit together more exactly.
In the "it's never as easy as it looks" concept - these are the failed attempts to bend the wood. Most of the little pieces are the bits that snapped off as I was trying to bend the first curve. The long strips made it past the first curve, but tended to crack or snap in the second curve or in fine tuning of the shape. Some of the longer straight bits were able to be salvaged for the straight lines of the edges. Most however were too short. Ah, practice makes perfect. Or at least workable.
Gluing the bottom edge binding into place. This involves a lot of cloth-tape and "citole bondage" as my wife calls it. The edge binding pieces are actually first fitted carefully all into place, and the edges trimmed and shaped so that they all fit as exactly as possible. (the brush, by the way, is for rapid spreading of the glue into the corners of the edging shelf - my fingers are too thick to fit into the small space).
The binding bits all glued into place. They are taller and thicker than necessary, and need to be trimmed down. This is done with chisels and files.
Bottom binding is now done. The dark "staining" is actually ebony dust that needs to be cleaned off. Otherwise we're good to go for assembly.
Working on the pegbox and figurehead. First the neck (now that the fingerboard has been fitted against it) was a little thick, so it was thinned down and the angle readjusted. Then the pegbox itself was softened and shaped. The wedge-space where the box meets the neck is rounded sort of into the shape like a violin neck, and the sweep of the box is cleaned up.
Doing the final carving on the figurehead. The rough-carved lion's face is smoothed out and rounded where needed. Shown here is working on the mane- the penciled in guidelines for cutting and shaping.
The figurehead carving done, I had decided to do inlay for the eyes. The idea was to have a base ebony piece and inlay the "white" of the eye with a small piece of ivory. Shown here are the little chunks of ivory and the scrap bit they were cut from, the strip of ebony I was using for the bases, the micro-needle files, the little pencil plan, and a tiny pair of needle-pliers to hold things while I was working on them. For scale, the ebony strip is 1/4" across.
The little tiny bits of ivory were shaped with the microfiles, and then very small shallow holes were cut into the ebony strip. The blocks were then cut from the strip, and the micro-files shaped the outside of the ebony into the rough eye-shapes. The outer edge was left larger in this picture than it finally ended up.
The final figurehead with the eyes inlaid, from front side and back views. Came out rather well I think.
Now that all the bottom binding is on and the peghead finished, most of the "rough" handling of the body block is done. I didn't want to add on the rather delicate soundboard until I was done with the twisting and turning and such of the body block necessary to do the bottom binding and the carving of the figurehead, etc. With that all finished, the soundboard and fingerboard are carefully test fit and any issues of that cleaned up, and then both are glued down in succession (soundboard first, as it is easier to read the placement off the light soundboard wood rather than the dark ebony). Once again I used the standard "handweight press" method of gluing.
Once the glue has set, the soundboard is cleaned up around the edges (I'd just changed the gerbil cages with cedar wood, and the filing of the aged cedarwood top filled the whole room with cedar smell) and the fingerboard is likewise cleaned up with the already thinned down neck. The only thing left now on the body block is the top edgebinding.
Not to be too repetitive here, but this is the top bit edge binding channel cut, and then the bent side pieces roughly in set. Since I had such a hard time bending the bottom pieces, which when placed turned out to be twice as thick as they needed to be, I decided to sand these down to about the right thickness BEFORE I bent them, which made the bending process much, much easier this time around. The top has five pieces - the two straight sides at the front, the two long bent sides, and the end saddle piece (a little thicker than the simple edgebinding to hold the stress of the tailgut).
What my wife likes to refer to as "citole bondage." The edgebinding put on - top shows the top edge going on. The nice cross-hatch pattern is the two front straight pieces, and the last image shows the saddle piece being held in place. For the last I used tension similar to the way it will actually be stressed by the tailgut to hold it in place.
The top edge binding is then cut and filed down to be flush with the body, and the saddle shaped and filed as well. That completes the construction of the body block.
However one more part must be done before can delve into final sanding, and that is cleaning up and finishing the pegbox. For that I need the pegs. Here is a roughed out peg (technically after shaving, they start out more straight edged and less tapered) in ebony. Using the triangular shaped heads to continue to match the angular designs covering most of the instrument.
There are two specialized tools used when doing the peg shaping - one is called a peg reamer and other a peg shaver. They both have to match rather exactingly in angle for the pegs to fit well into the holes. The reamer creates a tapered hole, and the shaver carves down the peg shaft to match that taper. Here is shown the peg shaver (and lots of shavings) with a peg.
Fitting the pegs correctly is a kind of back and forth process between fitting and then shaving, until they sit at the desired depth. The holes are cut as wide as tolerable to the pegbox without weakening the walls too much. As each hole is not exactly the same (they tend to get narrower toward the lionhead), and each peg length isn't identicle (the pegs get shorter toward the lionhead as the pegbox gets narrower), each peg is fit specifically to it's individual hole. Here are the pegs (still haven't been finally finished) in place. The overhanging shafts will be trimmed down so that they don't stick as much out of the opposite side when I finish each peg.
The body block is now done, and final sanding smooths out all the scratches and such. There are a couple of small imperfections which are cleaned up with wood putty or little grafts, to maintain the clean lines.
Doing the lacquer finishing on the instrument. Like with my own instrument (the highly carved one up above), I'm using a violin oil varnish from the International Violin Company for the finish (as I liked the way it worked on both the rebec and the other citole, and has held up well on both unlike the linseed oil finish which really needs retouching on the dog-headed citole). The oil varnish dries rather slowly. This has the advantage that it makes it easier to apply (the spirit varnish is drying practically as you are using it), but has the disadvantage that it takes a day or two between each coat for it to dry, making the multiple coats a very slow process. The local weather here (suddenly very cold and damp) has slowed that even more (as it doesn't dry as quickly in the cold damp air, and I have to leave windows open in the room as I don't have any real ventilation equipment and don't particularly feel like having my entire apartment smell like oil paint!). The maple, like with my other instrument, came out a very nice golden color. The Cedar is a little darker and redder, and I think will probably redden to almost a cherry color as soon as it sees sunlight. The ivory rosette now stands out VERY brightly.
While the finishing is going on, working on the small bits so that the strings can go on right as that part is done. Here are the nut and bridge roughed out. The nut is ivory (to match the frets), and the bridge ebony. The bridge also has a tapered T cross-section. I will also probably carve out some of the middle (making two "feet") to lighten it up a bit as it is a little heavy.
The last piece (short of the strings themselves) is the tailpiece, which has been roughed out here. Clearly visible on this picture are the guidelines for drilling the holes. The holes are initially drilled with tiny manual finger drills to place them as exactingly as possible (I don't have a drill press), and then widened first with bigger finger drills, and then with files until the string that needs to go through them can slip through without any snagging. The tailpiece will also get a bit of ivory inlay design.
The tailpiece prepped for the ivory inlay - the channels for the ivory have been cut into the thin piece using the small chisels and are now ready for the application of the little ivory bits.
The little ivory bits! These are about 1/16 of an inch wide and very thin. The LONG pieces here are about 3/4th of an inch. I actually have to use mini-pliers to handle them, as my fingers are too big to hold them and work on them.
The idea was to cut square channels and pressure fit the ivory inlays into them. Unfortunately, during one of the pressure fits, the tailpiece itself snapped in half. While rather annoying, I imagine it's better this happened now than when I was tightening up the strings and it trashed the face of the instrument. Ah well, back to the drawing board...
The little ivory bits! These are about 1/16 of an inch wide and very thin. The LONG pieces here are about 3/4th of an inch. I actually have to use mini-pliers to handle them, as my fingers are too big to hold them and work on them.
The new tailpiece. Presently this is about 1/4 of an inch thick (rather than the 1/8 that the other tailpiece was). I'll probably leave it a little thicker overall, and will add the inlay in first before I thin it down.
Even so, don't want a repeat of the previous disaster. So decided to try a different method - this time cutting V-grooves and inserting the diamond cross-sectioned ivory rods into the grooves, much like miniature versions of the frets. This little test sample (long side is 1/2 inch) worked very well and was quite a bit faster as I did not have to get the width of the ivory as exact (the wedge shape just fills the V-groove as far down as it can - the width of the groove determines the width of the sanded down piece). In any event, I'll proceed to do the inlay on the new tailpiece using that method.
In the meantime, the rest of the fitting are finished. Here you can see examples of the rough carved peg (bottom) and the finished shape. All four pegs are now finished and oiled. They will be drilled and cut to length during the stringing set-up. The bridge and nut likewise are fully shaped, and merely awaiting the string set-up for fine tuning. I decided to redesign the bridge a bit, giving it short feet with a small cutout in the center. All of it is now just waiting on the tailpiece, as the body block is complete - the last coat of varnish is dry and polished.
The tailpiece inlay once again didn't work (the thin pieces kept popping out as soon as the wood was stressed. So I finally deceded to scrap the idea entirely, and carved a THIRD tailpiece, this time just carving the design into it rather than inlaying it. That done, the instrument parts were finished!
The finished instrument. The strings are once again natural gut strings from Daniel Larson at Gamut Strings from where I get all my strings. This shows the top/side/bottom, 3/4 view, and a closeup of how the head finally turned out. Then comes that horrible moment when you finally get to hear the thing once it's strung up and discover whether you made a pretty sculpture or a musical instrument. In this case I was rather surprised. I had expected the cedar soundboard to make a slightly more warm tone than my personal instrument (the highly carved one above). Instead, the instrument is actually slightly brighter, and louder than mine. Now the body cavity is slightly smaller, and the walls and back are considerably thinner (the relief carving on mine is much deeper - this one weighs about half of mine), and I did redesign the bridge, so it's difficult to tell which of those factors is the actual culprit (or combination of all of them). In any event, it actually sounds very nice.
In order to ship the instrument to its new home, it needed a case. In brief searching, I was able to locate a 16" oblong viola hardcase for surprisingly little money from the Sam Ash store near my house. With the addition of a tailbit insert (made from a piece of dense foam sewn into a covering of quilted cotton), it fits quite nicely and snugly. It now is in the hands of its new owner!.
Since of course people ask "So what do these things sound like?" here's a (admittedly hasty) recording of this citole before I packed it up for shipping. The piece is Ce Fut en Mai, a 13th century French piece probably by Moniot d'Arras. Click on the sound title to hear it!
CITOLE NUMBER FIVE/SIX
I decided to try to do a pair of instruments, for three reasons. First I wanted to try to copy the Parma Baptistry instrument, because it seems to be the most often copied of them. Second, I wanted to see if I could produce multiple instruments off the same pattern. And thirdly, one of the problems I've encountered with the instrument is the short string-length. The 13-14 inch scale with gut strings makes for a bright sounding higher pitched instrument. Trying to tune it as low as the low notes of a violin, for example, means that the low string is quite thick and a bit thuddy in sound. Strummed heavily with the other strings it works fine, but when plucking out individual notes, it doesn't "ring" as well as the higher pitched strings. The only way to make the string thinner would be to either raise the pitch more, or to lengthen the sounding distance (the bridge to nut length). This runs into the opposite problem on the high end of the instrument. The longer length means the string either has to be extremely thin, or have very little tension, both of which reduces the quality of the sound. Even still, I decided to try a longer sounding length, and the Parma model allows for that rather readily without making a bigger sounding box. The body size is about the same, but the bridge can me moved pretty far back on the body, making for a sounding length potentially as long as 16 inches (like a viola more than a violin). So this is that experiment. These instruments will have the parma body outline, be constructed of cherry wood, and have low bridges with inlaid fingerboards, so that the top surface of the instrument is perfectly flat, much like a renaissance lute.
This is the pattern. Most luthier patterns are the "half-instrument" so that the instrument stays symmetrical down the long axis. I cut this from a 1/8" thick piece of masonite. It shows the approximate positions of the soundhole and bridge, though I will be moving the bridge farther back on the instrument.
The block of wood used was actually the remaining bit of the long block used for the dog-headed citole above. That piece was originally eight feet long, so plenty left over. The pattern was traced on both sides of the wood, so that it could be more accurately cut out. This is the basic instrument block cut out of the wood.
The next bit of cutting. The end of the instrument has been rounded off a bit, and the slotting where I need to chisel out the curve of the neck has been done.
A bit of amusement - I didn't actually notice Peebs sneaking into this picture until I looked at them. One of my rabbits deciding to "help" Daddy "carve" the instrument block (nom nom nom!).
The basic body block shape has been established. The neck has been carved down with the chisels to the basic shape, and the peghead rounded out. The back end of the body has also been more rounded off, and the tailknub softened. With the instrument's outer line more or less established, it's time to hollow out the body. A heavy penciled line marks the space to be carved out, and I grid the space in 1/2 inch blocks to drill out the holes to begin the hollowing process.
Using a "stoppered" 1/2 inch drill bit, I fill the space to be hollowed out with as many holes as I can fit. This dramatically speeds up the hollowing process with the chisels. As this is the softer cherry wood rather than the very hard maple, this only took an evening to drill out. Thankfully there were no blow-throughs. The body cavity of this instrument looks to be the largest of any of them to date.
Next I take the straight and scoop chisels and roughly hack out the hollowed space. The sidewalls can be cut fairly smoothly with the chisels, but the front and back ends of the body cavity where the chisel has to cut cross-grain are best done with the dremel. I've dulled too many chisels trying to hammer my way through them. You can also see that the neck has just been rough chiseled at this point, and the back curve is still segmented from the sawing.
With the space of the hollowing established, I turned to the neck and peghead. They started off the full thickness of the wood (about two inches), but need to be brought down to about 1/2-3/4 of an inch. The first part was to just saw the whole thing in half, leaving a piece about one inch thick. The peghead is then angled a bit downward, and the neck thinned down. Here you can see the chisel work shaving down the peghead and neck and angling the joint between the body and the neck.
The neck showing the thickness reduction.
The rough neck work finished. Here the neck has been evened out (both sides mirrored accurately), and the sides and joint to body rounded off with the dremel. The peghead has also been thinned and angled. In this picture, the upper "wing" has been cleaned up but the lower one still has some work to do.
Cleaning out the body cavity farther. The floor of the cavity has been leveled out so that it is even across the space (except at the very back where the back wall still needs to be cleaned up). The front wall has been smoothed and cleaned up, and the upper wing here clean up. The lower wing still needs final shaping and the "point" on the inner space cleared out. I also have decided, after closer examination of the original image, that the original instrument didn't have a tail knub, but that the strings appear to either be secured to pins or to a endpeg. Either way, I sliced off the tail knub, and finished rounding off the back of the instrument.
Putting together the soundboard now. This is the design for the rosette. The person who wanted this instrument was trying to get a lion design into it. This presented two problems - historically, most rosettes were geometrically designed, and it is extremely rare to non-existant to see actual figurative designs outside of the deep multi-layered baroque parchment roses. So I compromised, and came up with this Celtic zoomorphic of a pair of intertwined lions. It still is mostly geometric but presents the lions anyway. Obviously it would be unlikely to see a Celtic design on an Italian instrument, but I'll let that one slip this time.
This is the soundboard cut from its sheet. It is western red cedar, and like with the carpathian spruce, there is a large differential in the hardness between the winter and summer growth rings, so it is very strong along the grain, but flexible perpendicular to it. This is after it has been thinned down (using the planes) and sanded smooth to start the rosette.
Carving the rosette into the soundboard. I initially had thought this would be easy, given the inlay saw... until I realized that I couldn't use the saw in the center of the wide board. This rosette isn't inlaid into the soundboard (such as in Citole one or four), but cut from it (such as in two or three). As such the process for making it didn't change much from those instruments. The design was pencilled onto the wood. Lots of little holes were drilled into it using the finger drills, and the large spaces cut out with an x-acto knife. Then the holes were shaped with the micro-files until you get the center picture above. Unlike the others, though, this was not going to be a flat design. So with the micro-chisels and some minor file-work, the over/under of the knotwork was carved into the rosette, and the structural elements of the head were carved into the wood. This was extremely delicate work, and did result in at least one repair... The back of the rosette itself was then coated with a thin layer of glue to strengthen it and keep it from casually breaking while being handled.
Also different here is the way the fingerboard is being done. On the other instruments, the fingerboard is raised above the level of the soundboard, but on this instrument the top plane of the instrument is perfectly flat. The fingerboard and soundboard are on the exact same level, such as in a renaissance lute. To do this, the soundboard will be "inset" into the body block, and then the fingerboard will actually be inlaid into it, as the fingerboard doesn't reach to the actual edges of the neck. This is consistant with the original sculpture, which has raised frets that don't quite reach to the edges of the neck, and a fingerboard flush with the face of the instrument. Continuing with my trend of doing "reverse" colored instruments, the fingerboard here will be made from hard maple. Here is the basic piece cut out. It will be shaped exactly once I've determined the final thickness of the neck.
Finishing off the shaping of the body block. Here the neck has been carved down to its final shape, rounded and filed down. The joint between the body and neck has been cleaned up, as have been the wings. The peghead has been thinned down to about 3/4 of an inch and cleaned up.
Flipping it over, the body cavity has been cleaned up as well. The walls have been thinned down to about 3/16 of an inch (except the front wall, which was left a little thicker to strengthen the joint of the neck - it's about a 1/4 of an inch thick). The floor of the cavity has been lowered and leveled and the whole roughly smoothed. That's all the shaping on the body block, so now it's time to add the other pieces.
First, the soundboard is cut down to fit as closely to the body as possible. Of particular importance here is the line where the body meets the neck, and how far the soundboard extends over that line. That position is marked, and the body block will then have the walls lowered to have the soundboard inset flush to the top.
The fingerboard will be inlaid into the body block neck. Here I make a cardstock paper template to determine the clean dimensions and position the piece that will be the fingerboard.
The fingerboard piece has been cut down to the template size, and thinned down to a little over an eighth of an inch.
The wall of the main sound cavity has been lowered to receive the "inset" soundboard. This is quick cut with the dremel, and then leveled with the block files.
The soundboard fits cleanly and flush at the neck joint.
The soundboard needed a single brace to keep it from bowing under the pressure of the strings. This is cut from very light spruce, and has an inverted "T" in cross-section. It is glued between where the bridge is and the rosette.
Using the dremel router and cleaned up a bit with the mini-chisels, the channel for the fingerboard has been carved out of the neck. The little "divet" on the lower right side is where I set the dremel router a little too deeply, but it won't effect anything.
The fingerboard is then cleaned up and fit snugly into the channel. The level of the surface has to be set very closely, as I have to install the frets before I do the inlay, so it has to be accurate now.
Cutting the fret slots. This is done with a fret-saw (pretty much a small mitre handsaw). The scale-length has been set to 15.5 inches, and the fret distances figured from the fret calculator program noted above. That also makes this the longest scale for these instruments so far (two others were 13.75, one 13.5 and the other 13.25 inches). I'm hoping that the slight string diameter reduction will improve the lower end of the sound.
Cutting the frets. The frets are made out of wood, as with the other ones. Here the remainder scrap from the maple fingerboard is thinned down to about 1/8 inch and then the frets cut as "comb" into it. The combs teeth are then cut off to make the frets.
Even cut down, then still need to be reduced farther to about 1/16 of an inch. Here the leftmost fret has been filed down to proper thickness (square in cross-section). The others have yet to be thinned down. The drawing pencil is there for scale. Basically I'm making square toothpicks.
Once the frets are small enough, the fret slots are filed into a V shape, and the frets set diagonally into them (so that the cross-section looks like a diamond). Once all the frets have been glued in and the surfaces cleaned up from glue seepage, the frets are filed down to just above the surface of the fingerboard, with the first fret (rightmost in this picture) being the highest and the last fret being the shortest. The fingerboard is now ready to be glued into the body block.
The pegs I'll be using are modified Hill style violin pegs made from European boxwood, which is a rich golden color. These have been taper cut but haven't had the string holes drilled yet.
The holes for the pegs have been drilled in the clover head of the body block. They still need to be reamed to fit the pegs. At this point I'm still debating whether they should be thrust up from underneath or thrust down into the head. The original is a little unclear (could probably be interpretted either way) and various examples go either way. I've found that there is a little more stress on the pegs thrust down into the head, but I personally find them easier to tune that way then from behind (though I've been told I'm a little weird that way). Ellis in his version thrust the pegs from behind, while Marshall's come from above. After checking with the person who will end up with this one, I will be thrusting the pegs in from behind.
Sanding is forever. The image shows the peg-head after the shaping was finished and the holes had been drilled and reamed for the pegs. While it's basically flat and the edges have been beveled a bit, all that work had been done with chisels and files. It still has deep gouges and scratches and such from the shaping. Since this instrument will be finished using only oil and beeswax, it has to be sanded to practically glass-smooth. That is done in about four passes with increasing grades of sandpaper, starting with about 150 to grind the deep scratches out (which takes actually the longest - the peghead here took about four or five hours for that pass for the peghead alone), progressing to a 220 sandpaper to get the scratches from the 150 sandpaper out! Then I do a pass with 400 grade paper that pretty much glasses the surface of the hardwood, such that it feels perfectly smooth. A final pass with 3400-4800 grade buffers can actually shine the surface so that it is almost reflective on hard angle. This gets tedious, but it makes a big difference in the appearance of the final instrument.
Once the major sanding has been completed on the body block (sanded down to the 220 range), I'm ready to attach the fingerboard and soundboard. The fingerboard goes on first, glued into place with many weights.
After that has dried, I go over the fingerboard and level it to the rest of the neck. Unfortunately that now involves filing inbetween the frets, so it takes a couple of hours to do. Once that has been roughly leveled, but before any final sanding, the soundboard is glued on. Once again the trusty handweignts act as my clamps.
Here's the instrument now with the fingerboard and soundboard attached. The soundboard needs to be evened out a bit and the edges flushed with the sides of the body block. Then the whole thing needs to be sanded down again and glassed as best as possible.
Doing up the fittings. First is the nut. As the fingerboard is flush with the neck, there was nothing for the nut to press up against. So I needed to cut out a shallow channel to seat it into, and then rough cut out the nut from the same maple piece as the fingerboard. Here is the rough shaped piece in place.
Next is the small hardwood inlay at the tail, where the strings will come over the edge of the soundboard. Since the soundboard is softwood, a small saddle is placed here to keep the strings from cutting into the wood. Here the saddle is being clamped in place.
The rough shaped bridge, also from the same maple wood.
The saddle has been filed and sanded down flush with the soundboard and body. This instrument doesn't have a tailpiece. Instead, the strings are directly fixed to pins that jut from the end of the body block. The pins are relatively small and made from copper, and stand out about 1/4" from the body. They are held in entirely by pressure.
With the fittings in place, I use some black nylon string I have to do a mock-up stringing to set the action. This is how high the strings sit above the fingerboard, and it involves deepening the notches in the nut and bridge, checking the level, re-doing the notches, etc. until the height is where you want it. The nylon strings is about as thick as the thickest gut string that will be on this instrument.
The finished bridge and nut, with the notches at the proper depth. I've also "footed" the bridge to make it a little lighter, prettier, and fit more cleanly to the soundboard.
THE FINISHED INSTRUMENT
This is the completed instrument, strung up with gut strings and with it's finish done. It generally came out quite nicely. The wood (which has been aging in my house for quite a while now) darkened very nicely with the finish, so it almost looks like aged cherry rather than new. Some things did surprise me with the finish. First was that the white eastern maple stayed, well, bright white. Whiter even than the holly (see comparison with the carved citole below). And tiger striped as well (as can be seen in the fingerboard). Even more surprising was that the CHERRY tiger-striped...
(Close up of the back) - you can see the striping that appeared down the center back especially, though it is faintly visbile all over the back (just hard to catch the reflection in one photograph) and the really cool grain swirl that sharpened nicely at the neck/body joint.
Comparing this one with my decorated citole (the one I consider "mine"). Some of the things that this instrument were designed to do were successful. The sound is warmer and fuller than the decorated citole, which is expected given the material and the body size (considerably larger than the decorated instrument). The Parma is a bit louder though not as piercing. The longer string length does add some strength into the lower end of the instrument, and the low string isn't as "thuddy" as in the smaller one. The tradeoff there, though, is that the highest string is now under more tension, and might be more prone to breakage. Have to keep an eye on that aspect and see how it plays out. Since there will be a little delay in getting the instrument to its owner, I will see if I can do a little video of the two of them so people can get a chance to see and hear what they sound like.
CITOLE NUMBER SIX
This is another of the cantiga style citoles, specifically modelled after the image for Cantiga 150 (see the four Cantiga da Santa Maria images above, the upper left one). The citole there has a decorated edge, the pegbox is violin-like with an animal head scroll, and it has five rosettes - one large and four small.
The challenges for this one are going to be it's size and it's decoration. The person for whom this instrument is for wanted to tune it deeply, with the low string as C an octave below middle C. That's deeper than any of other instruments I've made, and as I found with the Parma style instrument, the vibrating string length really needs to be longer for the deeper rich tone. As a result the instrument needs to be larger, with a vibrating string length of at least twenty inches to avoid the gut getting way too thick. That's the entire length of my decorated citole (number one). Using the Cantiga image as a basic model, that scales the instrument up to about 32-33 inches long and about 9 inches wide. I narrowed it slightly at the widest point to about 8.5 inches, because I wanted to keep the soundboard a single rather than joined piece. That would make this by far the largest citole attempted.
The decoration for this instrument also was going to be elaborate in a different way. I wanted to try my hand at inlay again, so I've decided to do a kind of marquetry on the fingerboard, and on the edge binding. The player wanted to be able to use adjustable gut frets, so that left me free to do a more elaborate design on the fingerboard without having to cut into it for fixed frets. The desired figurehead on the scroll was going to be a gargoyle, so I found a neat 13th century gothic gargoyle on a cathedral in Aragon (border between France and Spain), so hopefully that will work as a good model. The main rosette is based on a 13th century cathedral window.
So starting with the basic layout, I did this design sketch for the body. Scale is one block=one inch. Shows the placement of the rosettes, and the idea for the decoration on the fingerboard and body.
The top picture shows the gargoyle that was I using as reference. The second shows the placement on the pegbox, and the design for the small rosettes. They will probably be about one inch across each.
The design for the rosette, slightly incomplete. The idea here would be carve this out of a contrasting dark wood, to match the darker woods that appear on the fingerboard and edge binding. Probably will be either walnut, maybe rosewood. Will see what I have around that would work.
So with the design, I cut out the template using masonite. This will be continuously used to correct the block as I'm going along, and is far more durable than paper for the purpose. To give an idea of the scale of this thing, the top is this template against the template for the Parma citole. The bottom one is this template against the template for the medieval viol (which is about the same size, though bigger in the body and considerably deeper).
So with the design in place and approved by the player, I went about searching for lumber. I decided in conjuction with the player that to use maple for the body block, and sitka spruce for the soundboard. I already have some good aged spruce wide enough to use for the soundboard, so that wasn't a problem. However, finding a piece for the body block proved very difficult. I needed a clean piece of maple at least 9"x2"x35", and that ended up being more difficult to locate than it should. All of my usual outlets did not have a suitable piece, so I eventually found a dealer on eBay that had some wonderful high flamed maple that was both large enough and clean enough. I got two pieces (always have a back up!) and selected the larger of the two, which was quite huge (14 inches wide, just over two inches thick, and about 40 inches long). I should be able to get another instrument out of the block (probably an oval fiddle), so I didn't want to chop up the extra wood on it too badly.
Here's the body block with the sketch of the body in place. A paper template was made from the masonite half template, and traced onto both sides of the wood very carefully. Because I'm hand-sawing this, it's good to have reference lines on both sides of the wood to make sure the cuts are straight.
Cutting out the body block. The wood piece is too large to cut in the living room like I normally do. I had gotten this butcher block table to use as a workbench/brace for the oak medieval table I'm working on. It was large and heavy enough to support this block for cutting, so the cutting for this is being done in the kitchen. Took about two hours to take off the first piece (upper left trapezoid in this picture). The upper right trapezoid is about 24 inches long by 8.5 inches wide, and will become another instrument.
The body block has now been rough sawn from the block of wood, at least as far as I can do with the straight saw.
The fastest way to clean up the sides is by "toothing" them with the saw to the right depth, and then chiseling out the teeth. This is pretty fast, and doesn't run a high risk of splitting or otherwise missing the desired line.
The outer shape of the body more or less determined, it's time to start hollowing out the body cavity. The walls are intially left about 1/4-3/8 inch thick, and I grid out 1/2 squares to drill out as much of the material as possible. The large "inclusion" seen here is a little bit of sapwood on the block. It's only about 1/16 inch thick, and won't even be visible on the final body block at all.
Using the stopper method, once again I drill out as many holes into the body cavity as I can using a 1/2 straight edge bit. This takes a couple of hours, as the drill does heat up considerably drilling through the dense maple.
Using the straight and scoop chisels, the larger majority of the internal material is then hacked out, leaving the outer walls and floor about 3/8th of an inch thick. The final thinning will be done once the outer shape has been finalized. As can be seen here (and in the picture below), the outer walls are still very rough.
Starting to get the outer body shape accurate now. Starting by sketching in the bits of the neck material to be removed. Again, I'll be doing the comb and chisel technique to carve out most of this space.
The neck and pegbox side view has now been roughed out (leaving a large square block where the gargoyle head will be carved). The bottom "button" where the neck joins the body I added to reinforce the long and thin neck.
While I was hacking out the neck parts, figured I'd do the other end as well, so the tail trefoil has been roughed out some more.
Getting the outer edge shape cleaned up. Several hours with chisels and dremel, and the outer shape of the body and neck have been cleaned up, so now the interior space can be properly thinned down. The block is now light enough that it's starting to feel like an instrument and not a heavy block of wood. And the tap tone is loud and resonant (hammer chiseling now is like beating a large wooden drum). This is probably going to end up a pretty loud instrument.
While the body block is progressing, starting on some of the fittings and other bits. These two pieces are what will be the two layers of the rosette. The left piece is a 3x3 inch square of eastern maple for the lower level of the rosette, which (based on the Parma instrument) is and stays extremely white. The right piece is a slap of olivewood from which the upper level of the rostte. Both have been planed down to thickness and sanded to a polish.
Now that the outside lines of the body block have been established, the walls and floor are thinned from the inside cavity. This is done with lots and lots of chisel work. Here can see thinning down the side wall and starting to work the floor. The goal here is to get the floor down to about 1/8 inch, and the walls to about 3/16th inch, preferably without cutting through them.
Many hours later, the portion that can be chiseled out is complete. The streaking on the floor is evident. Unfortunately the grain on the rear and neck joint areas of the walls cannot readily be worked without hammering heavily with the chisels, so I leave that to the dremel to finish out.
The body cavity completed. After chiseling, I go over the walls with the dremel to thin them down a bit more, to carve down the rear and neck walls, and generally smooth them out. The floor is then smoothed by a combination of the small plane and chisels. Lastly I go along the corners where the floor meets the walls and chip out the corner to as close to a right angle as I can get. This is now the body block pretty much done, save for finishing of the outer walls.
Moving down the body, next up is the neck. The heel and the neck are roughly rounded over, and I get ready to work on the pegbox.
While the body is progressing, background work continues on the rosette and other parts. Here is the completed upper rosette in olive wood. The olive is very difficult to work, as it is as hard as ebony, but the end result is very pretty, so probably worth the extra time. The rosette here is a two tier affair, with the olivewood on top, and the maple underneath. Each layer is about 2mm thick.
This is the progress on the main rosette. Starting with the lower tier in maple. The design is sketched in pencil on the thinned flattened wood (I ended up using white goauche paint for the olive wood, because it was too dark to see the pencil clearly). Then, using the finger drills, I drill pilot holes in every one of the openings to be cleared. And yes, there are 152 holes, in case anybody cares to count. Then those holes are used to insert the jeweler's saw and the holes are rough shaped. Since these holes are actually seen through the upper rosette, the final finishing is done with the upper rosette in place. That is then glued to the lower rosette, forming the basis for the main rosette. Then the bottom layer is cleaned up with the mini files and the edge trimmed. The whole process represents about 200 hours of work from the blocks of wood to the finished rosette.
These two pieces of olive wood will be used to form the four pegs. They have neat figure, and are about 3/4 inch square in cross-section.
Starting to work on the soundboard. First we select the piece - this is a nice aged piece of very tight grained sitka spruce.
Tracing the shape off of the block, the piece is rough cut out, and the places for the four small rosettes and central rosette are sketched in with pencil.
Before carving out the rosettes, I thin the board down to it's final thickness - in this case, from about 5mm down to about 2mm in total thickness (the lower piece shown is cutoff from the original board, which will be used as the bracing).
Then we start working on the four small rosettes. Again, I start with the finger drills of various sizes and set up pilot holes in each of the openings (25 openings per rosette). Then I use the micro-files to clean up the shapes of the holes so that the final rosette looks like the top one here. It takes about a full evening's work to do each one of the small rosettes.
With the four rosettes done, next parts are to cut out the rough hole for the main rosette, and then place the braces. For the previous instruments I'd used only a single fairly heavy T brace. For this one, the board is sufficiently large that I decided on several smaller braces. Four thin braces cut from the scrap of the soundboard piece itself are positioned across the two widest points, and on either side of the main rosette, careful not to place one directly under the bridge. These are then shaped down to a slight curve (the first one here is done, the others are still rough cut).
Braces are glued down, and clamped using hand weights.
Finished braces. Now clean up the main rosette soundhole to fit the finished rosette precisely.
The more or less complete soundboard. The main rosette has been glued into place, and it is ready to be matched up to the body block once that is complete.
Back on the body block, it's time to finish up the pegbox and neck. I start with the pegbox by penciling in on the rough cut block the outlines from the side and top views.
The block is is then cut out (using combination of saw and chisel) to roughly match the profile view.
Drawing the "top" view now onto the shaped block is a little harder, but that is sketched on and I start to carve that down (the top horns have been cut out a bit here.
Using mostly the dremel and some small chisel work, the "top" view is cut into the pegbox, so that the pegbox itself is set to the correct shape - the figurehead still needs one more pass - the "front" view. And yes, after almost 15 years, we have a new rug in the living room, so the general background is changing from the old green one to the new red and gold one.
With the pegbox final shape determined, the neck is cleaned up to final shape, the joint with the body is smoothed out and cleanup up, and the joint between the neck and pegbox has been rounded out and made comfortable to hold.
Working directly on the pegbox now. The head has been fully blocked out now and only requires the final detailing carving (which will be done from a 3-D model forthcoming). The sides and top of the box have also been cleaned up and I'm ready to start shaping the interior.
Space is left for the nut at the end of the fingerboard, and then the box itself is hollowed out using chisels. Here you can see the start of the process (lots of little curly cues that the bunnies like to munch). You can also faintly see the markings for the peg holes on the side.
The box has now been completely carved out, and the basic holes for the pegs drilled cleanly out. The holes still have to be reamed for the individual pegs, but that will be done in conjunction with the pegs. All that's left really here now is the figurehead.
One of the more elaborate processes of this instrument is the fingerboard, which is an assemblage of little triangles. Here is the layout plan for the fingerboard. It is long enough to grant up to twelve frets should they be desired. The frets on this instrument are going to be tied on, so I can make the board itself more decorative.
The triangles will be mounted to a baseboard of maple. Here is the baseboard cleaned up. It's about three to four millimeters thick.
The triangles themselves will made from more of the white maple (used for the backing of the main rosette) and another slice from the same chunk of olive wood that the main rosette and tailpiece were constructed from. These are worked down into very thin planks about two to three millimeters thick. Those planks are then cut into 7/8 inch (yes I know, I randomly switch between English and metric, using whichever is a the more convenient unit of the moment) wide planks using a fine toothed straight saw here.
The 7/8 inch planks are then fed through a mitre box, and the triangles each isoceles 7/8 on the sides are cut from the planks as exactingly as possible. Clamping the piece for the last cuts is particularly difficult.
And the end result is a pile of nice triangles!
These are then test fit against each other on the fingerboard base, and prepped to be glued into place.
The triangles are then glued one row at a time, each row of four triangles cleaned up and squared off before moving onto the next row. This takes a long time as the glue has to dry between each row before I can move onto the next.
All the triangles have been glued in place, along with the two little cap squares at the (bridge) end.
The sides and edges are all then cleaned up, mostly with files, and the surface leveled and sanded down until it's pretty much glassed..
Finally, the edges of the fingerboard are finished off with strips of mahony edge-binding. The grain and color of the strips almost exactly matches the dark olivewood, so they compliment it well. Here one side is being put on while the other side sits next to it. The clamps are violin assembly clamps, but are just the right size for this purpose.
The edge bindings are shaved down and sanded and everything given a final pass of cleanup. The end result is quite nice I think, and a very successful first real attempt at marquetry.
Next up are the pegs. Here's the sketch of what they will look like.
The olive wood pen blanks are then penciled with the centerlines and the marks for the heads vs. shafts of the pegs.
The pieces are then turned on a mini-lathe and made into gerbil barbelles (top). The barbelles are then cut into little mallets (bottom left) and then the heads flattened and rough shaped into the pegs (bottom right). Final finishing will be done after the pegs have been shaved to their actual peg holes.
The tailpiece is next for the fixtures. It is shaped from the cutoff from the rosette. Left shows the rough cutout piece (again using goauche paint to do the lines, as the pencil is very hard to see). That is then thinned from about 8mm to about 3mm thickness, and the edges cleaned up and rounded off and everything sanded to glassy smoothness (which really does darken the wood that much - there is no finish on it yet). The holes for the strings and tailgut will be added when I do the actual string setup.
I decided to do something a little different with this end trefoil than I have with the other two I'd done. The other two instruments that had this type of end just had three lobes. Here I wanted to add the additional decorative element of a "strap" wrapped around the lobes, kind of like what is on the Warwick Castle gittern. The left picture shows the rough demarcation of the straps, and starting to round off the lobes. The center one shows the lobes rounded off, with the straps now following the curve of the lobes and overlapping each other on top (and on bottom, though you can't see that). The right image shows the final clean trefoil.
Sometimes my inspirations come from odd sources! Or sometimes my troglodyte distaste for the sun burns interesting patterns into my feet (I was wearing my gillies for an SCA event, and managed to burn my feet). It was just funny to see the pattern replicated as I was taking pictures with the instrument on the ground next to my feet.
This little chunk (cut from the underside of the trefoil) I used as a varnish tester. The finish for the final instrument will be a clear gloss violin varnish. I used this scrap to test the response and drying time, and to see how many layers it would need. The varnish (from the International Violin Company) is an oil based varnish. It takes about three hours to be touch dry and about a full day to be dry enough to buff. It seems like three coats should be sufficient, so that's what I'll be doing with the body block once it's done with sanding.
With the trefoil end done, the walls of the body block are worked with the files until they are clean and straight, and the joints with the neck and trefoil tail smoothed out. After that has been completed, the block is prepped to receive the soundboard. The soundboard will be inset into the body, so that it's surface is flush with the base of the neck, and the fingerboard can sit cleanly on top of both. So two millimeters are taken off the tops of the walls, and a clean line set up at the neck joint.
Next the pegs are fit to the body block. Each of the peg holes is reamed with a violin peg reamer and the shafts of the pegs cut down with a violin peg shaver (both shown here) such that each peg is cleanly matched to it's hole. The pegs themselves still need final finishing, but have all been cut to rough shape.
The pieces are then test fit together (the soundboard in place and then the fingerboard in place) before final assembly. I just laid the tailpiece down to see how it would look. The bridge and nut will also be from the olivewood. All that remains now for the body block is the peghead.
I personally find it much easier to do carving in the round from a three-dimensinoal model, rather than from simple drawings. So, as I have done before, I made a close to one-to-one scale model of the figurehead out of clay (in this case Fimo polymer). This particular one lined up almost perfectly with the original drawings in all views, so it is pretty accurate to the original concept. Using this as reference, I carve the actual figurehead.
Carving "Filbert" as my wife has dubbed him. The gargoyle figurehead is probably the most elaborate piece of three-dimensional carving I have attempted. The first picture shows the block having been shaped from the top, side, and font views. The areas to be shaped for cutting out the mouth, marking the nose and the eye planes are marked in pencil. Using the mini and micro chisels, the basic shapes are worked out (the mouth was cut out with the jewelers saw), and more pencil lining to mark where the eyes themselves will go, as well as shaping the cheeks). The most of that was done with the micro chisels, and then going over it with the small and mini files to smooth out the surfaces and etch in some of the finer details. The eyes holes and nose holes were drilled with the finger drills. Overall I think he came out pretty well!
Now that the figurehead is finished, I can attach the soundboard (I'm handling the instrument so much trying to get at angles to carve the figurehead that there was too much risk of the soft wood of the soundboard being damaged to do it before). Test pressuring the soundboard in place with the stress the bridge will put on it, I decided to add a fifth brace before gluing it down, and did so at the mid-point between the third and fourth braces (counting from the neck). That added a lot of strength at the critical point, so it seemed fine. Using the usual methods of handweight clamping, the soundboard was glued into place. The edges were them cleaned up flush to the body, and the soundboard was ready for adding the edge binding.
Next up was to cut the channel for the edge binding. For this I used a Stewart-McDonald edge binding jig attachment for my Dremel mounted with a square router bit (yes, that's about as much jargon as I will ever use in one sentence). It has both adjustable height and depth of cut settings, so worked well. That is run around the top edge of the soundboard. The corners where the soundboard meets the neck are hand cut with the mini-chisels, as is the the slightly deeper indention for the saddle nut (shown here). Once that is done, we're ready to bend the binding.
Adding on the edge binding. I have dark mahogany edge binding from other projects that matched the color of the dark olivewood pretty well, so decided to use that rather than the ebony. The thin strips are cut to length. The straight ones are just glued directly into place, using electrical tape to hold them in place while the glue dries. The long curved bindings have to be bend into shape using the bending iron. The pieces are soaked in hot water, then the bending iron (the pole on the left side) heats the wood further, making the grains more maleable and allowing me to force them into shape without breaking the wood. It's a fairly slow gentle process, involving a lot of test fitting, then bending, then refitting and rebending, etc. to get the piece into the appropriate shape. Then everything has to dry before it can be glued into place, again using the electrical tape to hold it into place while the glue dries. The saddle nut is cut from the same piece as the rosette and the endnut and the fingerboard squares. It is simply filed to shape and glued into place. I use the nylon cord simulating the tailgut to hold it in place to dry.
Once everything has dried, the overhang is trimmed down and the whole thing sanded flush with the top and sides of the body. We're now ready for the fingerboard.
The already fully assembled fingerboard (see above) is glued into place (this is my kitchen floor, as the bunnies were romping in the living room at the time). Again used the handweight clamp method. Unfortunately there was a problem...
I discovered after the fingerboard had dried that it was offline. I hadn't marked the position clearly enough, and between the assymetrical placement of the weights and using perhaps too much glue, the fingerboard had drifted off center enough that the high string was in danger of not crossing the forward corner. After some debate as to whether it was worth the risk of attempting to fix, I decided it was just too far off line, so needed to remove it. My first attempt at removing it was painfully slow and not very effective. Using a long exacto-blade and holding the neck over a pot of boiling water, I attempted to steam loose the glue and slice it out using the exacto blade. It technically worked, but moved at a rate of about maybe an inch an hour if I was lucky, and was not feasible over the wider space (and softer wood) of the soundboard (the exacto blade just couldn't reach that far and remain flush against the surface). Abandoning the attempt for the night, the next day my wife suggested using an eyedropper to apply near-boiling water to the space I needed, which would work. Secondarily, I took one of my large scraper pieces and ground a razor blade along it's edge to create a huge flat chisel. The combination of applied hot water and tapping the large scaper blade against it sliced it cleanly off with minimal damage to any of the pieces (there was a little tearoff of the soundboard under the fingerboard, but the fingerboard was going to be replaced over that space, and the tearoff did not compromise the integrity of the soundboard, just cosmetically scratched it). After letting everything dry again, I re-chiseled and filed the surfaces clean again, decided to cut a shallow channel down the neck to reduce the overall surface area in contact with the fingerboard to make the joint cleaner, and reglued the whole thing again, this time making sure that the alignment was clearly marked and stayed in place. The whole problem ended up setting me back three days, but the result was fine.
The fingerboard finally in place, and the neck is cleaned up flush with it.
The last bit for the neck (while I was waiting for it to dry) was the endnut, again cut from that same piece of olivewood as the rosette and fingerboard squares. It is presently too tall, but that will be fixed when I actually do the final set-up after the varnishing is done.
And while I had out the dremel to shape the endnut, I took some time to clean up the pegs into their final design (you can still see they are rough-cut in the endnut picture above). They are now ready for final oiling and drilling during final set-up.
The body is sanded to death, so that everything is glassy smooth and all the major scratches in the wood are removed. There was a little notch in the back bass of the body (a chip that can out in sawing the block) that I patched with a little piece of the scrap cut-off from the block. Otherwise it went straight to varnishing.
The body received several coats. The first coat is a grounding thick coat of oil varnish sealant. That is then fine sanded, and any glue marks (where the sealant doesn't penetrate the wood leaving bare "white" wood) are scraped down to the bare wood and touched up with tung oil as a sealant. Once that is all clean, a layer of violin oil varnish is put on, allowed to dry (it's pretty quick drying, though it does take a long time to fully cure), and is sanded down with very fine sandpaper (380-400 grade) until smooth, and then another layer of the varnish is applied, and then that's sanded down and then polished all the way to 6800 grade sandpaper to get it nice and glossy. The flame of the wood block comes out particularly strongly with the first layer of sealant, so you can see the brillance of the wood. The while maple turns a light golden color which is very pretty. The spruce also darkens slightly to a kind of beech color, and it's light flaming also is visible (see below). The details on the gargoyle head are also enhanced, as the varnish seeps deeper into the cut cracks, darkening those lines a bit more that the polished sanded surface. All of this is done in my kitchen, as that has the best ventilation in the house as well as being the farthest away from the rabbits. The instrument is suspended from a dowel thrust through the pegholes to dry. Note that the fingerboard and the rosette are only given a treatment of tung oil, and are not varnished. The same is true for the pegs, nut, bridge and tailpiece.
Now that the body block is done, the last bit is the setup. This is putting the strings on the instrument and setting their "action" or height above the fingerboard. First I need to make the bridge, which is cut from a small piece of the light olivewood (the same batch of wood that I used for the pegs).
The bridge is shaped, and the holes drilled in the pegs and the tailpiece using the small finger drills. Then notches are placed in the endnut and bridge.
Then I do a mock-stringing, using thin nylon cord. This allows me to tension them, test the fit, undo them and adjust everything, retense it again, etc. without destroying the pretty expensive gut strings by constantly stretching and unstretching them. Once the height is good, the instrument is pretty much done.
The gut strings have been installed and the instrument brought up to pitch for a sounding. This is always the worst moment for me. It's the point where you get to hear whether you made an instrument or a pretty wooden sculpture. In this case, I definitely got an instrument. The deeper pitch and bigger body made for a much more resonant instrument than the smaller bodied ones I'd made so far. It almost had an oud-like sound. All I had to do now was install the frets (which were going to be tied gut frets).
I encountered two problems with the frets. The first was that I hadn't tapered the neck. The logic of that didn't strike me until I realized that meant that the neck frets had to be tied at the correct tightness in place. Normally you tie frets a little up the neck as tight as you can easily, and then slide them down the neck into position, which tightens them as the neck normally gets thicker toward the body (at least on gambas and fiddles). Here the neck was the same thickness for it's entire length. Point taken for future instruments... The other problem I had was that with all the frets in place, I was getting a little buzz on the top and bottom strings. I'd set the action a little too low to allow for the string to fully vibrate with frets in place. So I slipped bits of paper under the bridge until the action was satisfactory, and then cut a new bridge from the same piece (see above - the center section with the wild grain in it) and installed that. That solved the problem nicely, and everything was fine.
THE COMPLETED INSTRUMENT
This is the finished piece. The flaming came out nicely in the main block, and the constrast on the fingerboard shows up very well (the white maple vs. the tiger maple). On the side view you can see the tiger striping well in the neck, but even though it's almost as brilliant on the side, I couldn't get the light to strike it correctly to get a good shot of it. Ah well. The bottom pictures show the gargoyle head nicely and the final shape of the pegs in their box.
Overall I'd say this one came out very well. The depth of the sound was a little surprising, but given the relative size of the box, it shouldn't have been too much so. I was pleased with the marquetry effect and the carving of the gargoyle head, which is probably the most complex 3-D carving I've done so far. My wife wanted me to give him little ivory teeth with one gold tooth... but I figured that might be pushing it too far.
Before I sent it off, I recorded this short video in my office so give people a chance to see what the citole sounds like. Since this is an instrument based off of the Cantigas de Santa Maria MS, I figured playing a couple of the Cantigas on it would be appropriate.
CITOLE NUMBER SEVEN
I had a request for an early period citole, perhaps one based on the images in the Utrecht Psalter. The Utrecht Psalter is a wonderful manuscript from the Ninth Century (variously dated anywhere from 816-850) with dynamic pen and ink drawings for each of the psalms included in the text (about 100). It was probably produced at Reims in northern France, possibly for the Archbishop Ebbo (yes, we don't have a lot of definites for these texts). The psalter spent a good portion of the middle ages in Canterbury, England, where several copies were made. It ended up in the hands of Robert Cotton for a while, and was carried to the Netherlands during the English Civil War. It was acquired by Utrecht University in 1716, from whence it derives it's present name, and has been kept there since (actually it was briefly lost there and "rediscovered" in the mid-1800s). Which is probably more than you wanted to know about the Utrecht Psalter.
In any event, in the over one hundred drawings of the text, David is often shown leading the figurative reader through the images, and he is often depicted with instruments. Occasionally these are harps, but in a number of the drawings these are what appear to be citole-like instruments. Some of these (with their page numbers from the manuscript) are here. I apologize for the fuzziness of the images - they are from a low-resolution print source (where the pictures are very tiny); I recently found a full facsimile exists in our library here at Rutgers (in New Brunswick) and will be getting better images from that shortly.
There appear in the manuscript four variant shapes. Common to all appears to be two or three strings, no soundholes (though that could be scale of drawings and stylizations), and a floating bridge. The strings appear to be directly attached to the tail without a tailpiece (exception being 63V, which definitely has a tailpiece), though again this could be a factor of the size and style of the drawings (which are small and very loosely drawn).
The four basic shapes and representative examples are below:
Type 1: Long neck with curled "arms" and no frets
Type 2: Long neck with curled "arms" with frets
Type 3: Long necked with spade body
Type 4: Short neck with rounded body and short "arms"
From these variant versions I decided to construct a sort of mean one, with some other additions for the aesthetics of the player involved. The longer neck variety was preferred, and the player wanted frets, so the basic instrument would be most similar to Type 2, especially in the second image from 81v. The player wanted a rosette, which is perfectly fine, and which I decided to do a kind of knotwork-like version of based on other 9th century designs from northern Europe. The player also wanted to have four rather than three strings to increase the utility of the instrument. While I can't necessarily justify that from any of the illustrations of the Psalter, there is no structural or technical reason not to, so it will have four strings (like all the others I've made). So using that as a basic model, and taking the rough proportions from that illustration, I drew up these basic plans:
Which makes an instrument with a 20 inch scale length, and an overall length of 29 1/2 inches. Only a bit smaller than the cantiga one I'd just made, but with about the same scale length (because I did like the way that sounded).
The rosette is a knotwork style, with a pair of dragons. The surface patterning may or may not work, but I kind of like the way it looks.
I made a template to scale from the pattern. Here is it laid against the one from the Cantiga citole above. They are about the same overall length, but the body of this one is smaller and the large spade peghead is very prominent. With those plans in place, I started looking for a block. For this one I wanted a dark body wood, something with a warmer tone, so was looking for a large piece of walnut.
Happily I came across a truly beautiful piece of claro walnut (a hybrid species of English and American Black walnut that is mostly used in orchards) from a company called Antlers Express out on the West Coast of the USA. It was a elbow piece, and was oddly highly figured (I didn't know walnut could be fiddle-backed!). The sweep of the grain matched the shape of the instrument pretty well (which helps to strengthen the long narrow neck), and it was more than large enough, so here it is!
The pattern was carefully lined up on both sides of the block, and the grain sweep lined up with the body/neck joint carefully. It fit very well (though it's a little hard to see the pencil lines in this picture).
A number of hours later with my hand saw got the body block to rough shape (actually it looks like something out of an old video game!). The walnut cuts and handles almost exactly like the maple, but is a bit heavier in weight. Already that wild grain looks really cool though.
Using the "tooth" method of slotting with the handsaw and then chiseling out the body outline is worked closer to the actual lines of instrument. I also at this point pick the top and bottom very cleanly checking the grain. The grain on this one is quite swirled, so might prove to be a challenge to work.
As has been done a number of times now so I'm not documenting it to death, the area of the body cavity is marked out, and I use a hand drill to fill it with 1/2 inch holes using a stoppered bit. Then I go at it with a spoon chisel and mallet to remove as much of the material as possible.
The body cavity has been worked about as far as I can get with the rough chiseling. The grain is indeed very swirled and makes working the ends of the cavity a little tricky, as the grain dips down at both ends, meaning it has to be chiseled from the ends toward the middle to avoid splitting or cracking the piece. At this point the floor has been leveled, and I'm starting to work on thinning the walls down. The wall at the back of the instrument will mostly be worked by dremel bit, as the grain is too irregular to chance splitting.
Whacking the body block can be relatively noisy, so when I'm working a little later in the evening and don't want to drive my neighbors nuts, I switch over to the soundboard. Again, the idea was to go for a warmer overall tone for this instrument, so the soundboard will be cedar. I had this piece of high grade cedar left over from another project, so it will be the soundboard for this instrument. First the rough shape is traced off of the body block.
Using the mini-scroll saw from my mini power tools set, I cut out the cedar soundboard piece. There is a very high contrast in hardness in the cedar (like in the Carpathian spruce) between the winter the summer growth lines, so it can be a little tricky to cut without skipping along those lines, especially when cutting close to the grain.
The centerline is re-established and a "top side" chosen. Then the rosette pattern is traced onto the wood (using a "rubbing" method more or less and then cleaning it up).
The openings are drilled with the mini finger drills, and yes it does take hours to drill all those little holes carefully. I can't drill too many at one time, as it literally wears the skin off my fingers (for some reason I just do not callouse on my hands or feet - can be a little annoying at times).
I got a new tool for this one - a deep throated (13 inch) jewelers saw, that allows me to cut the rosette openings out with the saw even when the rosette is cut directly into the soundboard. It's slow, but still MUCH faster than trying to do it exclusively with the files.
After the rosette has been roughly cut out, I thin the soundboard down to close to it's final thickness. This involves a large amount of planing (the bunnies liked the pile of curled bits), with the end result being about 2-3mm thick. The surface is leveled with a block sander.
With the piece now rather thin, it is easier to do the filing to clean up the rosette edges. This is the rosette now with crisp edges. Still needs the "over/under" carving done to create the three dimensional knotwork pattern.
More or less the finished rosette (final sanding pass to come when it is installed on the body block). Shows hte 3-D carving on the knotwork and the little dragon heads and tails.
Going back now to the main block. Starting to get it closer to actual shape. To this end, the tail is sawn off to it's more proper thickness.
Laying out the neck - I'm leaving a heal to make sure the neck joint to the body doesn't warp. The neck and peghead are drawn onto the wood to thin both to about 1 inch thick.
The chunk (what amounts to a big arrow) is sawn off the neck block. It was difficult not to notch the wings while cutting close to the heal.
The big chunk of white eastern maple finally arrived. It's about five feet long, about 8" wide, and about 1.5" thick. I need a really small piece of it...
Carving down the neck with the chisels. The heal is rounded off, the neck is basically rounded off (it will be distally tapered as well eventually), and cleaning up the shape of the peghead. The peghead will be carved into an angle as well.
Working on cleaning up the exterior outline of the instrument now. Can see the outer walls have been smoothed down to their actual lines. The heal has been rounded over and the neck roughed out to it's proper width and rounded over.
The peghead has been tapered into an angle, and the merge with the neck rounded into the spade. The peghead is now about 1/2 inch thick.
The exterior outline is now pretty much finished. The tail has been cleaned up, the outer walls have been cleaned up and smoothed out. The inner cavity has been leveled down to about 3/16" on the floor. The walls are at about 1/4" thick at the moment. They will be thinned down to about half of that now from the inside, using a combination of chisels and the dremel.
Cutting the fingerboard out of the block. There was one section of good clean straight grain that I wanted to use on one side, so I cut about a foot off the end, and then sliced a piece out of the remaining block. That then was cut in half laterally to roughly thin the piece down to about 1/2-5/8" thick.
The rough cut fingerboard piece (I have a lot of random chunks of wood floating around, so I do label them periodically when they are just rough cut out so they don't get confused in the pile). The piece is actually pretty white (looks a little more yellow here than it really is). Needs now to be thinned down to about 1/4 inch thick and properly leveled.
Cleaning up all the parts now. The tailpiece has been cleaned up including the joint with the body. The walls of the body are also all down to sanding level finish at this point.
Final shaping on the peghead and the neck. The neck has been left a consistant width (from top view), but given a distal taper top to bottom (side view). This should make the fingering easy, but also allow the tied frets to be much easier to install. The peghead has also been cleaned up, and the angling of it finishe. The large "joint" overlap has been mostly removed.
The peghead, showing the lines and new merge with the thinner neck that shows not as much of "joint." Still a few chisel scars that need to be removed with filing, but otherwise this is done with shaping.
I decided to reangle the neck joint just a bit, so that the cut into the body wasn't as severe. This was done both to make the joint a little easier to carve, and also to give it a little more strength. The new "line" is now finished.
The only carving now left on the body block is to thin the outer walls to about 1/8 inch thick. This is done by a combination of chisels and dremel work. The most annoying part is carving out the tips of the wings. This shows them in process, with the space being hollowed out using the mini-wedge chisel. It's slow but steady going.
Through a combination of chisels, dremel grinding, and file work, the walls and the floor of the main body are thinned down to 1/8 inch or so. The joint with the neck has been squared off, and the tips of the wings cleaned out.
It has been decided to do a tailpiece with tailgut for this one, so the tail fan area has been rounded off to run the gut around. The cross section where it meets the body is now a U shape.
The body cavity done, the last bits of the body block are being taken care of. Here I've marked the points where I'll drill the peg holes, and marked where the neck will be hollowed, and where the nut will be placed.
Now that the body cavity is done, the soundboard needs to be finished and fit to it. So it is carefully place and the "true edge" marked. The lines for the braces are also measured out.
The braces are made from cut-off material of the soundboard, and are about 1/2 inch tall at their centers. Three braces are placed, and the edges are made sure to clear the inner walls of the body. The soundboard is then cut down to fit flush with the body.
Test fitting the soundboard onto the body block, and cleaning up the place where it bumps up against the fingerboard. This picture is blanched out (taken on sunny afternoon). The soundboard is actually considerably darker.
Fitting the fingerboard against the soundboard and the neck. The test fits are all now clean, and the soundboard is ready to be attached.
But first we do the last cleanups. Here the peghead has the peg holes drilled, and I've filed down the head clean. I actually liked the slight ridge "joint" with the neck, so decided to keep it.
The back of the body block is then block sanded down to even, and all the pen markings removed. This is easier to do when the soft soundboard isn't on the other side...
And lastly the neck is hollowed out a bit to lighten the overall body weight and to reset the balance point of the instrument (otherwise it ends up rather head-heavy).
Meanwhile, starting to get the fittings together. The fittings will all be made out of the same while maple as the fingerboard. Here I've cut the basic blocks for the tailpiece, bridge, and nut.
Likewise the pegs. I cut out two chunks about 5 1/2 inches long and a little over an inch in diamater. They are then carved down to rough cylinders in prep to put them on the mini-lathe.
Each one of the cylinders is then put on the lathe, and turned "head to head" to make two pegs.
The end scrap is cut off, and the two pegs cut apart. Here are the resultant four cylinders. The rosewood peg to the left is a standard violin peg for size/shape comparison. The little piece to the right is the pattern which I was using to keep the pegs as similar as possible on the lathe.
One of the finished pegs after the heads have been finally shaped. The peg has also been through the peg shaver and is properly tapered as well. The other point of interest here is the "reflection." I sometimes refer to "glassing" the wood. This is the back of the citole before I applied any finish to it - just sanded wood. The wood is smooth and clean enough without any finish at all as bare wood to still allow for a reflection of the peg on it. The holes for the strings in the pegs will be added when I do the set-up.
Gluing on the soundboard. I had enough spiral clamps to do this with them, which was helpful. The soundboard is glued on and the edges cleaned up.
Next the fingerboard gets glued on. I'm still left with the handweight clamping for this though.
The body is then sanded to glass finish (3500 grit). This takes a really long time. All the edges and any issues are also cleaned up here.
Sanding is all done. This is the instrument just before finishing. The pegs have been set in (holes reamed and pegs shaved), and the tailpiece has been finished and drilled (shaped like a miniature version of the body).
The body is then finished with a mixture of beeswax and mineral oil. The flame in the grain suddenly emerges - this is perhaps the prettiest piece of wood I've ever worked with.
Doing the final fittings. The bridge and nut finished in maple. The set-up takes some time of setting the action.
The last structural bit before fitting the final strings is adding the frets. The frets are tied on using gut double looped around the neck. The scale length is set at 20 inches, and the frets positioned using a fret calculator. The gut starts at about 1.00mm and goes down in increment about 0.05mm each fret down the neck. This neck was pretty long, so I installed eight frets. After that, the strings are added on and the final action (with the frets in place) set.
And the completed instrument. The tone was quite loud, though not as warm in sound as I thought it might be. But overall it came out quite well.
And a sample of how it sounds. This is a short video of the test playing of the instrument before I sent it off to it's new owner.
As a side note, a short set on "How to Ship an Instument."
Start with the instrument. The string tension is lowered (though not to totally slack).
The instrument is wrapped in a spare pillowcase (ironically it's mate is still with the Cantiga citole).
The whole is then wrapped in several layers of bubblewrap.
OTHER RECREATIONS
Since I put up this page, I've discovered a number of people who use or make citoles, so I have included them here for people that might want to acquire one, but aren't willing to kill themselves to make one. Its also really interesting to see what other people come up with as solutions to the form of the instrument. These aren't in any particular order - mostly just added as I found them. If you know of any makers or reproductions not listed below, please drop me a line and I'll try to include it. I like to be as thorough as possible.
BERNARD ELLIS did a very nice simple recreation of the Parma Baptistry citole, strung in wire on the left. DAVID MARSHALL did a very similar reworking of the Parma instrument (here posed almost like the original) also strung in wire. Unfortunately, both of these wonderful British luthiers have now passed on, and these instruments may only be found on the secondary market.
SAMUEL COULTER of Dancing Stickmen in California also makes a very nice version of the Parma Baptistry instrument, strung in wire with more decorative carving (see the website for more images and information). His are available for around $1,000.
WAIDLER acquired a number of Bernard Ellis's designs, and is producing them at their workshop in Germany. This is their reworking of his Parma Baptistry Citole, available through the Early Music Shop in England. Present listed price is about $850.00 with the present exchange rate.
MORILLO workshop is now making both a Parma style citole (not pictured, but selling for about $1100) and a Cantigas de Santa Maria style "Latin Guitar" style citole pictured here for about $1000, both through the Early Music Shop in England.
JESUS REOLID in Spain does several variations of citole, based very heavily on the Spanish (logically) Cantigas de Santa Maria (see image above). His webpage is in Spanish, and he does not list prices, so I cannot say what his availability or costs are. But the instruments are very pretty.
CHRIS ELMES at Gaita Instruments in Scotland also makes a really nice version of the Cantigas citole. It is strung in gut with four courses, with the two courses double strung in octaves. His sell for around $1,000.
JOSE IGNACIO FERNANDEZ from Cinco Siglos in Spain did another very elaborately carved variation of the Cantiga citole that came out marvelously. The picture above doesn't come close to doing it any justice - check out his website to see the construction process and the gorgeous final instrument, decoratively carved in patterns along the lines of the Warwick gittern.
UGO CASALONGA (can also be found at Arte di a Musica) from Corsica makes several variants of the Spanish citole. They range in price from $1,000-1,300 or so, depending on decorative elements.
HEILIGENBERGMUSIK also makes a nice citole variant, with a parma like body and a long sickle head. The site is in German, but worth a look (he also makes REALLY nice vielles...).
Luthier Lyn Elder created this citole, being played by its present owner and co-builder Deborah White.
KATE BUEHLER of Unprofitable Instruments is has made a wonderful recreation of the Warwick Castle Gittern/citole, block carved out of a giant chunk of maple. Amongst the most beautiful recreations I've seen. Her webpage (click on her name) has more details on her interpretation. This particular instrument is for sale for $3,200 (not unreasonable) including custom case.
JAN KLIMA in the Czech Republic makes some nice cantiga style citoles. The website is in Czech, so it is rather difficult to read, but the price on the instrument is 15,000 Koruny, which comes out to about $600 US.
VINCENZO CIPRIANI in Italy does another version of the cantiga style citole. See his website for more views of the instruments - very cute animal heads! No prices anywhere that I can find.
GIUSEPPI SEVERINI in Italy (there seem to be many Italian early instrument luthiers) makes several varieties of citole. The first pictured here is a variant of the Parma Baptistry citole, with the second closer to the cantiga style. He makes a third style that he calls a vihuela de penola, but which I think fairly closely resembles the Warwick gittern in basic form, especially if you look at it from the back. Again, he has no prices anywhere that I can find on the website.
TAMARA JOVANOVIC in the Netherlands makes a nice citole, block carved, similar to the Warwick gittern, though she has a cute cat head rather than the dragon. No price for this is listed.
TONY LACEY in England makes a simple variant of the cantiga style citle. You can hear it on the recordings by Trouvere, which give a good interpretation of "citole continuo," in my opinion. No price listed that I can find.
BIBLIOGRAPHY:
"A Memento: The Medieval Recorder" by Nicholas S. Lander - paper posted to the web.
Henry Farmer. A HISTORY OF MUSIC IN SCOTLAND. London, 1947.
Canon Francis Galpin. OLD ENGLISH INSTRUMENTS OF MUSIC, THEIR HISTORY AND CHARACTER, fourth ed. Methuen and Co., Ltd. London. 1965. (First edition 1910).
Laurence Wright - "The Medieval Gittern and Citole: A case of mistaken identity." in THE GALPIN SOCIETY JOURNAL, May 1976-77 pp. 8-42.
David Munrow. INSTRUMENTS OF THE MIDDLE AGES AND RENAISSANCE. Oxford Univ. Press, London, 1976.
Jeremy Montagu. THE WORLD OF MEDIEVAL AND RENAISSANCE MUSICAL INSTRUMENTS. Overlook Press, Woodstock NY, 1976.
Christopher Page. VOICES AND INSTRUMENTS OF THE MIDDLE AGES: Instrumental practice and songs in France 1100-1300. J.M. Dent & Sons Ltd, London, 1987.
Emanuel Winternitz, ed. MUSICAL INSTRUMENTS AND THEIR SYMBOLISM IN WESTERN ART. Yale University Press: New Haven. 1979.